Search results: "runtime"

Archimatix Runtime For Artists

If you’re artist who is not that into coding (just yet!), but you still want to create Archimatix Pro (AX) runtime behaviors, well, you can in version 1.0.6 and later!

While Archimatix parameters can be exposed to the interface of your model, allowing easy access to them via custom game scripts, you may also use  Unity’s built-in UI system or assets like PlayMaker to control the values of AX parameters with the help of an easy to create runtime controller.

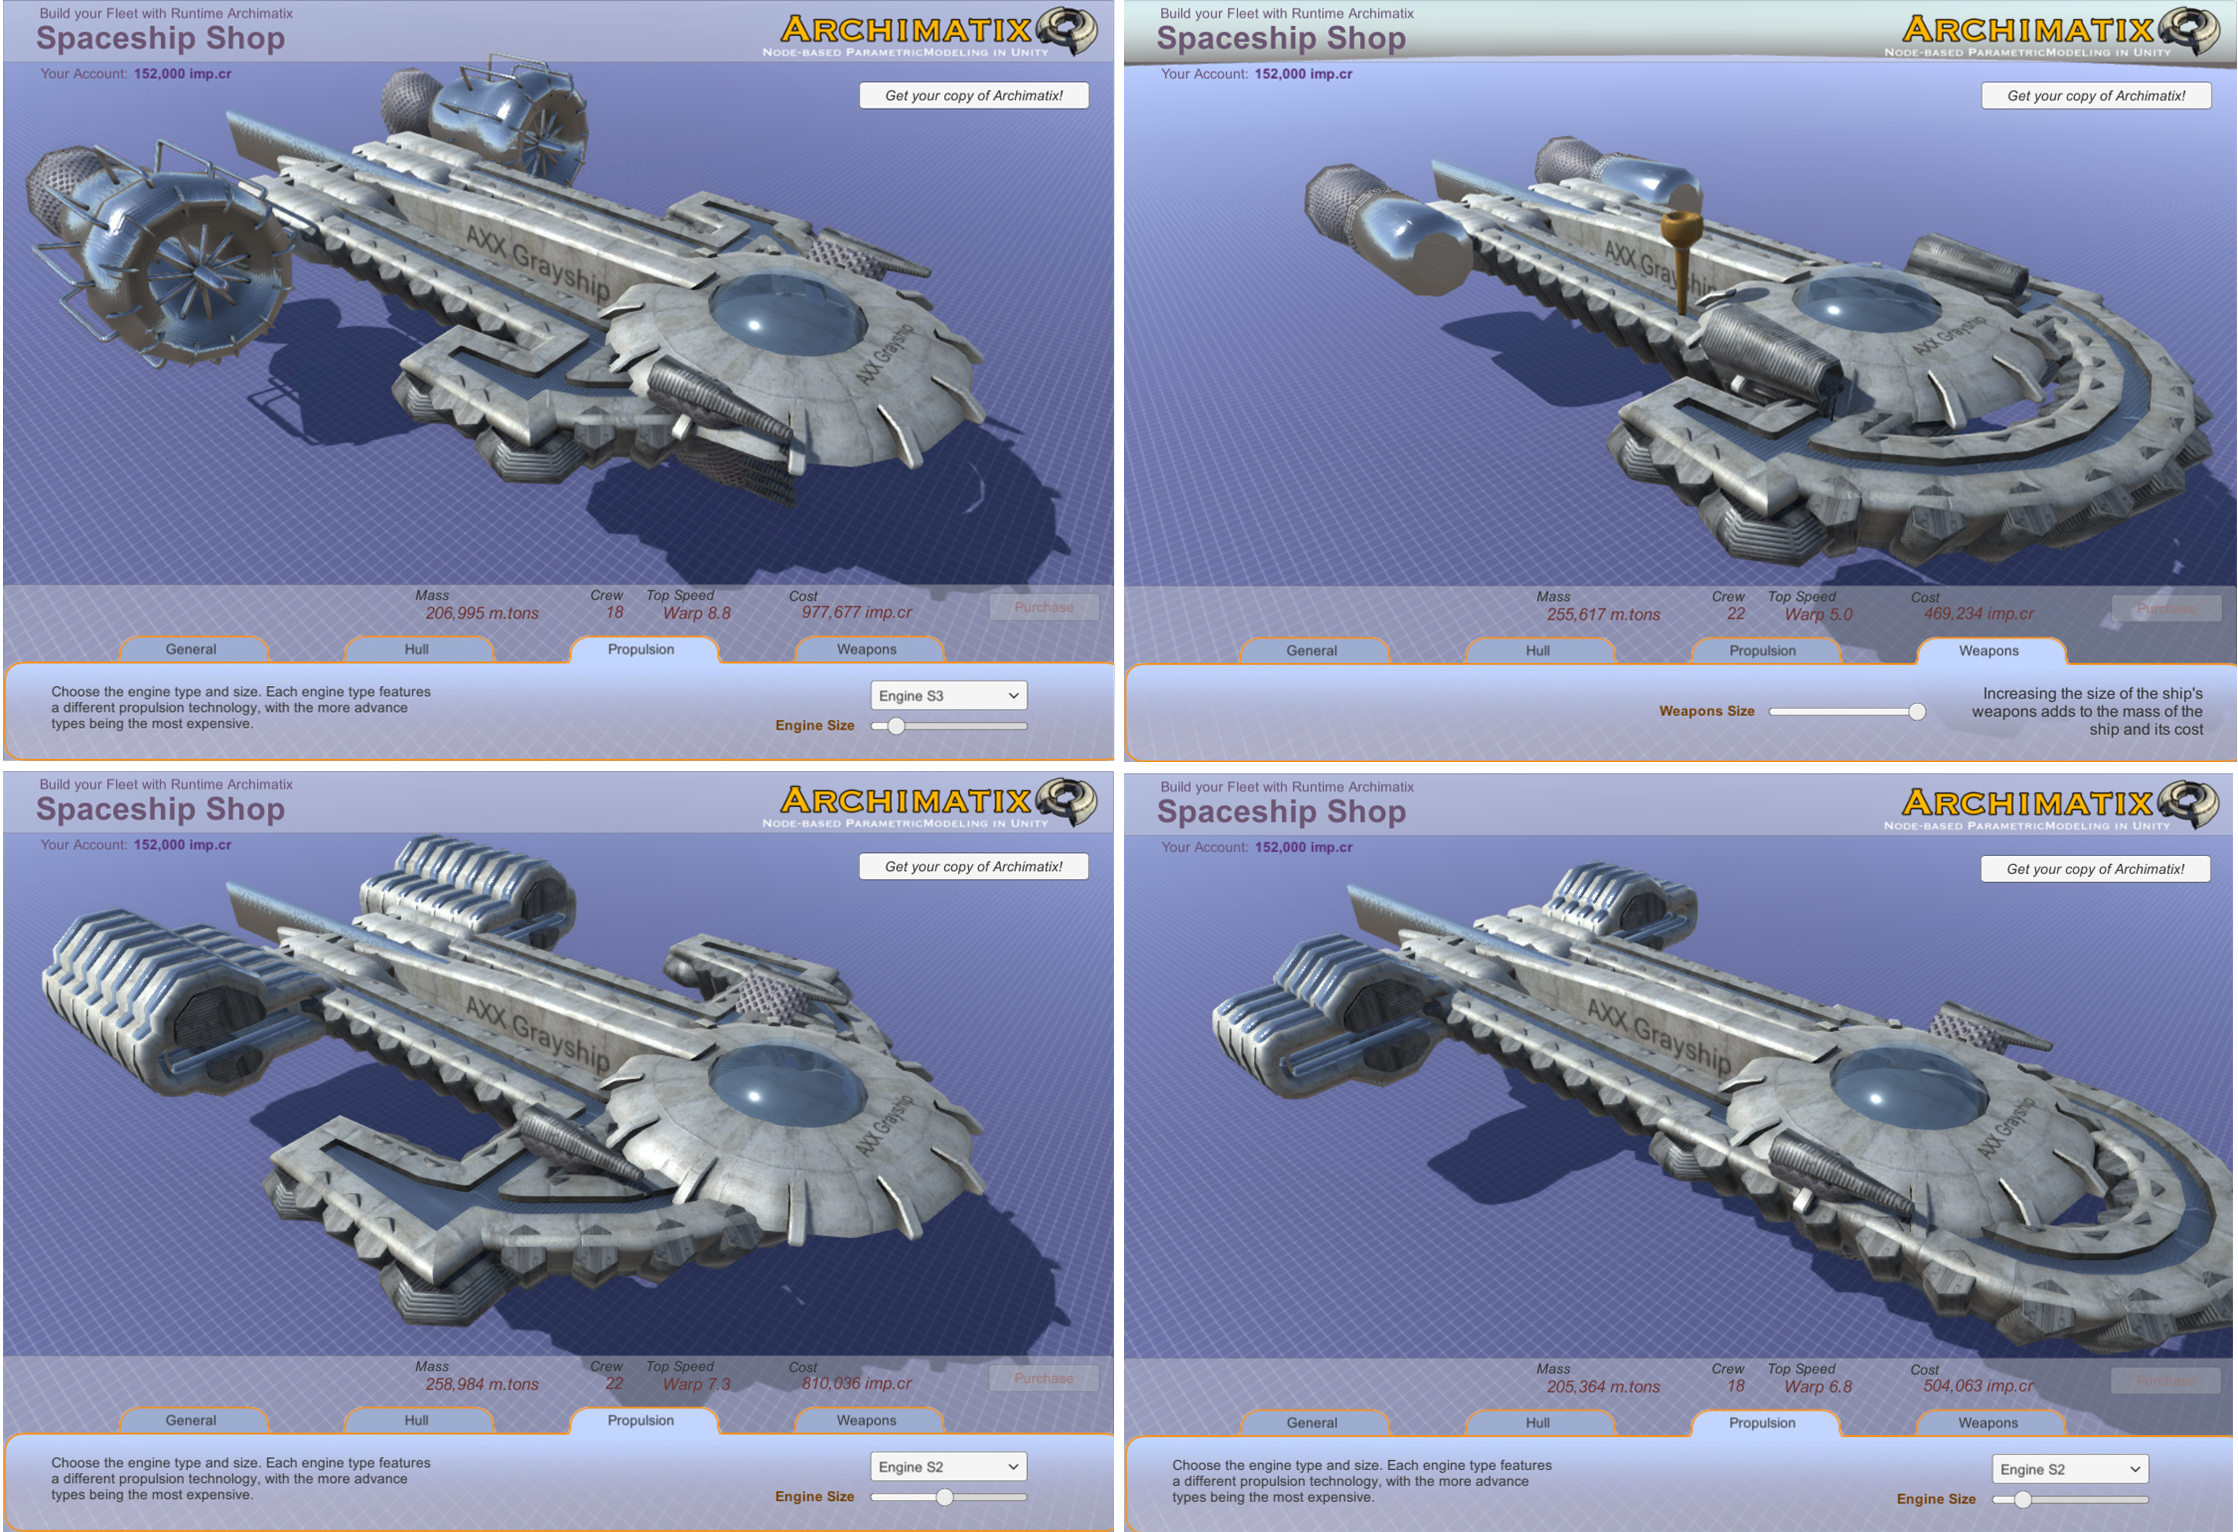
Let’s jump right into a short example to show rather than tell! While you can control any manner of complex and sublime models you have created in AX using runtime parameters, in this example, we will keep it simple and just adjust the height of a Box at runtime using a UI Slider. For this example, we won’t eve use the Node Graph Editor.


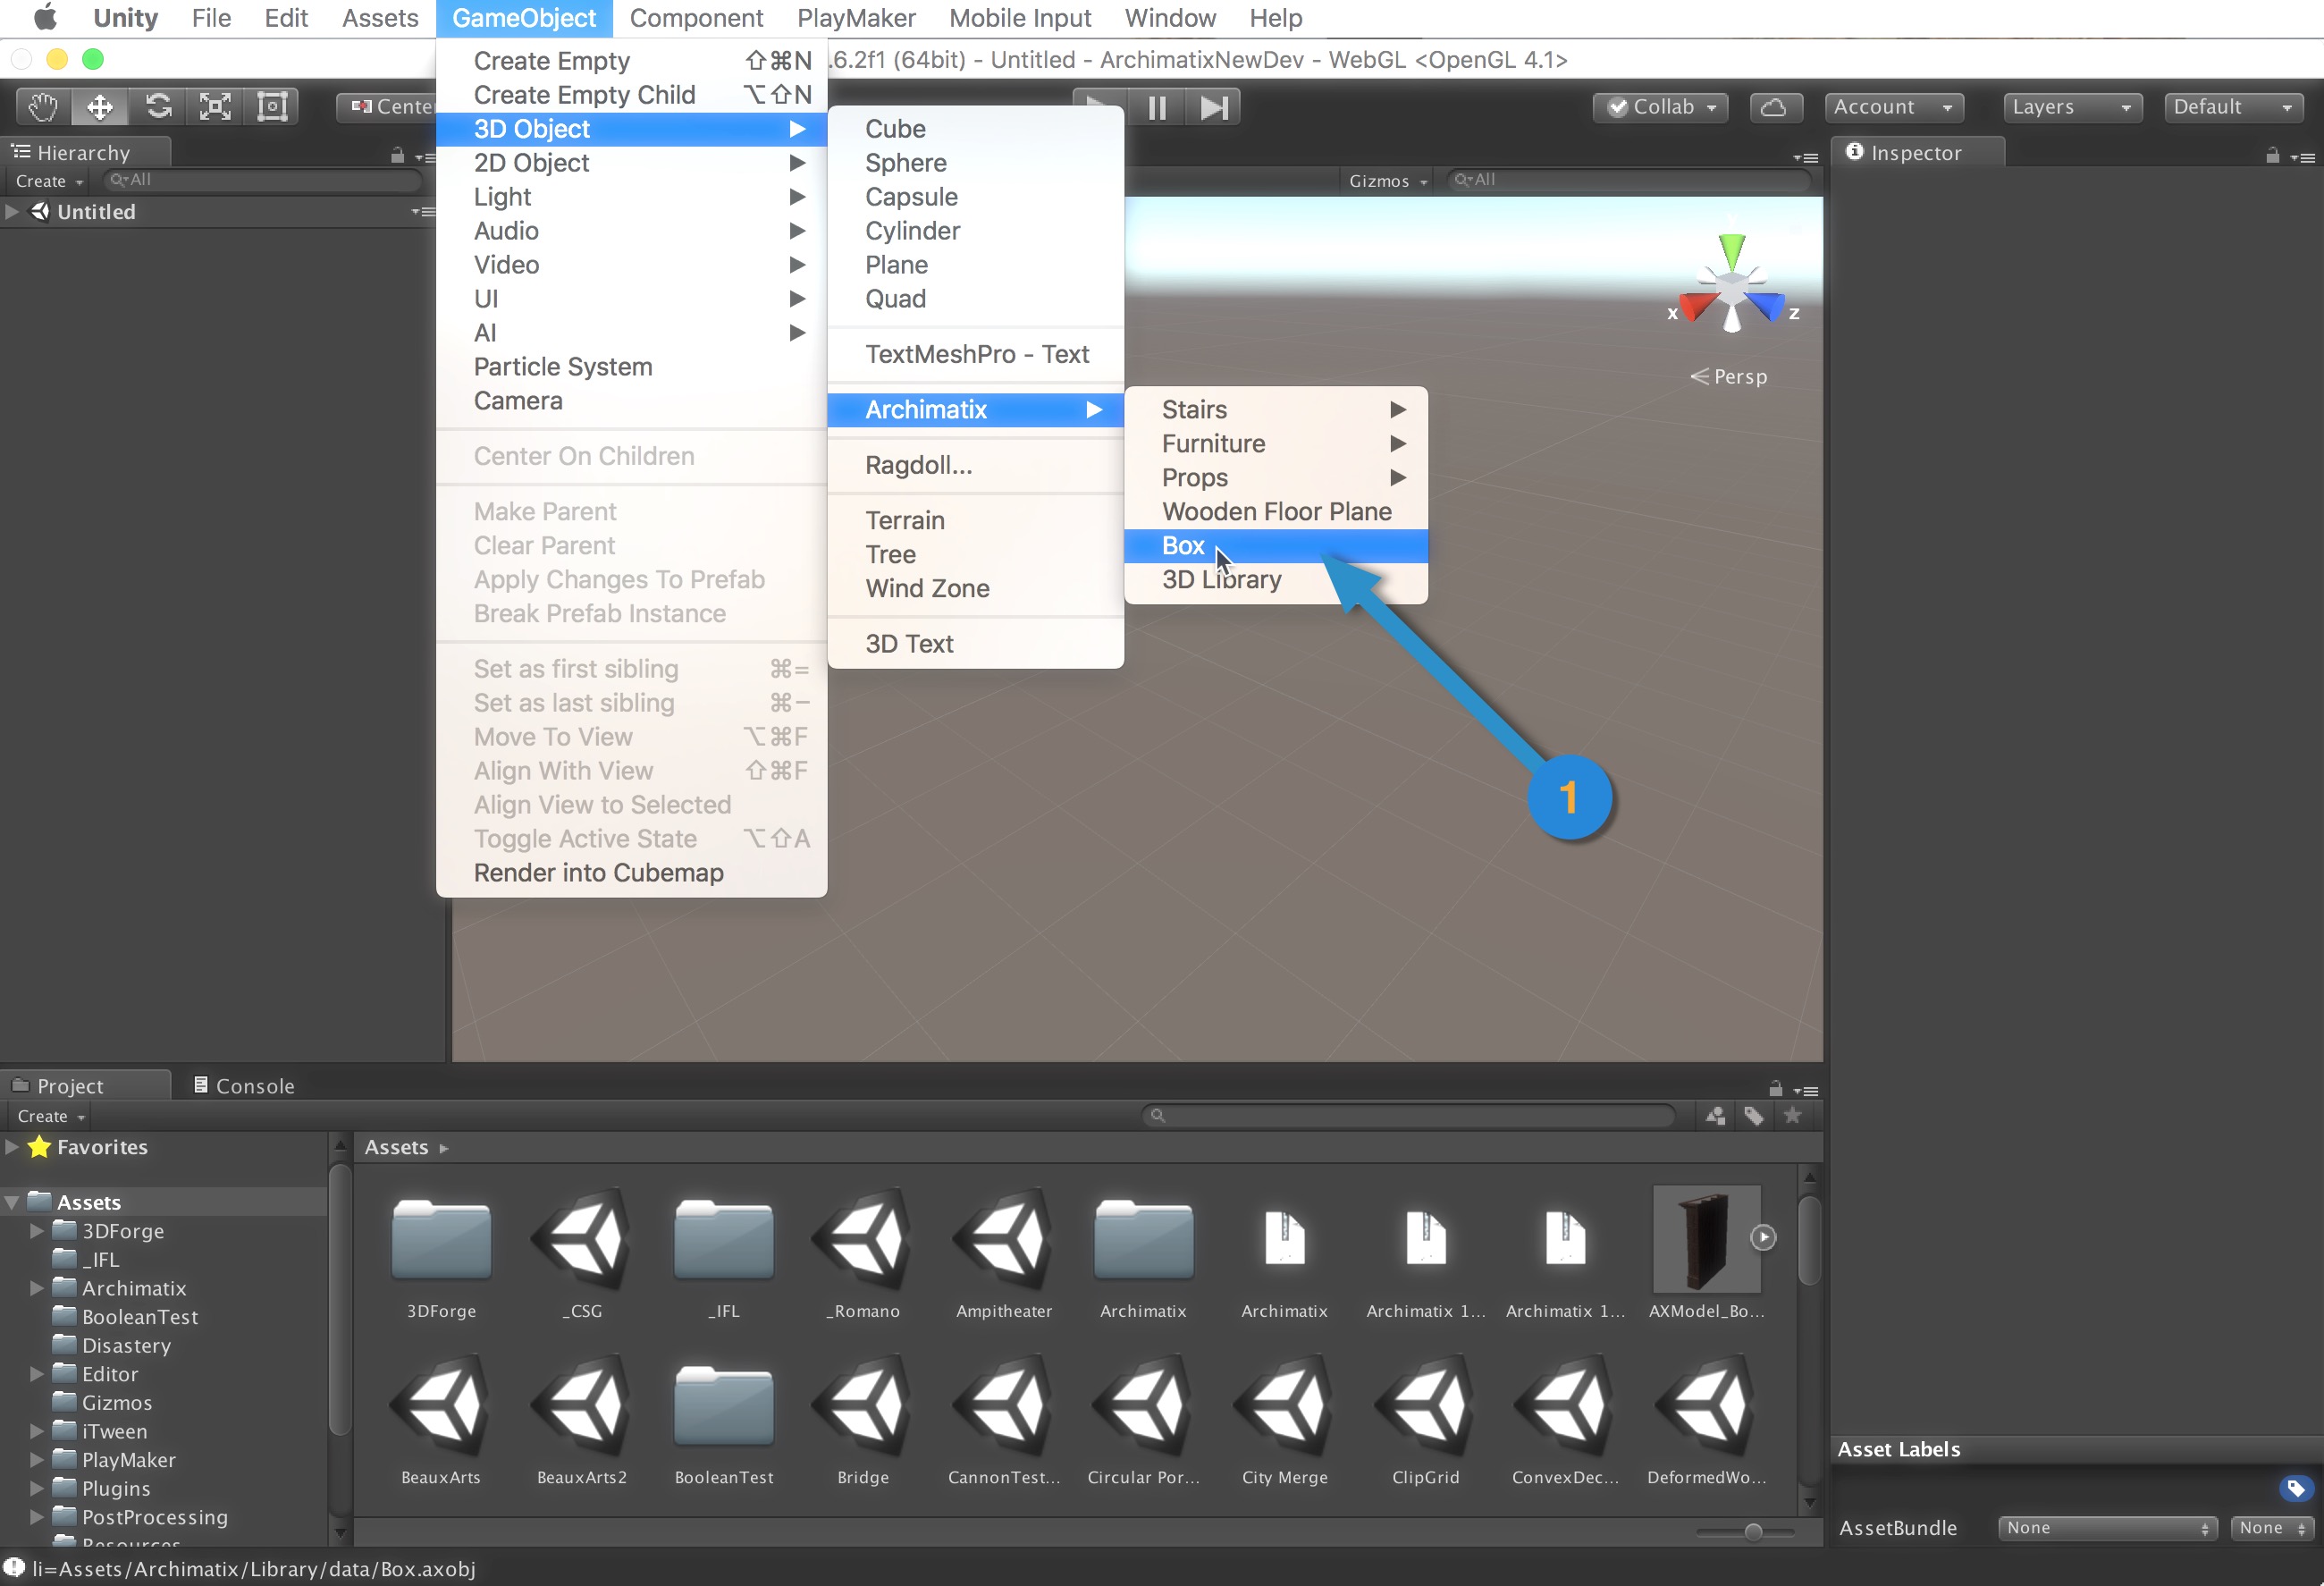
Step 1. From the Unity menus, create an Archimatix Box.


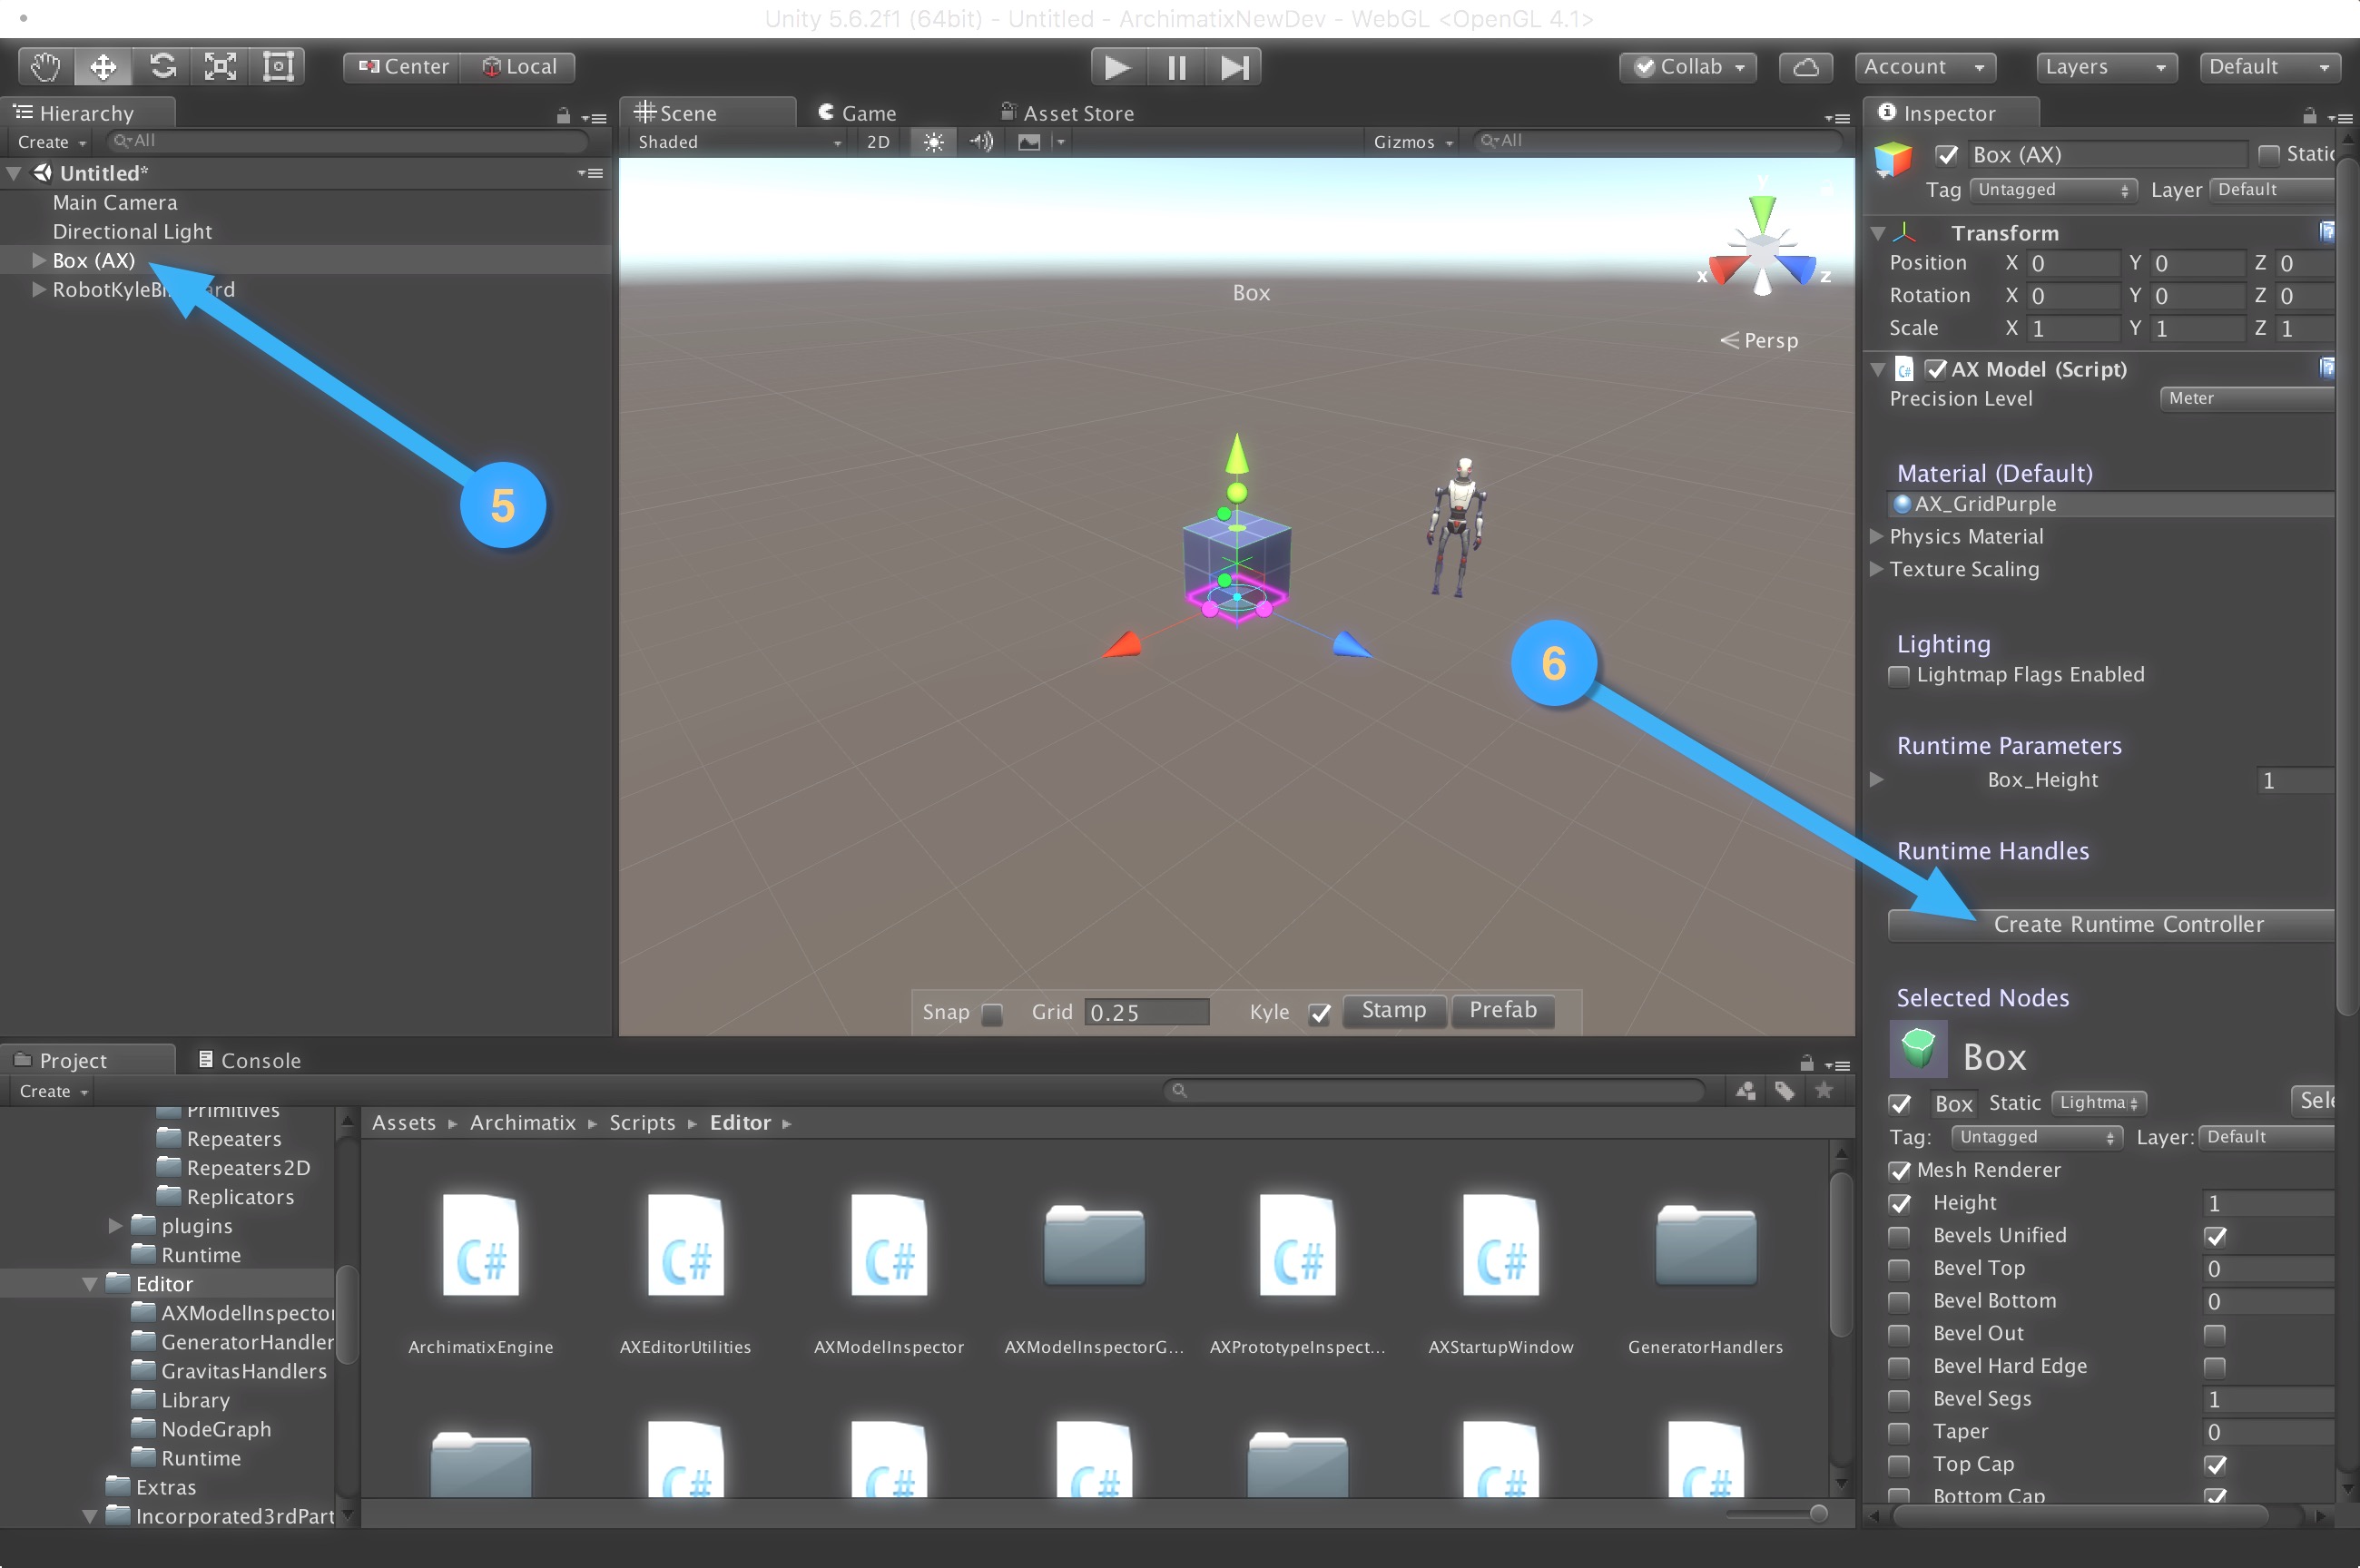
Step 2. Select the Box in the Scene.

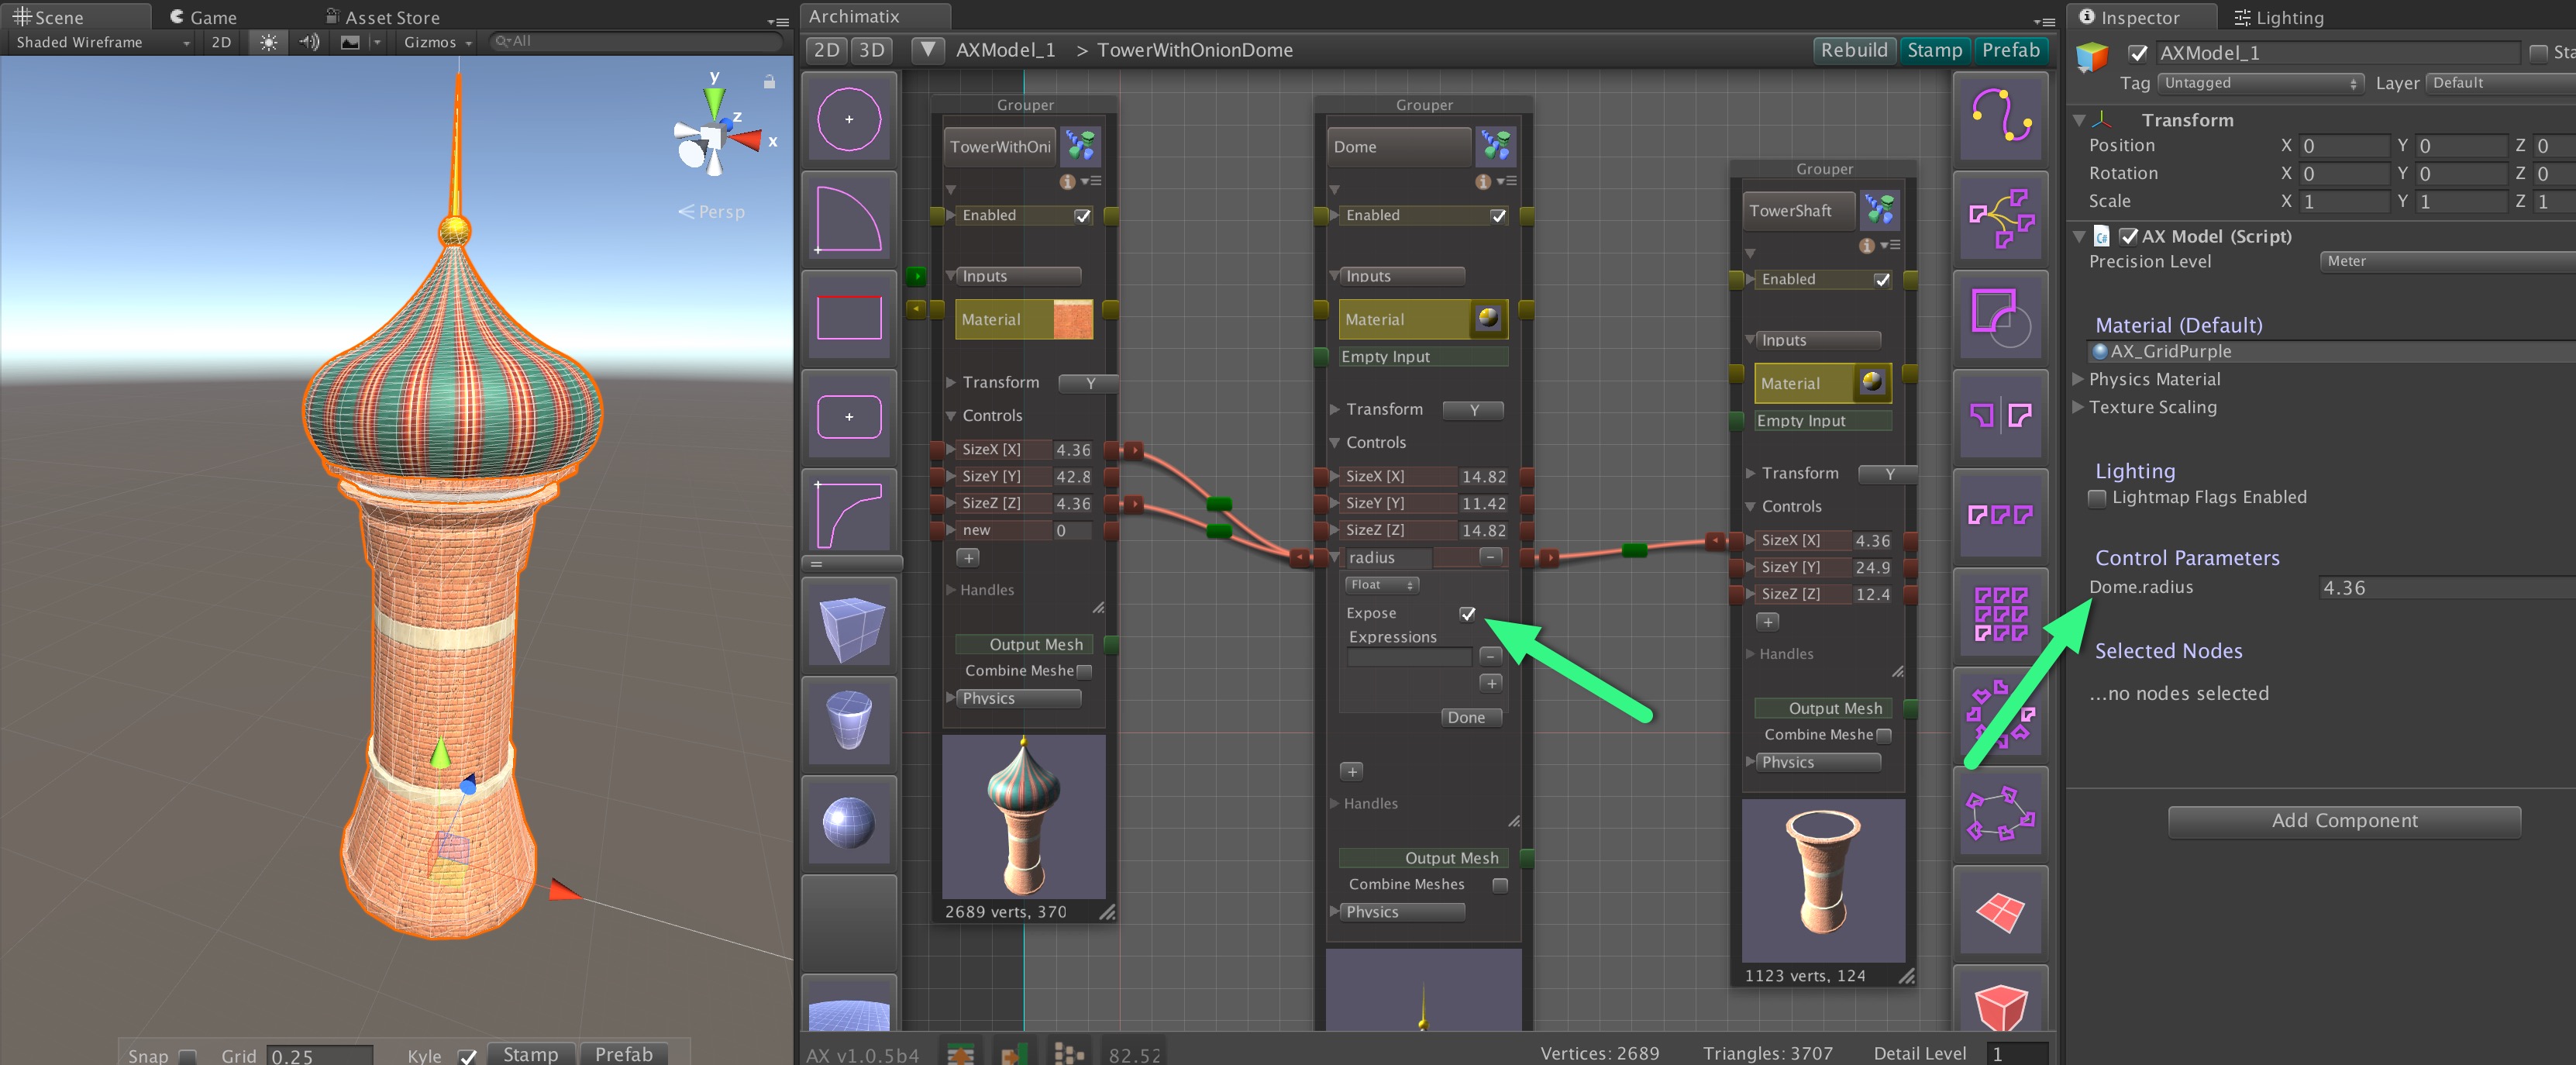
Step 3. In the Inspector choose to expose the Height parameter as a runtime parameter by clicking the checkbox to the left of the parameter name.

Step 4. Note that the Height parameter has appeared in the list of the model’s runtime parameters.

The exposed runtime variables are easy to use in any game script, but they can also be easily made  available for binding to Unity’s UI system, PlayMaker, or any other system that connects to dynamic variables. All we have to do is create an AXRuntimeController asset. Fortunately, this is done with the click of a button!


Step 5. Make sure the AXModel GameObject is selected.

Step 6. Click on the “Create Runtime Controller” button.

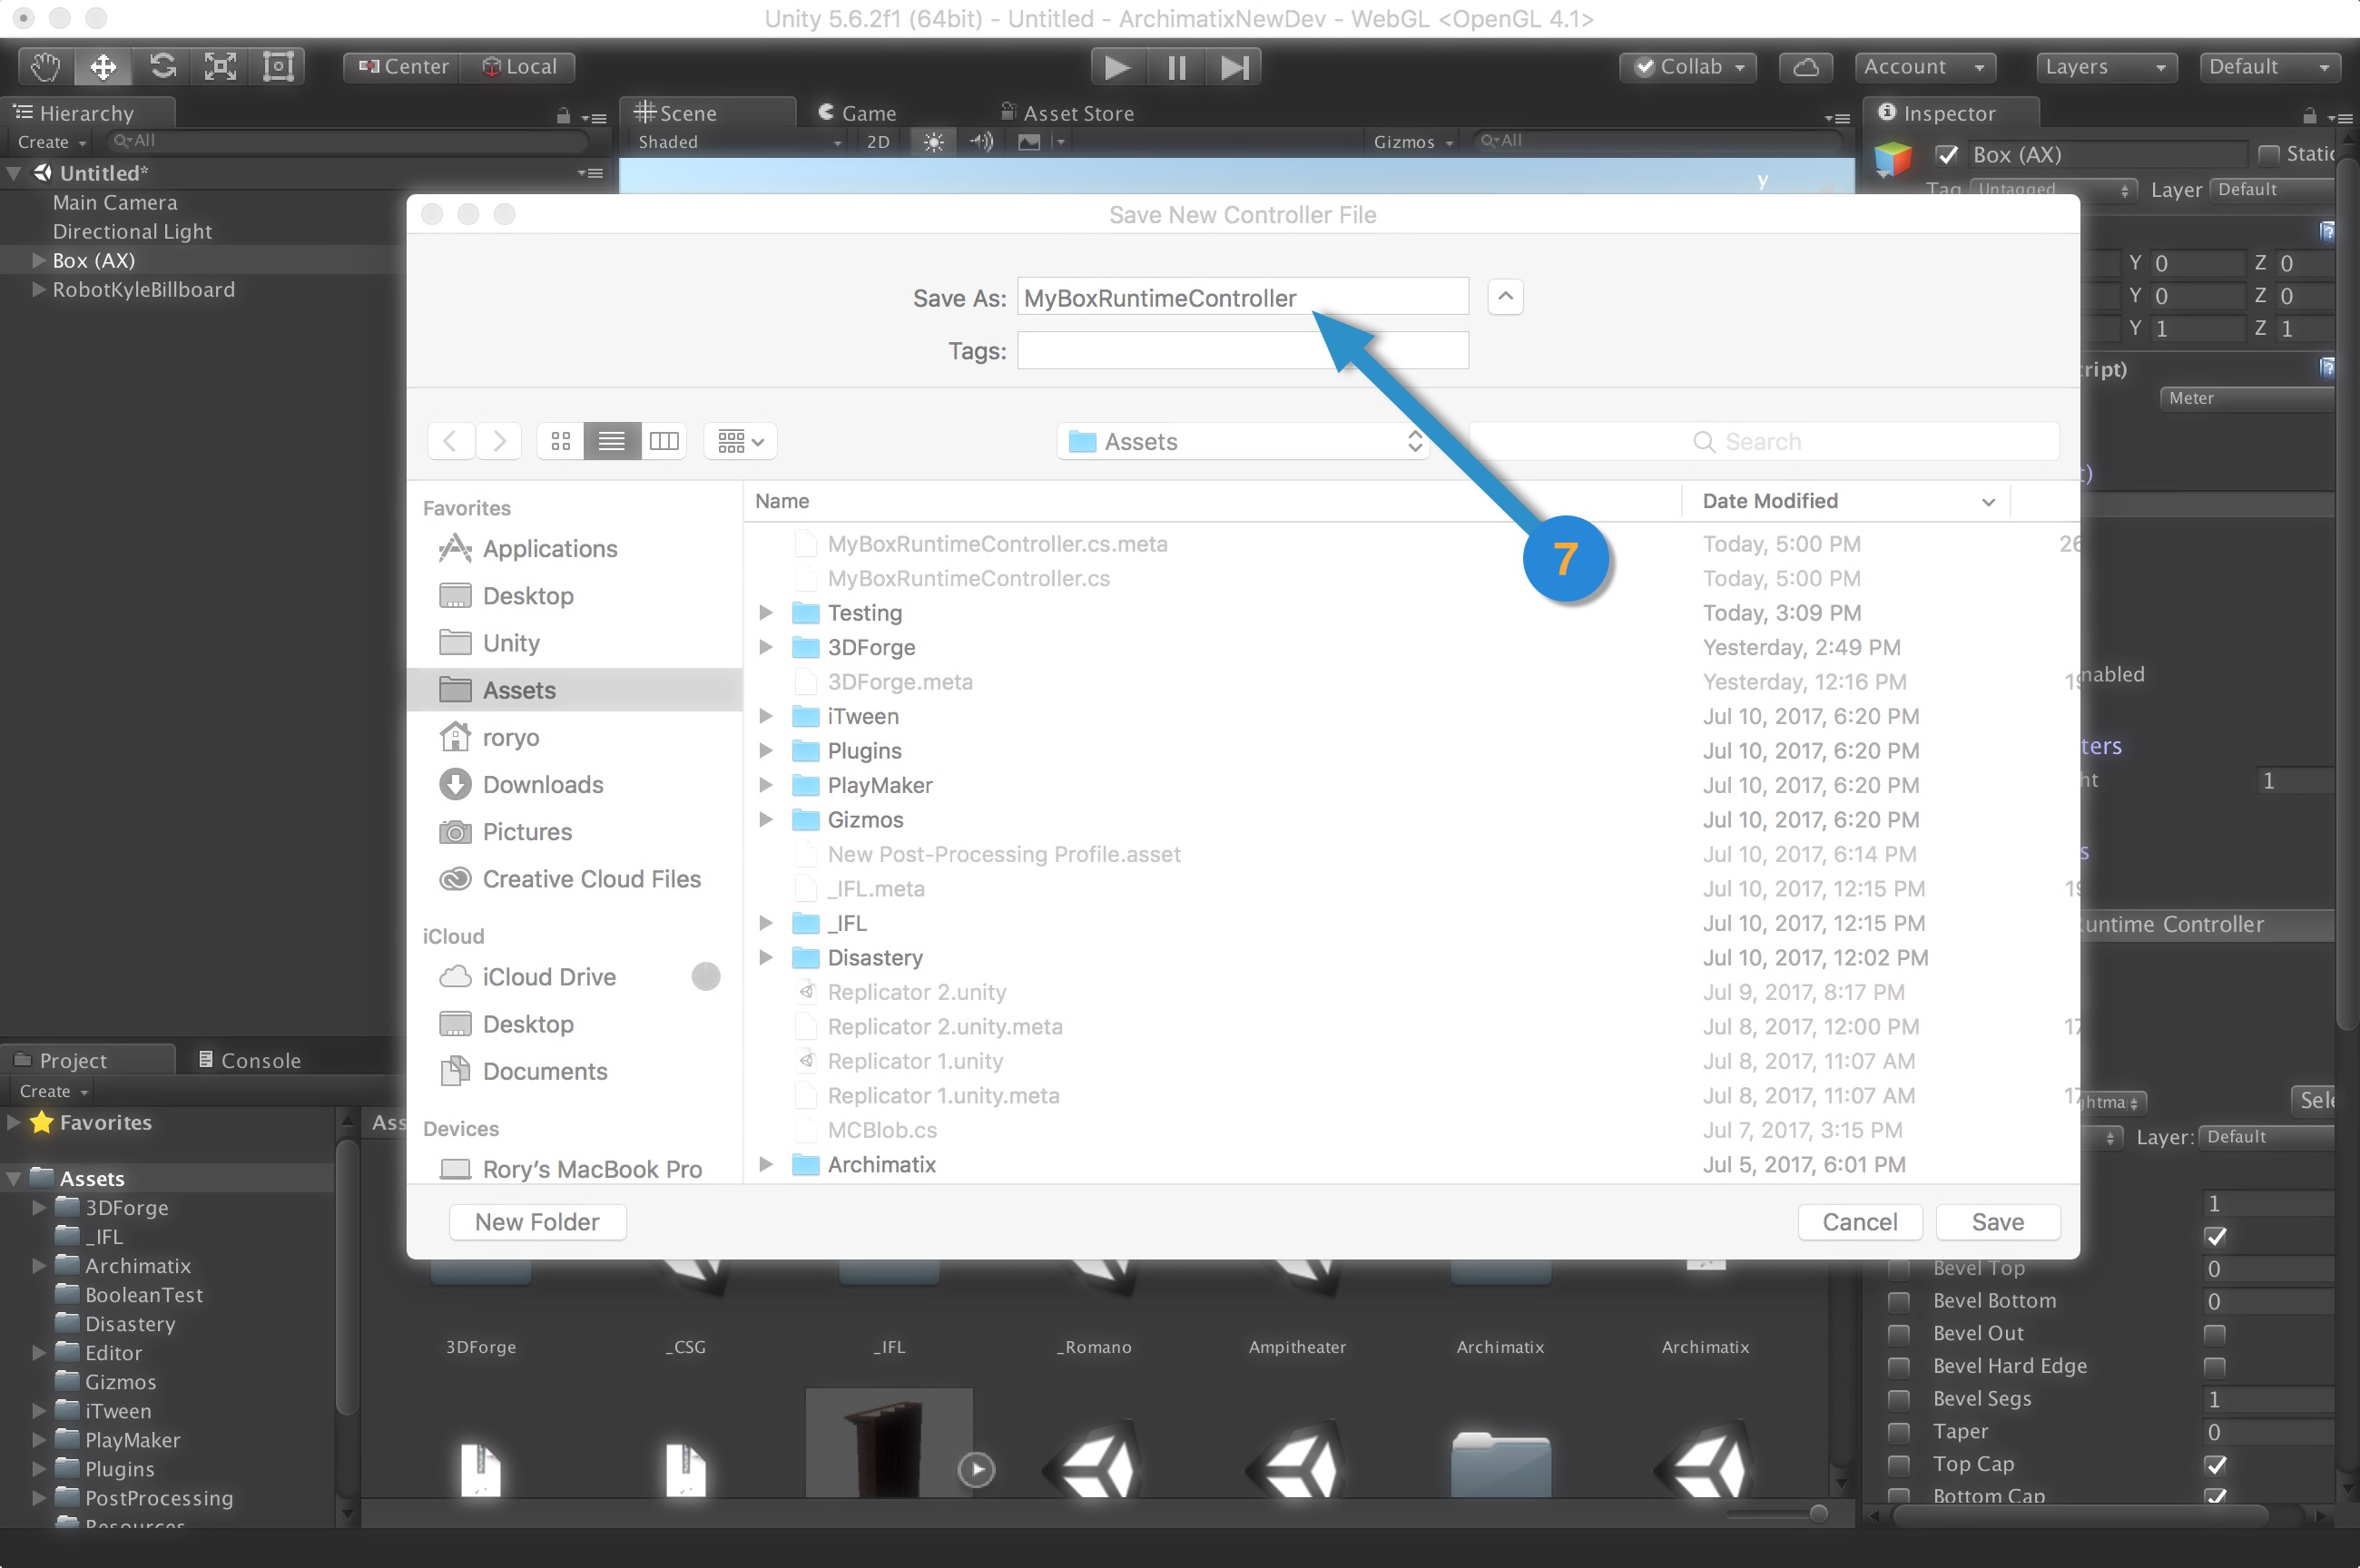
Step 7. Save the new controller file anywhere  in your Asset folder.


You’ve done it!

You now have an Asset that connects to Archimatix’s runtime parameters and serves as a source for for Unity’s UI system, PlayMaker, etc. When choosing a connection, use the runtimeController asset you just created as your source of variables.

You may not have realized it, but by clicking that button, you 1. created a GameObject in the AXModel hierarchy and 2. added a new component to it, the runtimeController asset you created.

If you select other parameters in your AX model to become exposed as runtime parameters, just click the “Create Runtime Controller” button again. This time it will not ask you to locate the file, but just overwrite the one you have already created.


Now let’s take a look at how we can connect your new controller to Unity’s UI.

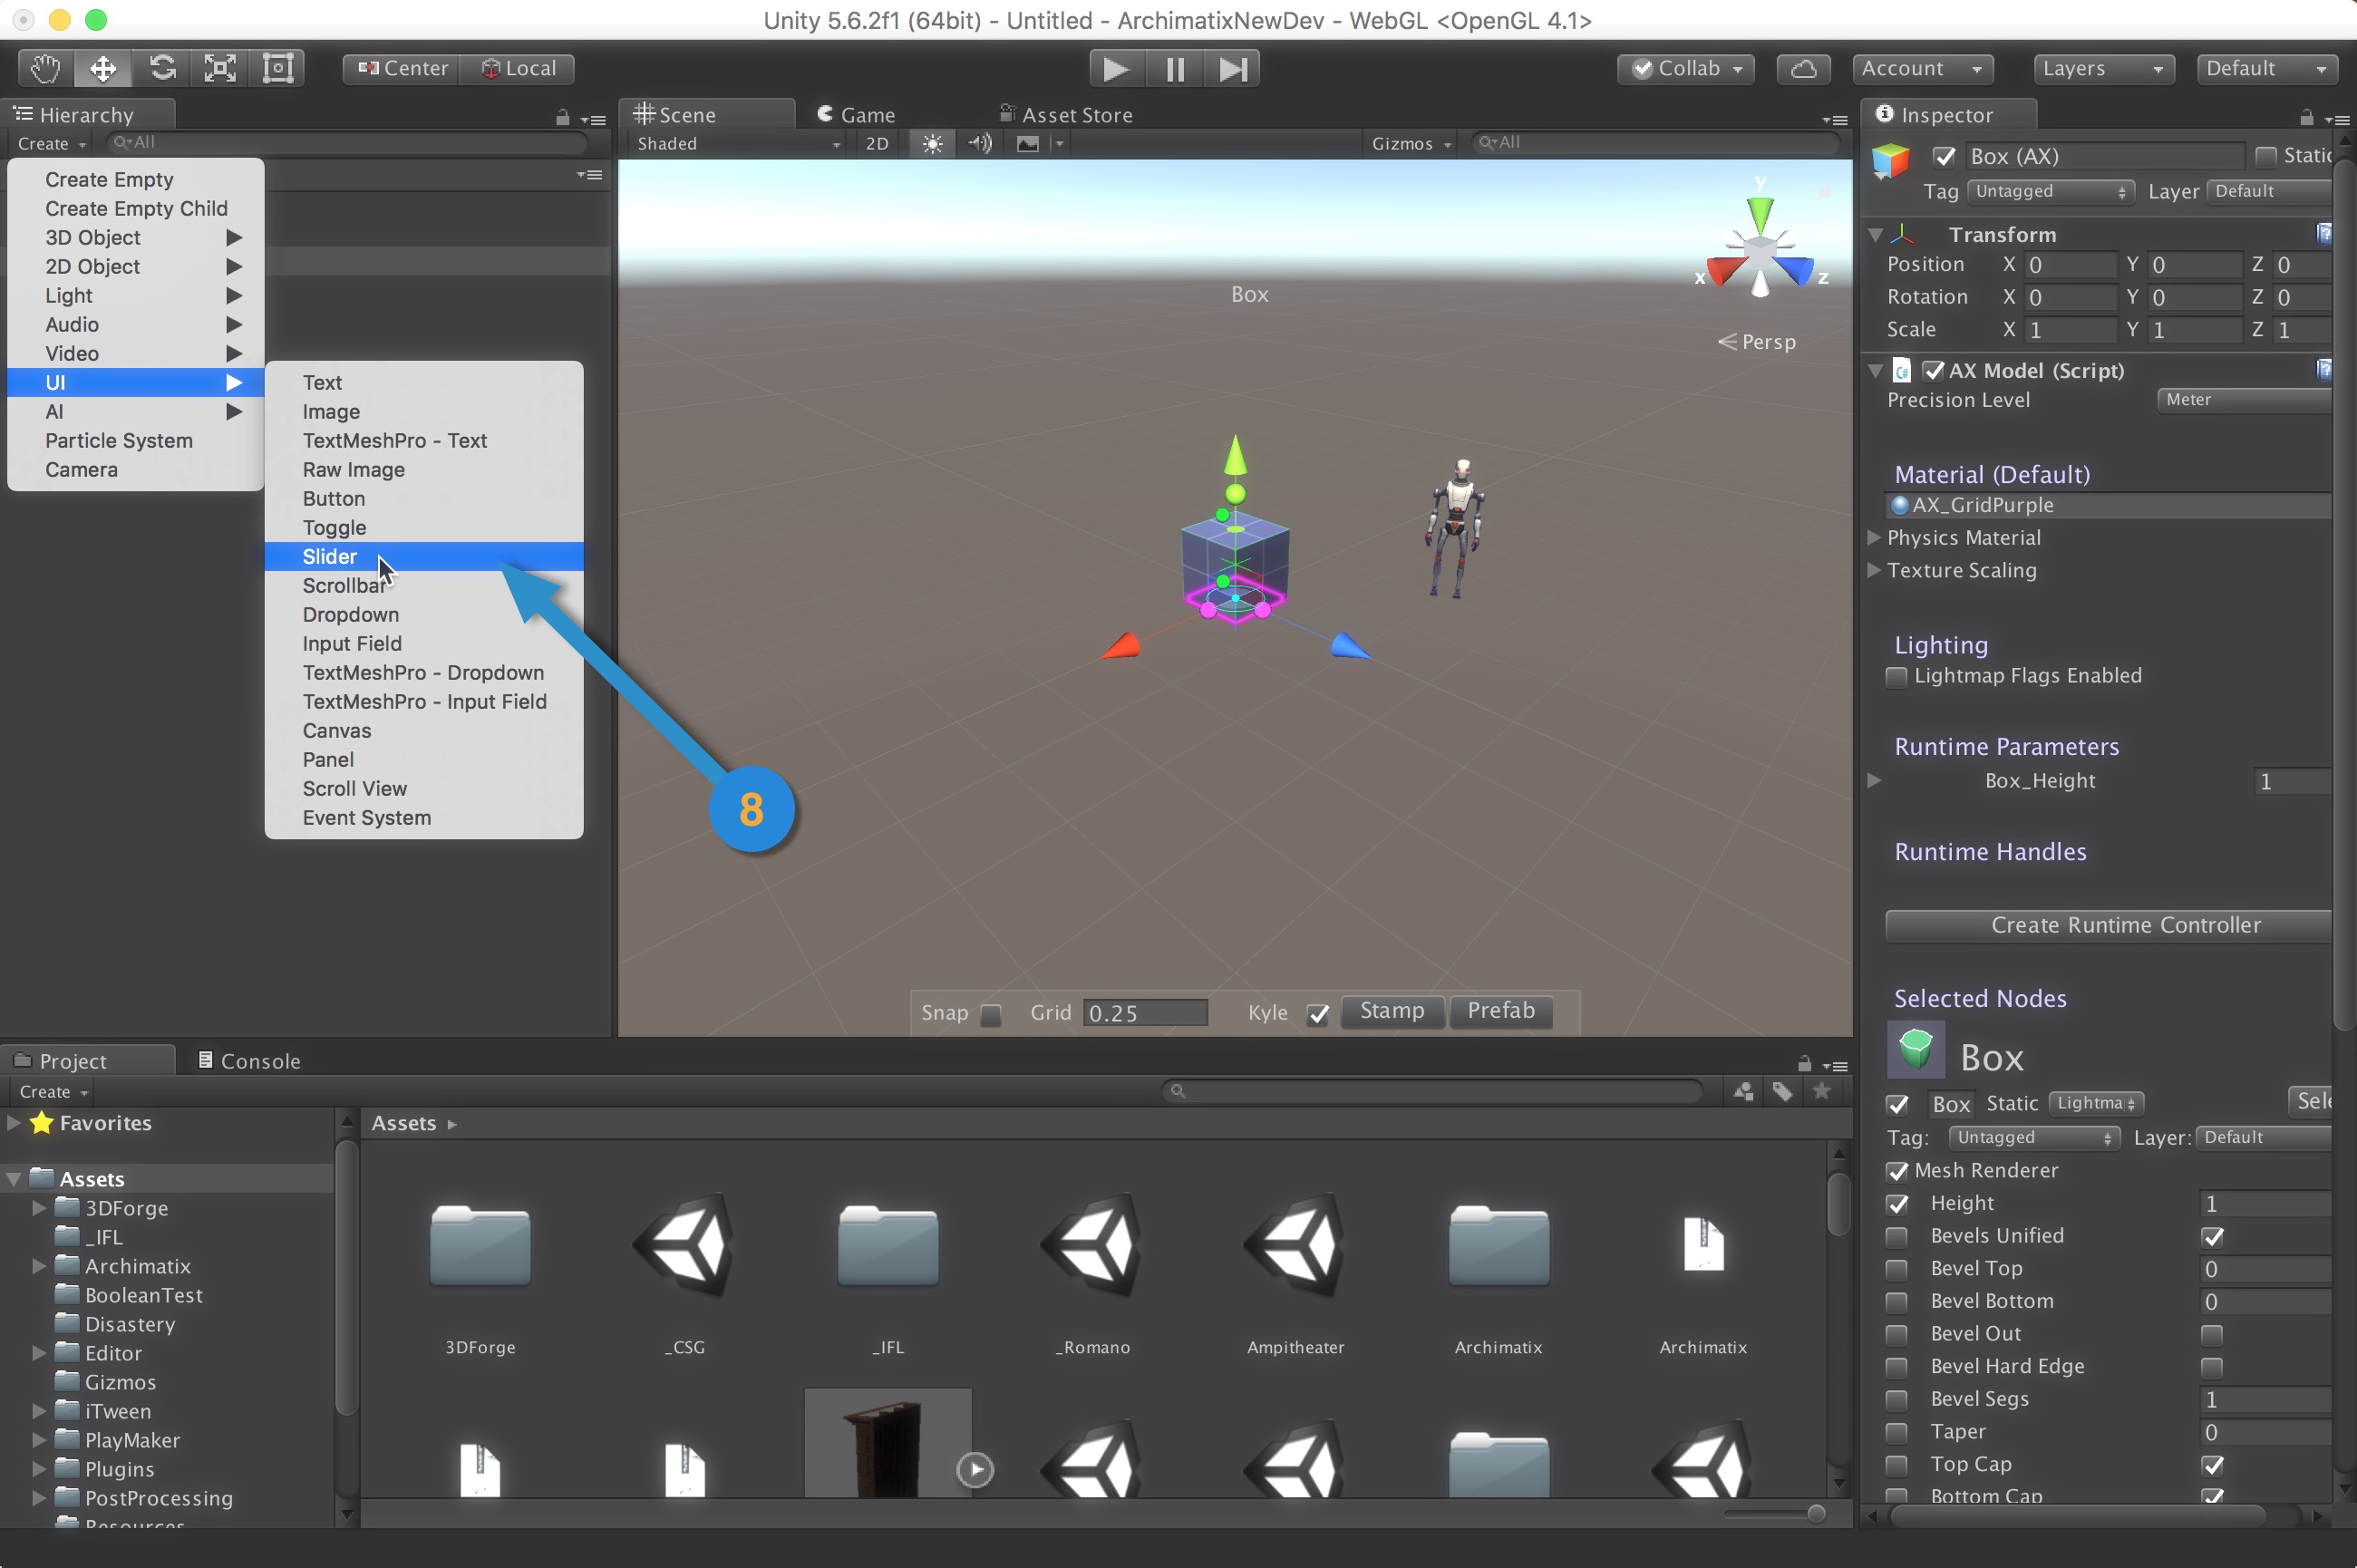
Step 8. Create a UI Slider. Adjust its Max Value to 10.


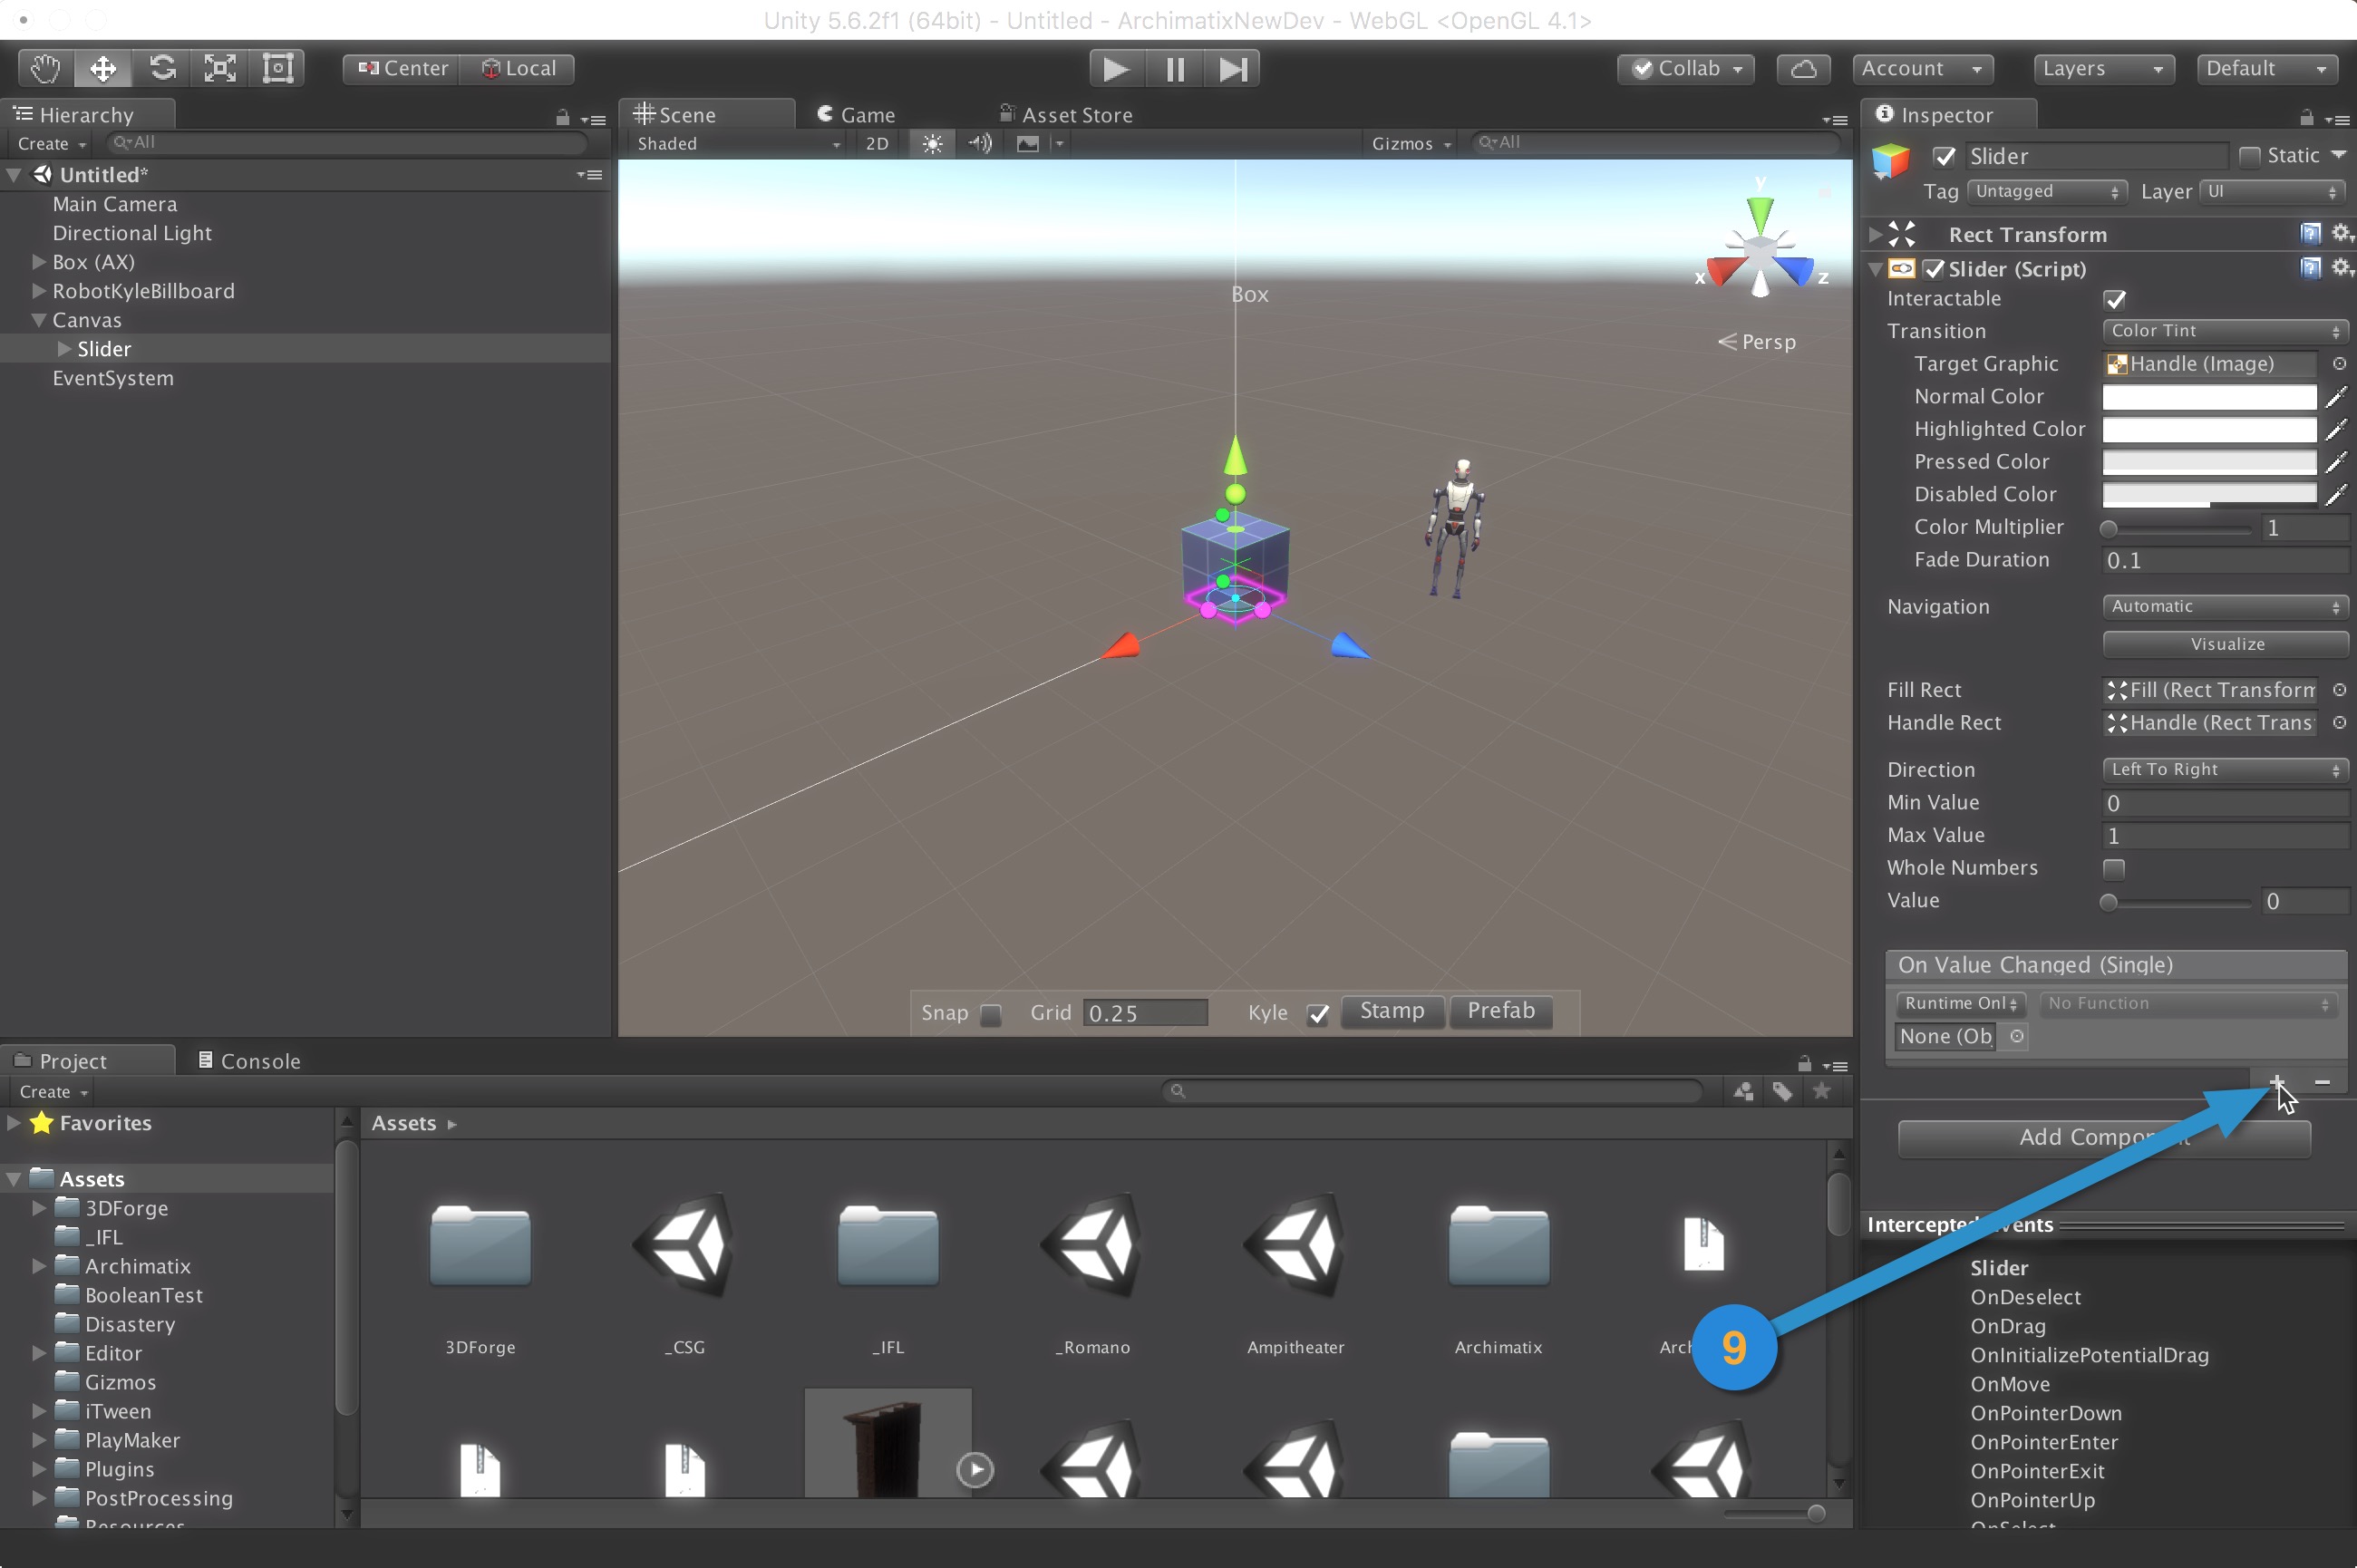
Step 9. Add an Action to the Slider.


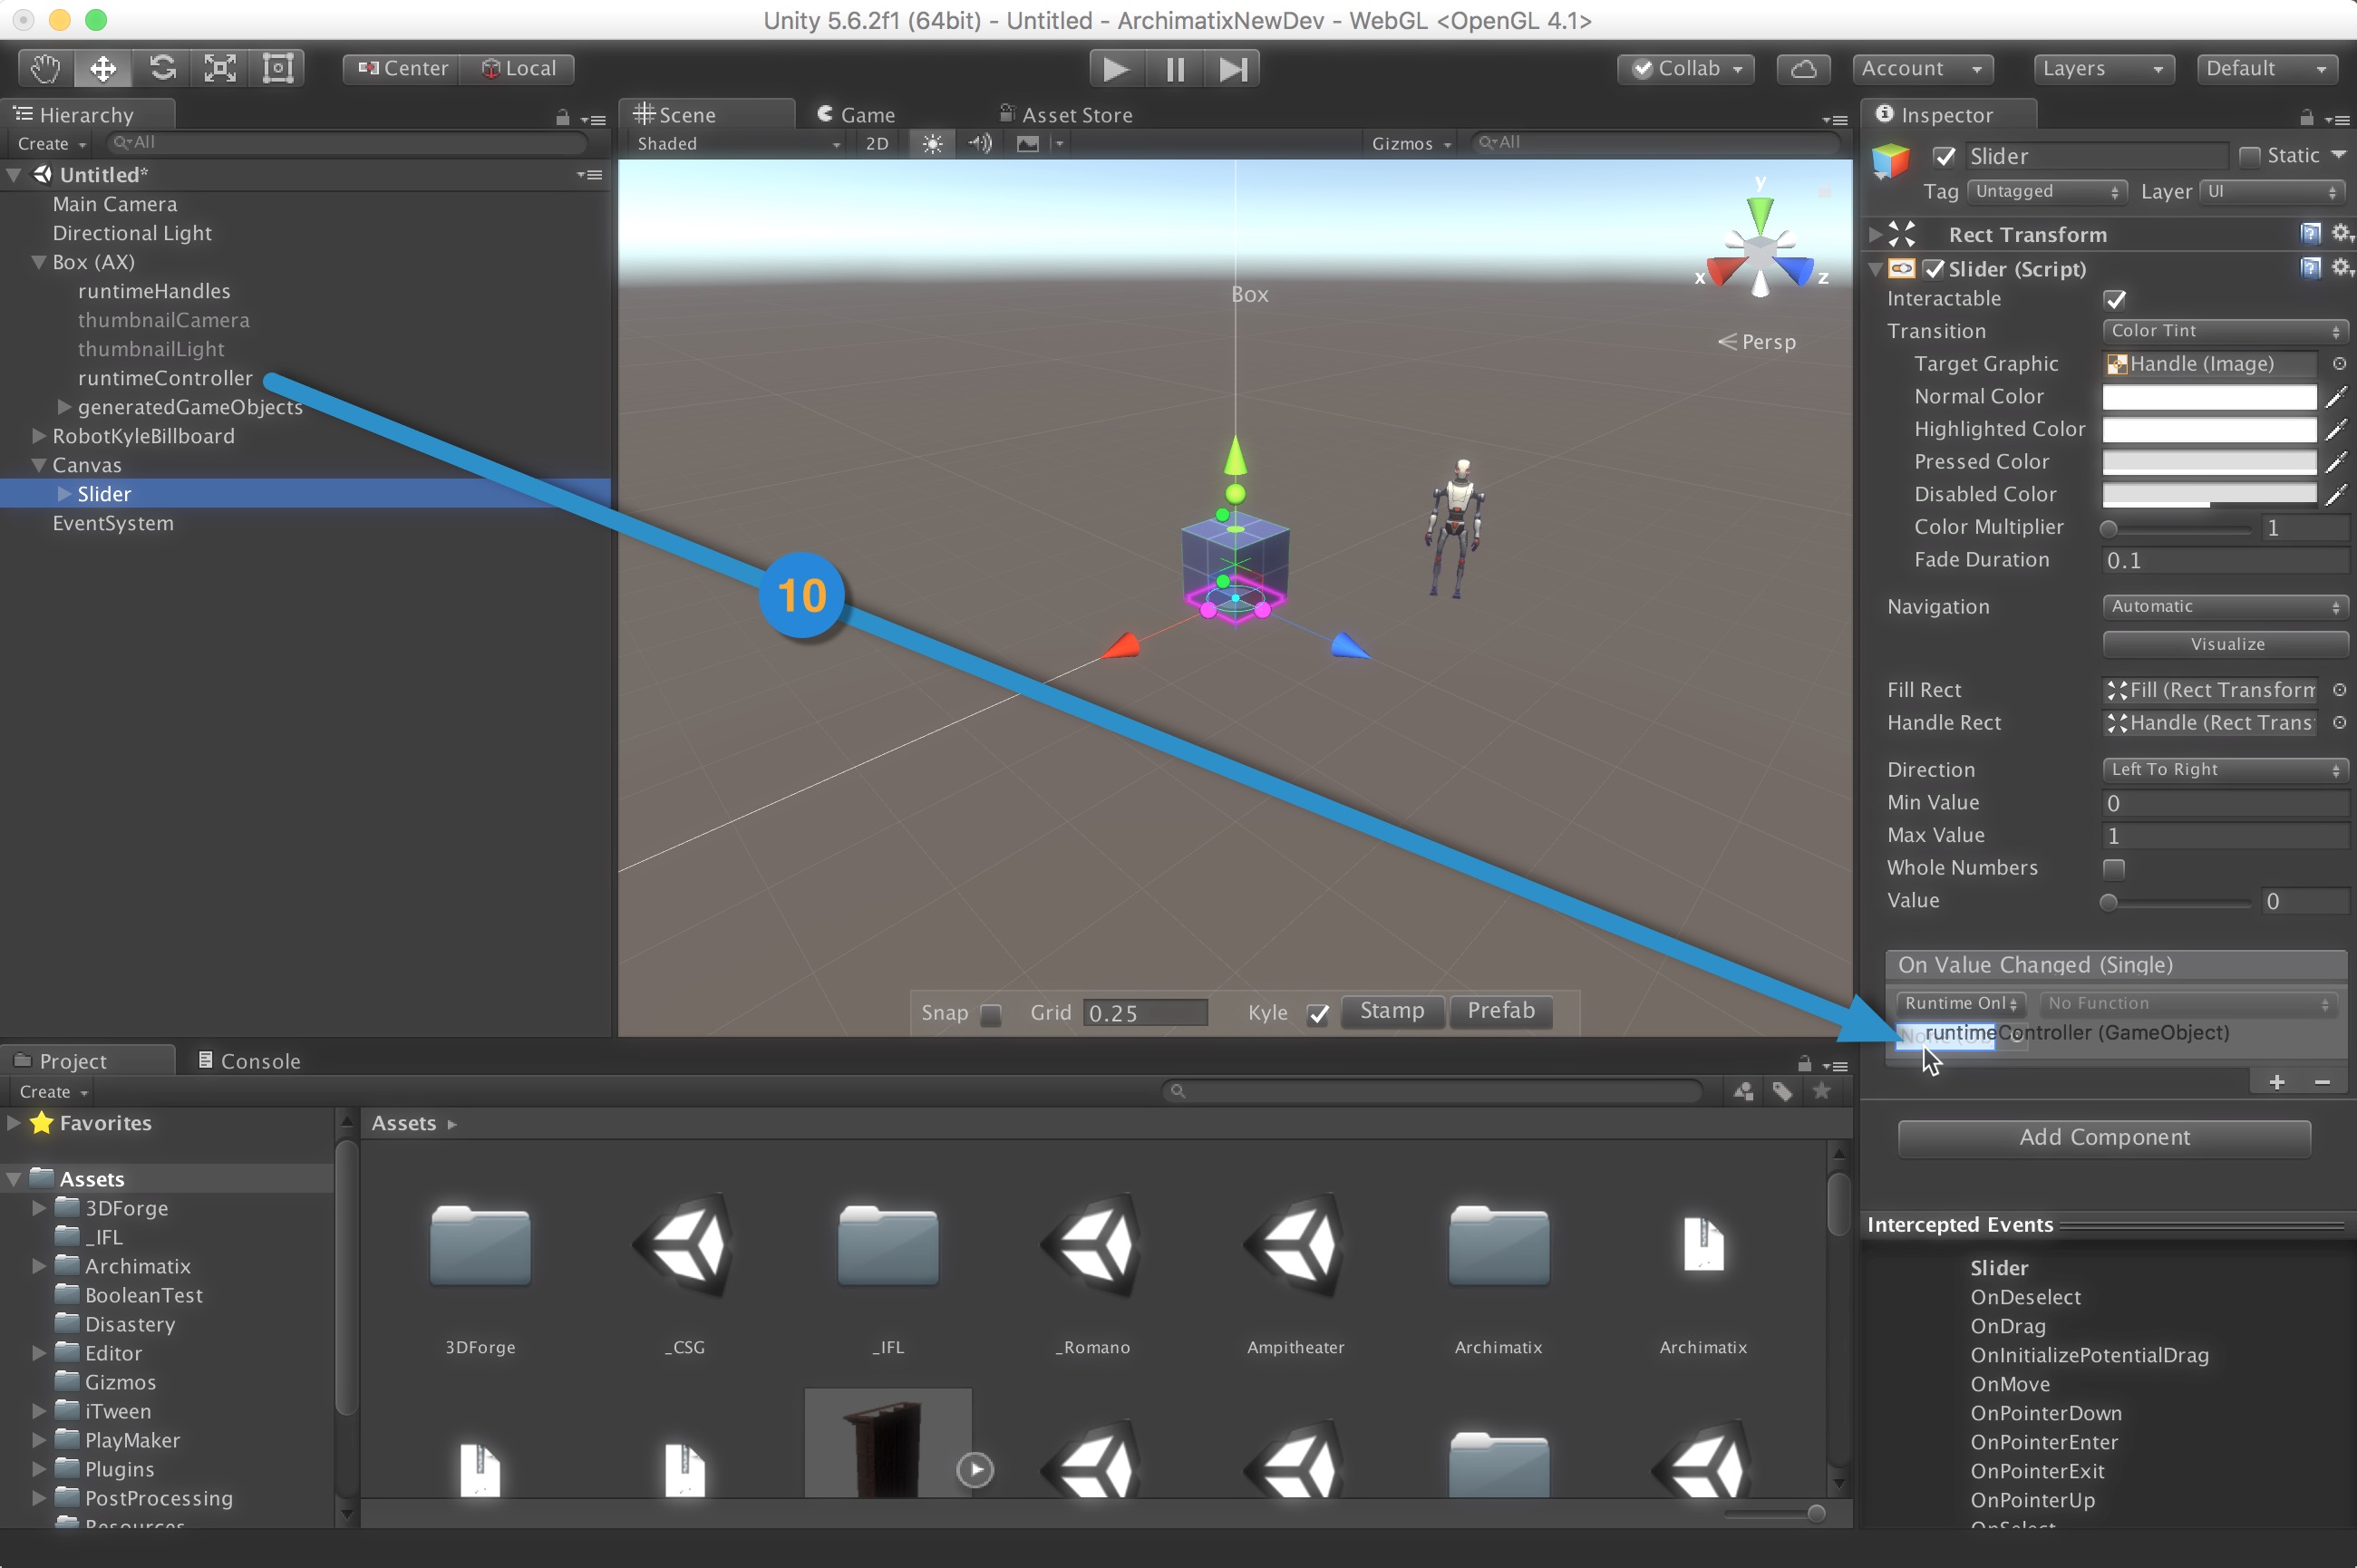
Step 10. Unfold the Box model, click on the Slider in the Hierarchy and drag the runtimeController to the ObjectField in the Slider Inspector.


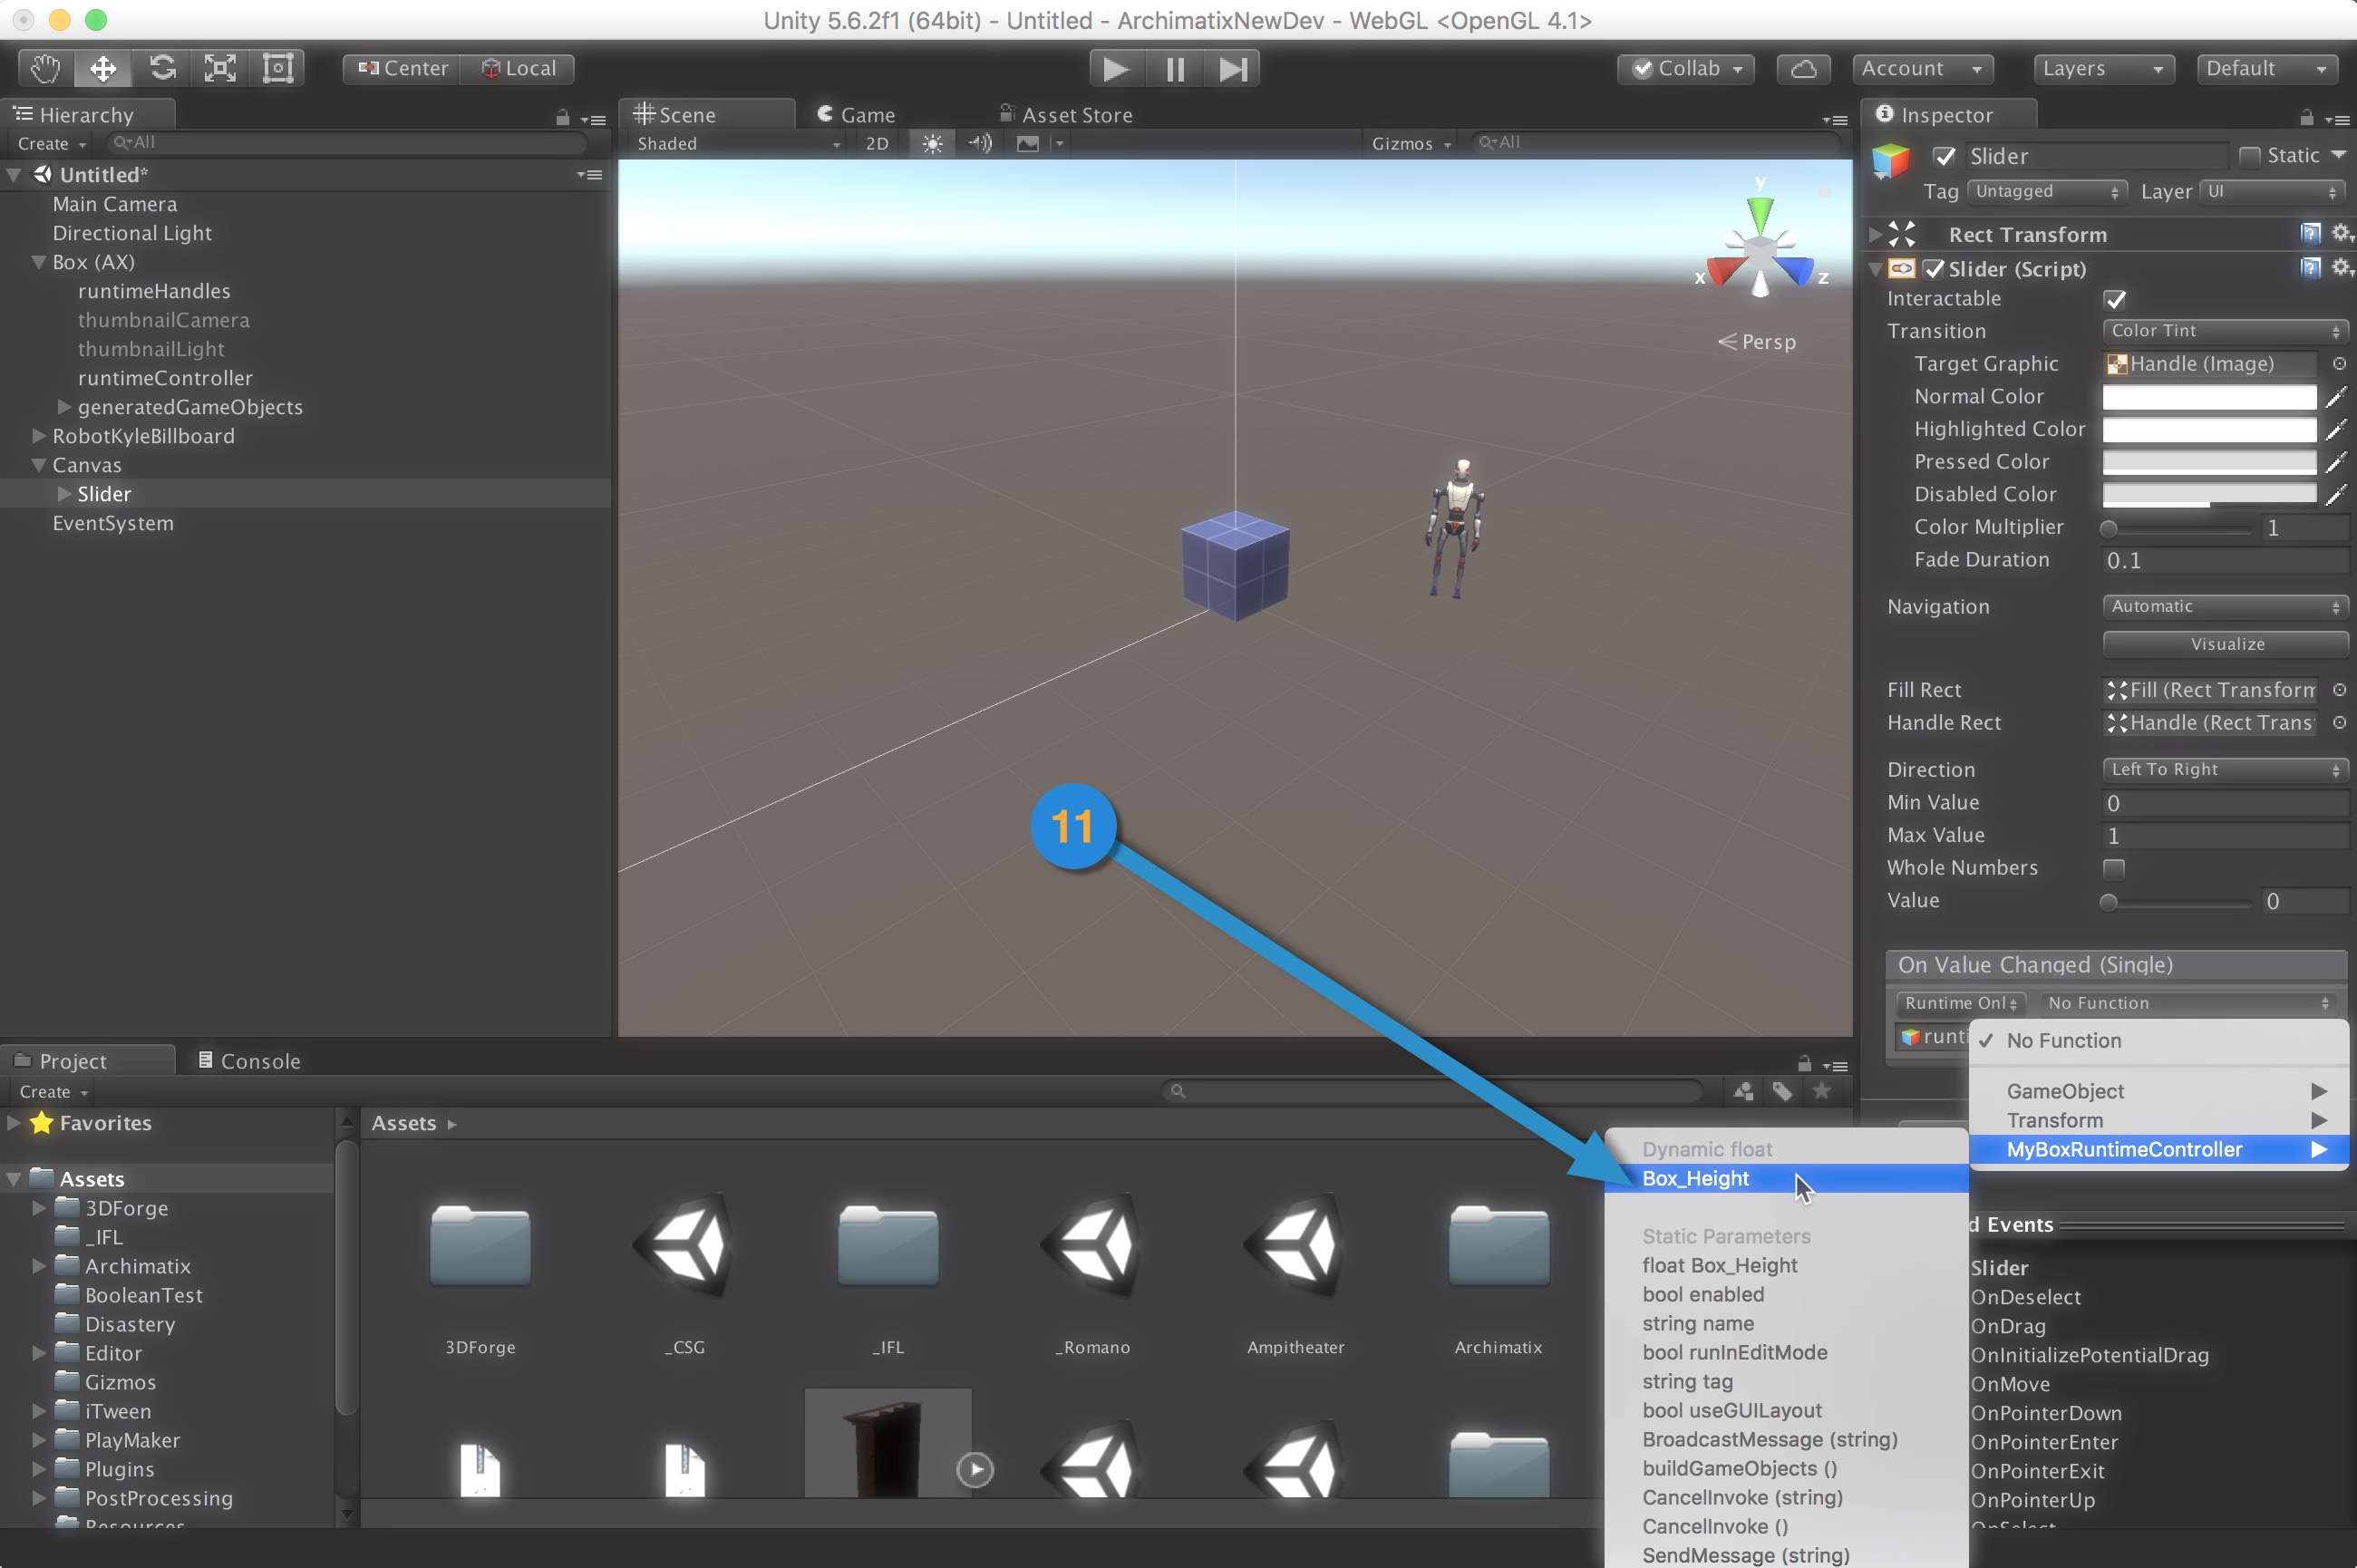
Step 11.  For the Function pulldown in the Slider Inspector, choose your controller and the Box_Height variable.


By Jove! You’ve done it again!

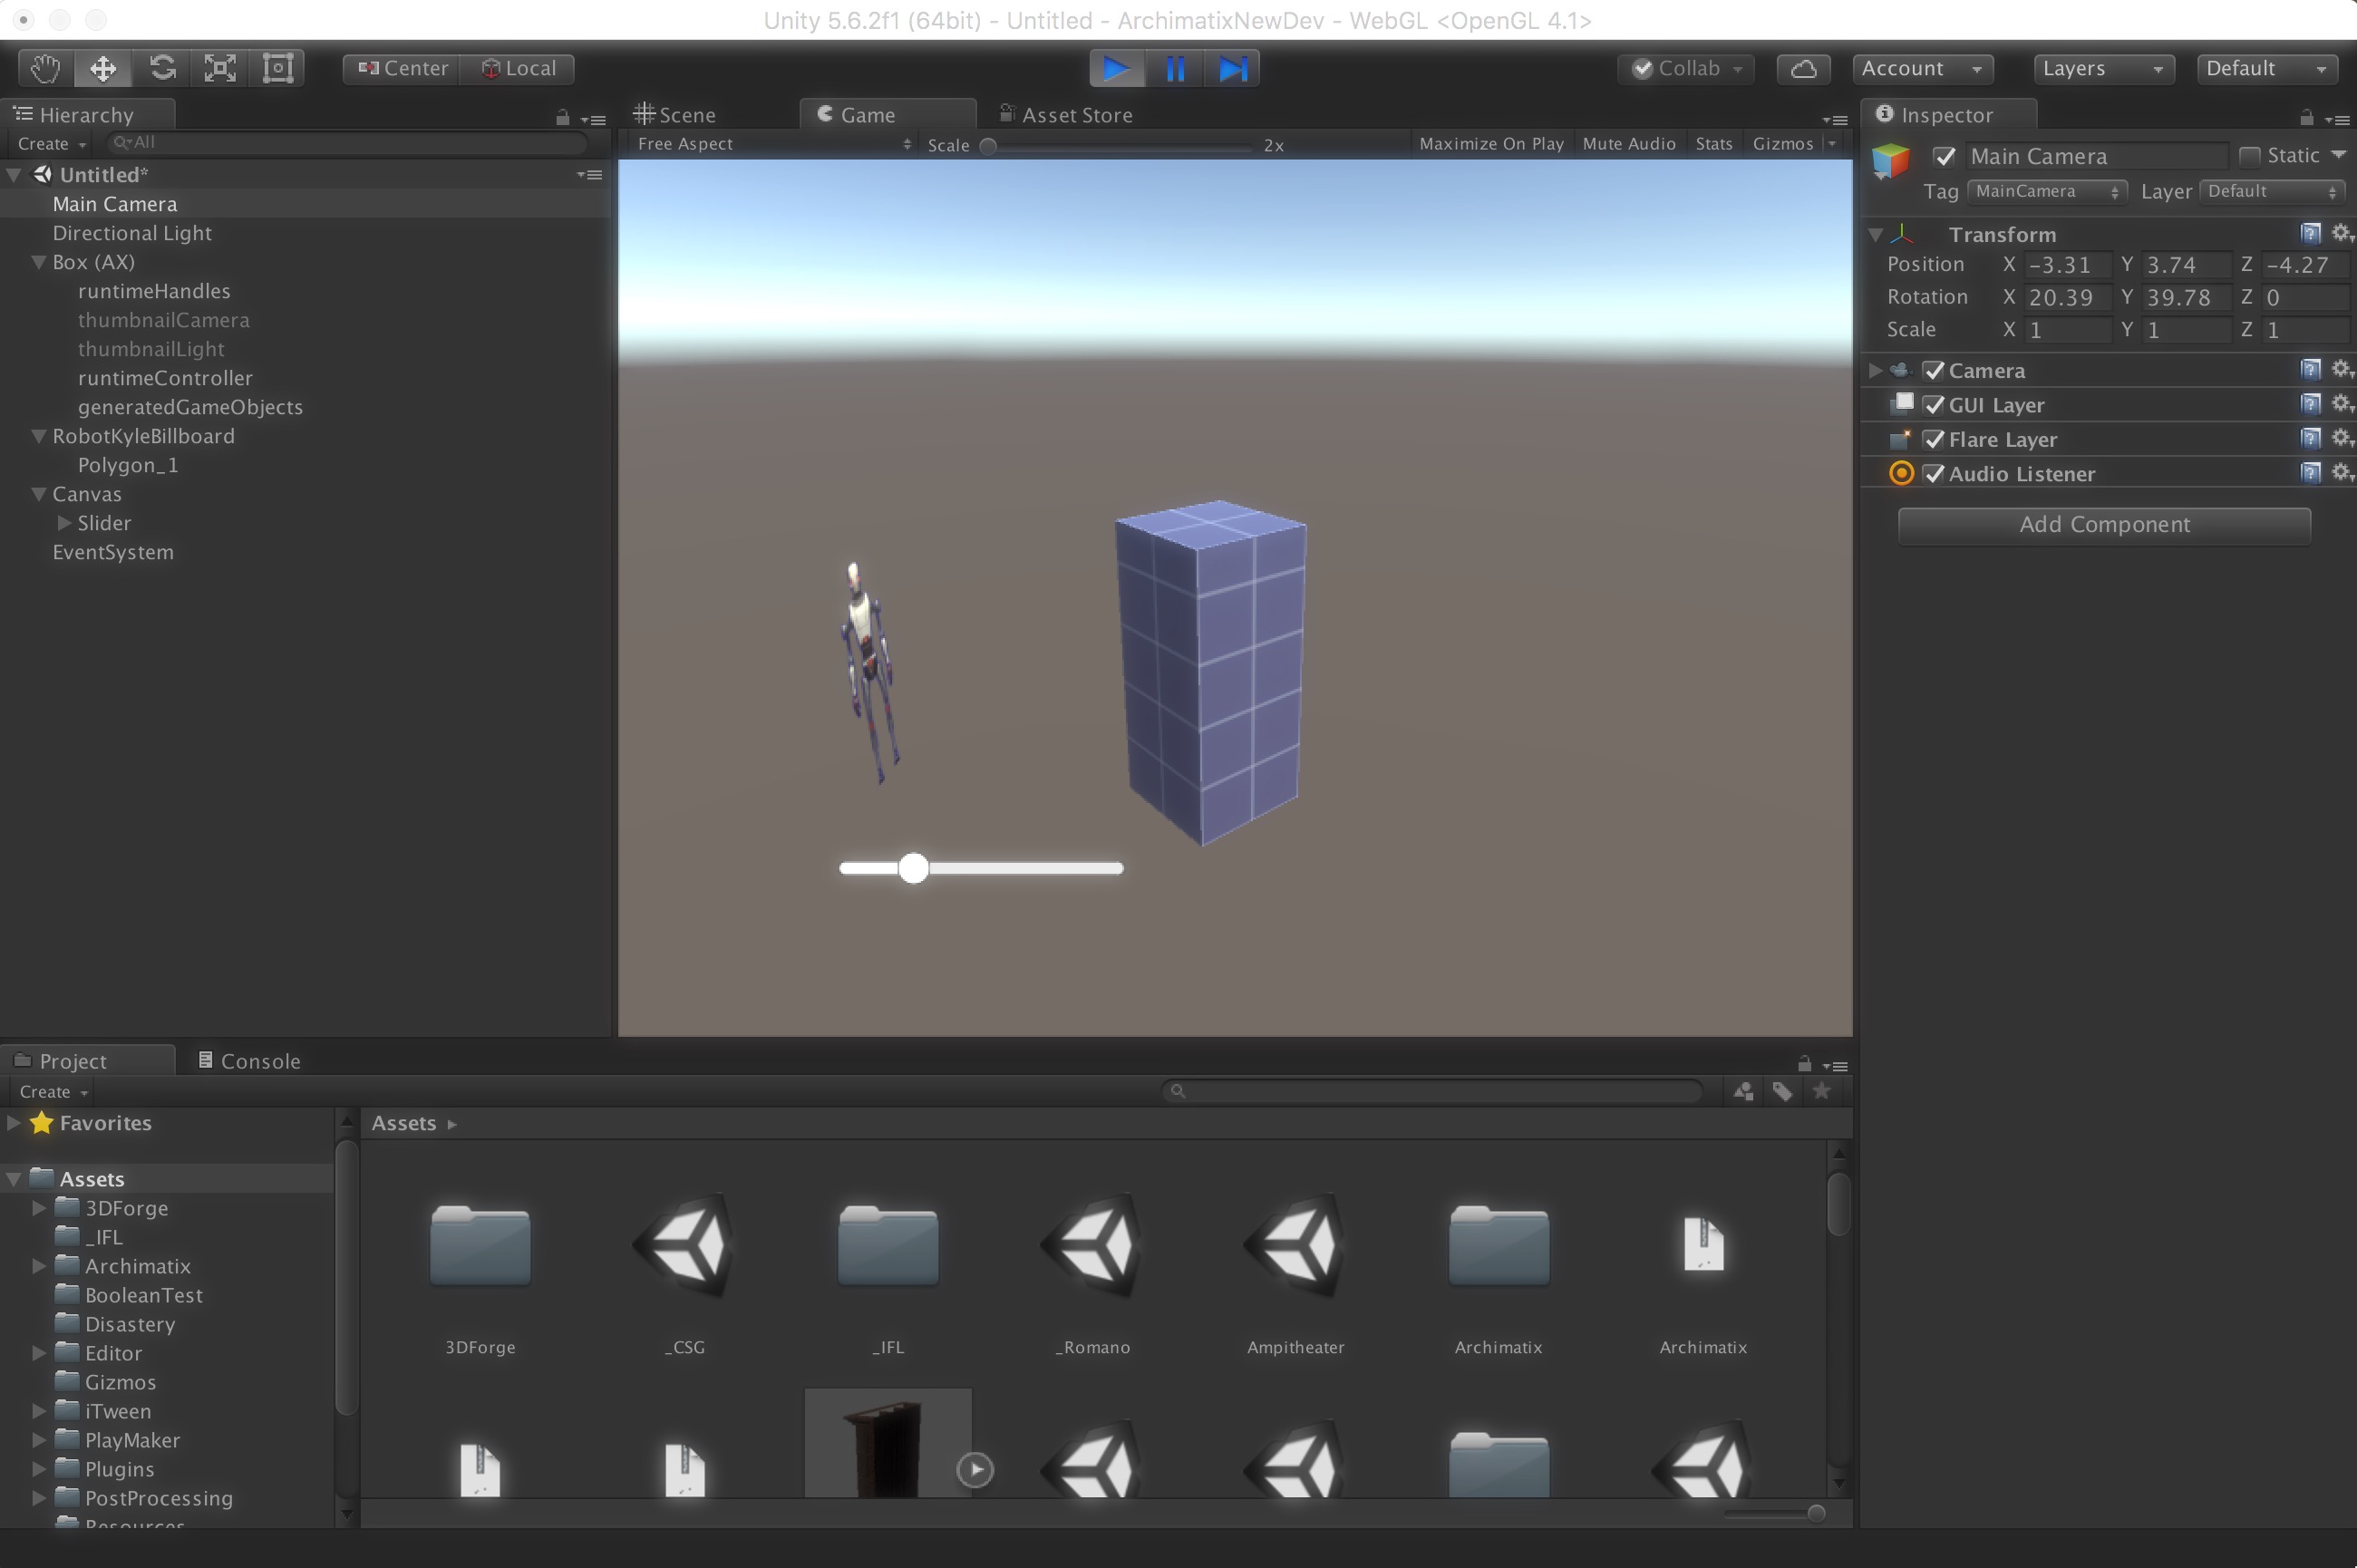
You have just empowered your game interface to do runtime modeling! Check it out!


Step 12. Check your UI to make sure the Slider is visible in the Game View. Click Play and manipulate the Slider. The Box height should be adjusting as you move the Slider.


Runtime Archimatix

Runtime Archimatix is available in version 1.0.5 -full documentation  coming soon!

With Runtime Archimatix available only in Archimatix Pro, you can create in-game interactive modelers of your own design. A good example is the Spaceship Shop demo scene included in Archimatix Pro. In this demo, you can use the in-game UI to deliver simple modeling functionality, such as changing the shape of the hull with runtime handles, choosing the engine type and size, as well as sizing and positioning the weapons. Such a shop could be part of a game or its own independent application.

Other examples might include in-game house construction, maze design and, well, anything you can dream up! By creating such runtime applications, you not only make environment and prop building simple, fun and thematic, but also generate opportunities for in-app purchases that go beyond the acquisition of modular inventory items.

In its first iteration, runtime Archimatix (AX) allows you to control AX parameters from your runtime scripts. This means that you can connect your  runtime UI to an AX model and control it in a way that works with your game design. For example, if your player can spend game dollars to build a house, then they can size the house interactively while watching the cost of the house vary with the floor area of the building.

To facilitate this, AX has an “Expose” checkbox under each parameter in the node palette. Once you check that, the parameter will be displayed in the Inspector for the AXModel. With the variable exposed at the model level, your script can easily access the variable to get and set its value.

In order to modify these parameters in runtime, you need a reference to the AXModel (a Component of a GameObject in your scene). In your MonoBehavior, add a public member of type AXModel:

using AX;

public class GrayShipDesigner : MonoBehaviour {

    public AXModel model;

}

After doing this, you can drag the AXModel aGameObject into the ObjectField in your runtime script. With this reference to the parametric model, you can get and set the parameters that you have promoted put to the model interface. When you set these parameters, they will ripple their value change throughout the graph based on the Relations you have established between parameters.

To make your code more readable, it may be good to set up references to the parameters so they are easier to get to:

using AX;

public class GrayShipDesigner : MonoBehaviour {

    public AXModel model;

    public AXParameter P_Radius;
    public AXParameter P_Channel;

}

In the Start function, you can establish these parameter references using the getParameter function. This function uses the name you have given the parameter in the graph to find the parameter:

 // Use this for initialization
 void Start () {

    // Establish refernces to AXModel parameters.

    if (model != null)
    {
        P_Channel = model.getParameter("Engine.Channel");
        P_Radius  = model.getParameter("Engine.radius");
    }
}


To modify the parameters you have a reference to, use AXParameter.intiateRipple_setFloatValueFromGUIChange(floats value) and then let the model know you are ready to have the changes regenerate the model while dragging with model.isAltered() or after UI edits are complete with model.autobuild().

 // Example of a UI callback function. This could be a delegate of a Slider that controls the radius. 

 public void radiusSliderUpdate(float val)
 {
    // Set the value of the parameter and let this change ripple through the network of Relations

    P_Radius.initiatePARAMETER_Ripple_setFloatValueFromGUIChange(val);


    // Let the model know that you are done making your changes,
    // but not necessarily to create new game objects.
    // isAltered() is often called during a repetitive change such as with a slider.

    model.isAltered();

     // Other relevant game state changes not necessarily related to Archimatix 
     
     radius = val;
     recalculate();
 }

   
 public void engineTypeDropdownUpdate()
 {
     // Set the value of the parameter and let this change ripple through the network of Relations

    P_Channel.initiatePARAMETER_Ripple_setFloatValueFromGUIChange(engineTypeDropdown.value);


    // Tell the model to rebuild its GameObjects. 
    // autobuild() is often called after a Dropdown or Checkbox UI is modified.
    
    model.autobuild();

    // Other relevant game state changes not necessarily related to Archimatix

    recalculate();
 }

That’s all that you need to get started with runtime Archimatix! There will be full API published eventually as well as some example scenes.

Channeler

The Channeler node lets you connect multiple mesher nodes as input and provides a Channel parameter that lets you select which of these inputs will be passed through as its output. Its 2D analogy is the ShapeChanneler.

In the example below, we have nodes for three different stairs that we instantiated from the 3D library sidebar. If we multi-select the the three nodes and then click the Channeler node, the 3 nodes will be automatically fed into the node inputs. You may still add more nodes after that.

The Channel is perhaps most effective as a runtime parameter, where your player can choose from a menu of objects. An example of the Channeler in action is in the SpaceshipShop demo. If you click on the Propulsion tab, you can use the pulldown menu to choose between one of three engines.

In this demo, choosing different options for the engine type incurs different costs in game currency. To see how this demo was rigged up, please see the scene Archimatix>Scenes Runtime>SpaceshipShop included with the Archimatix package.


ShapeChanneler

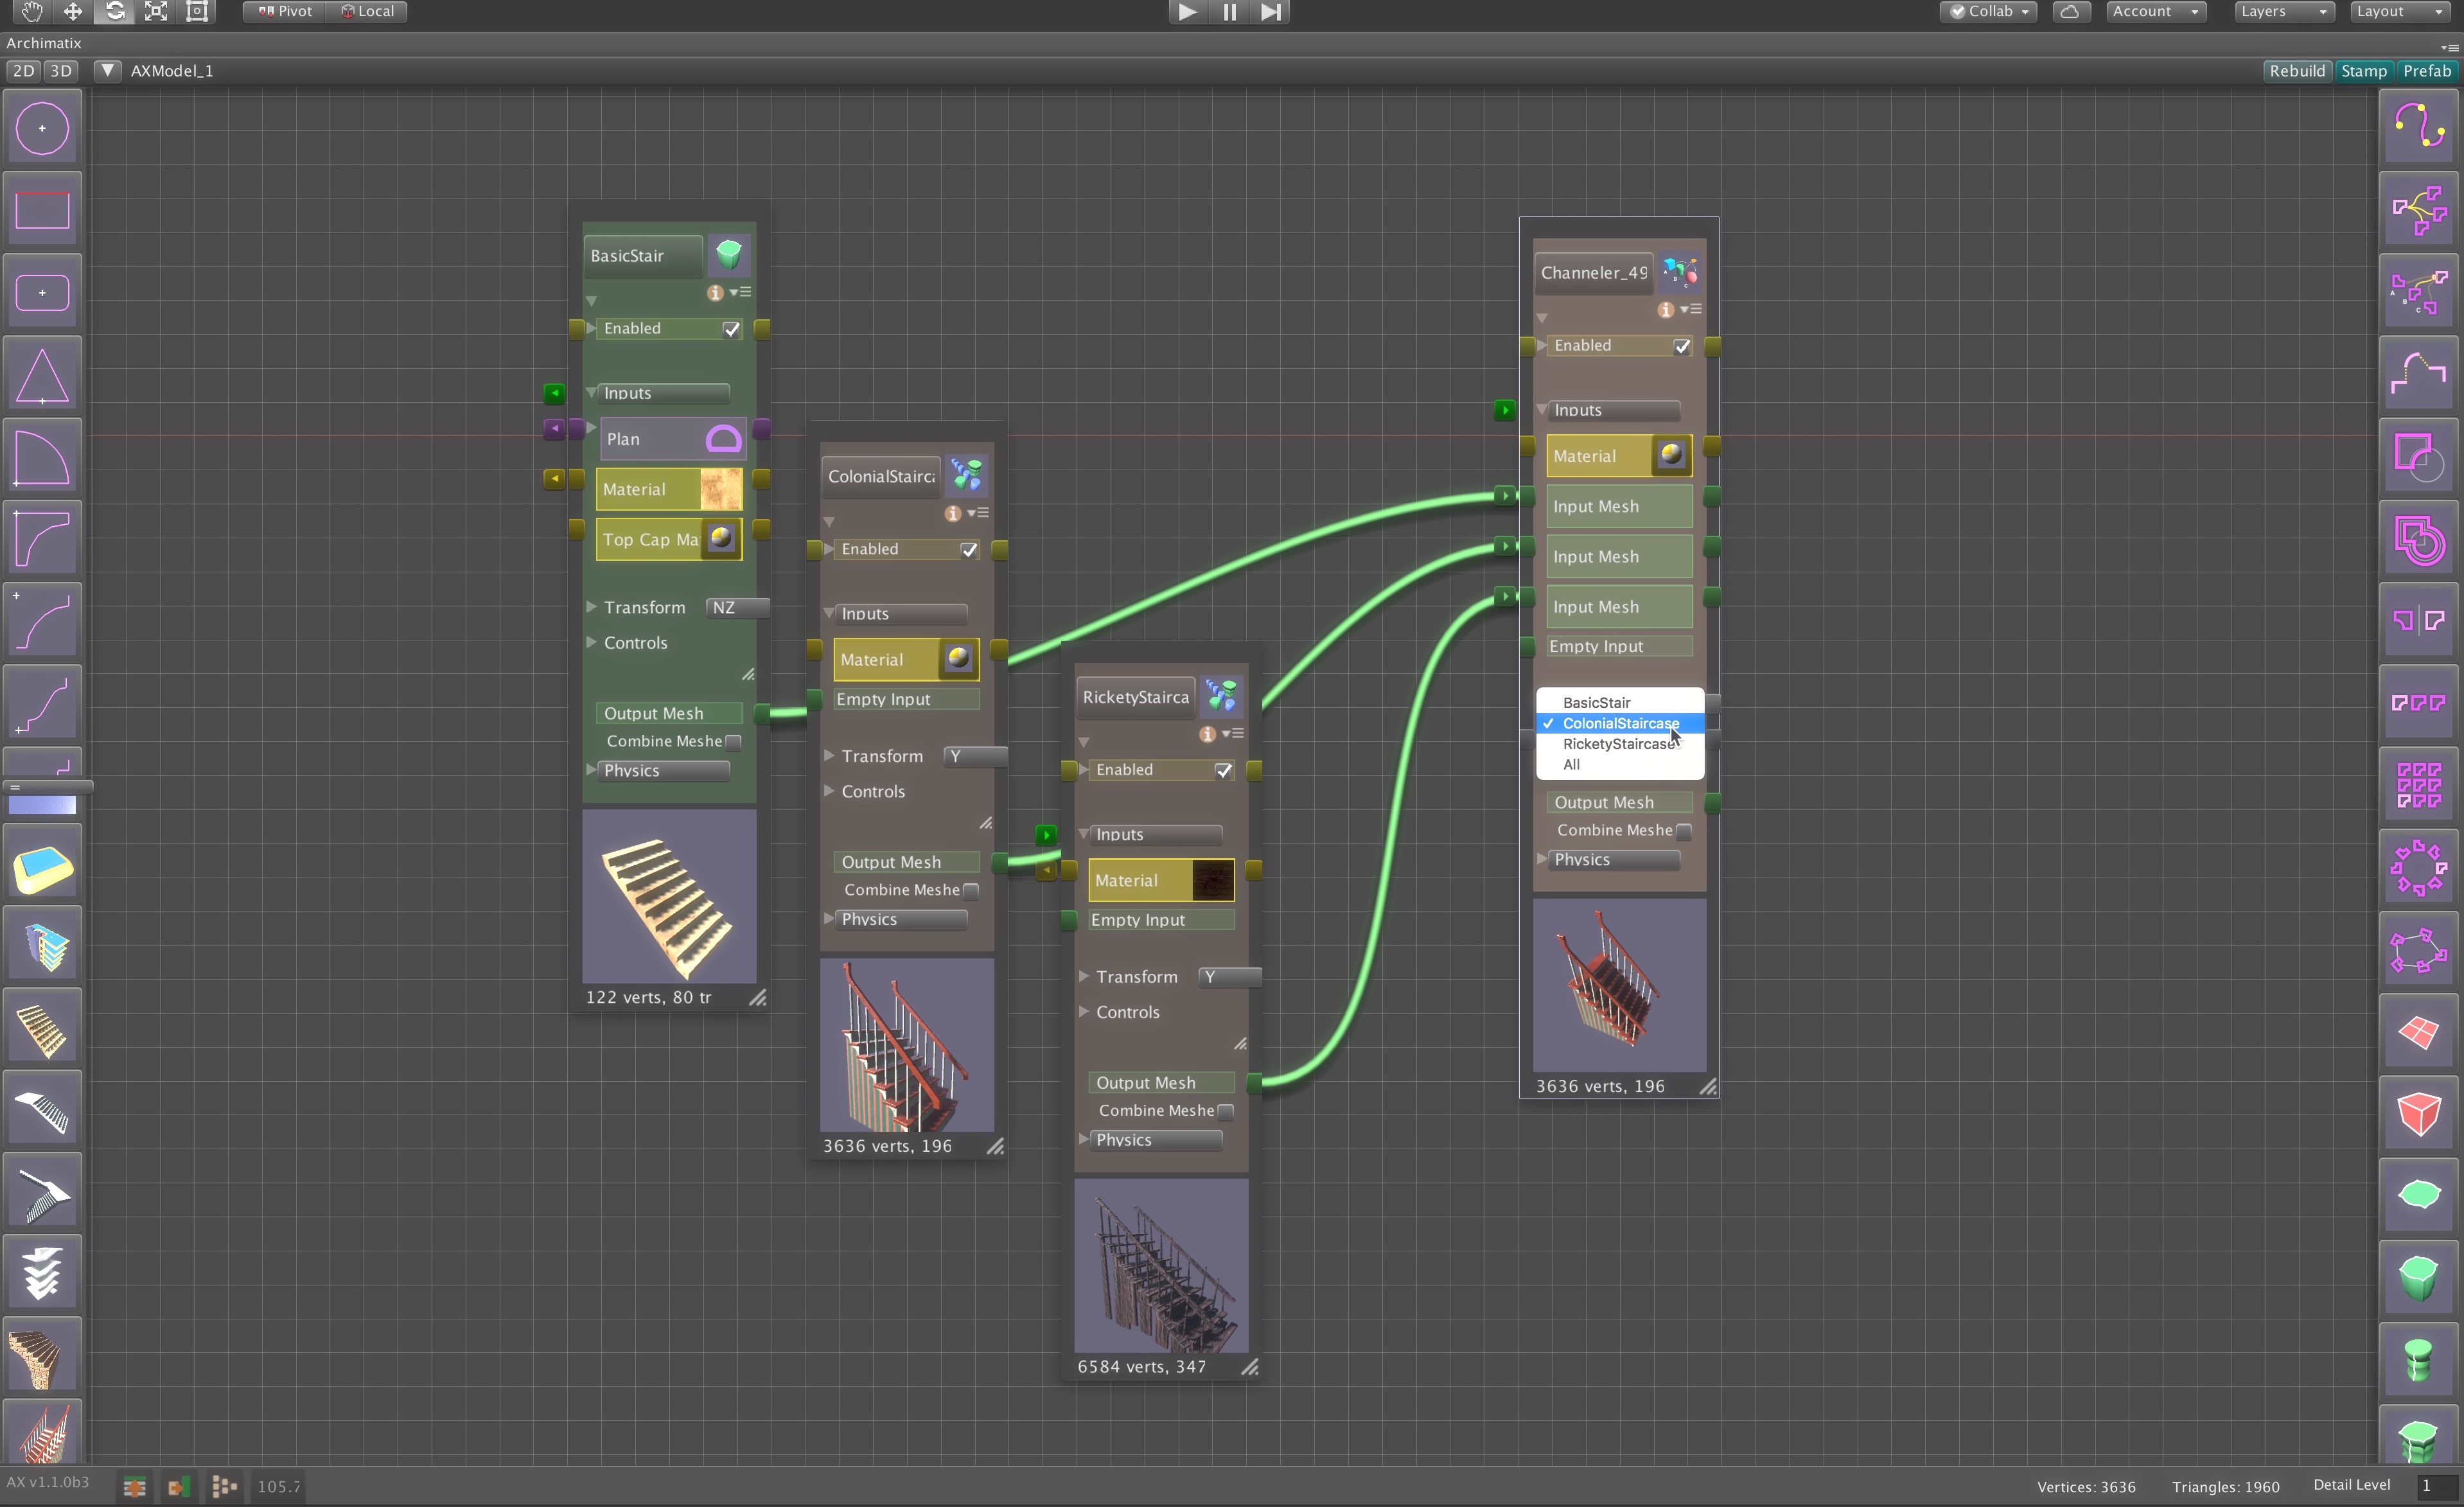
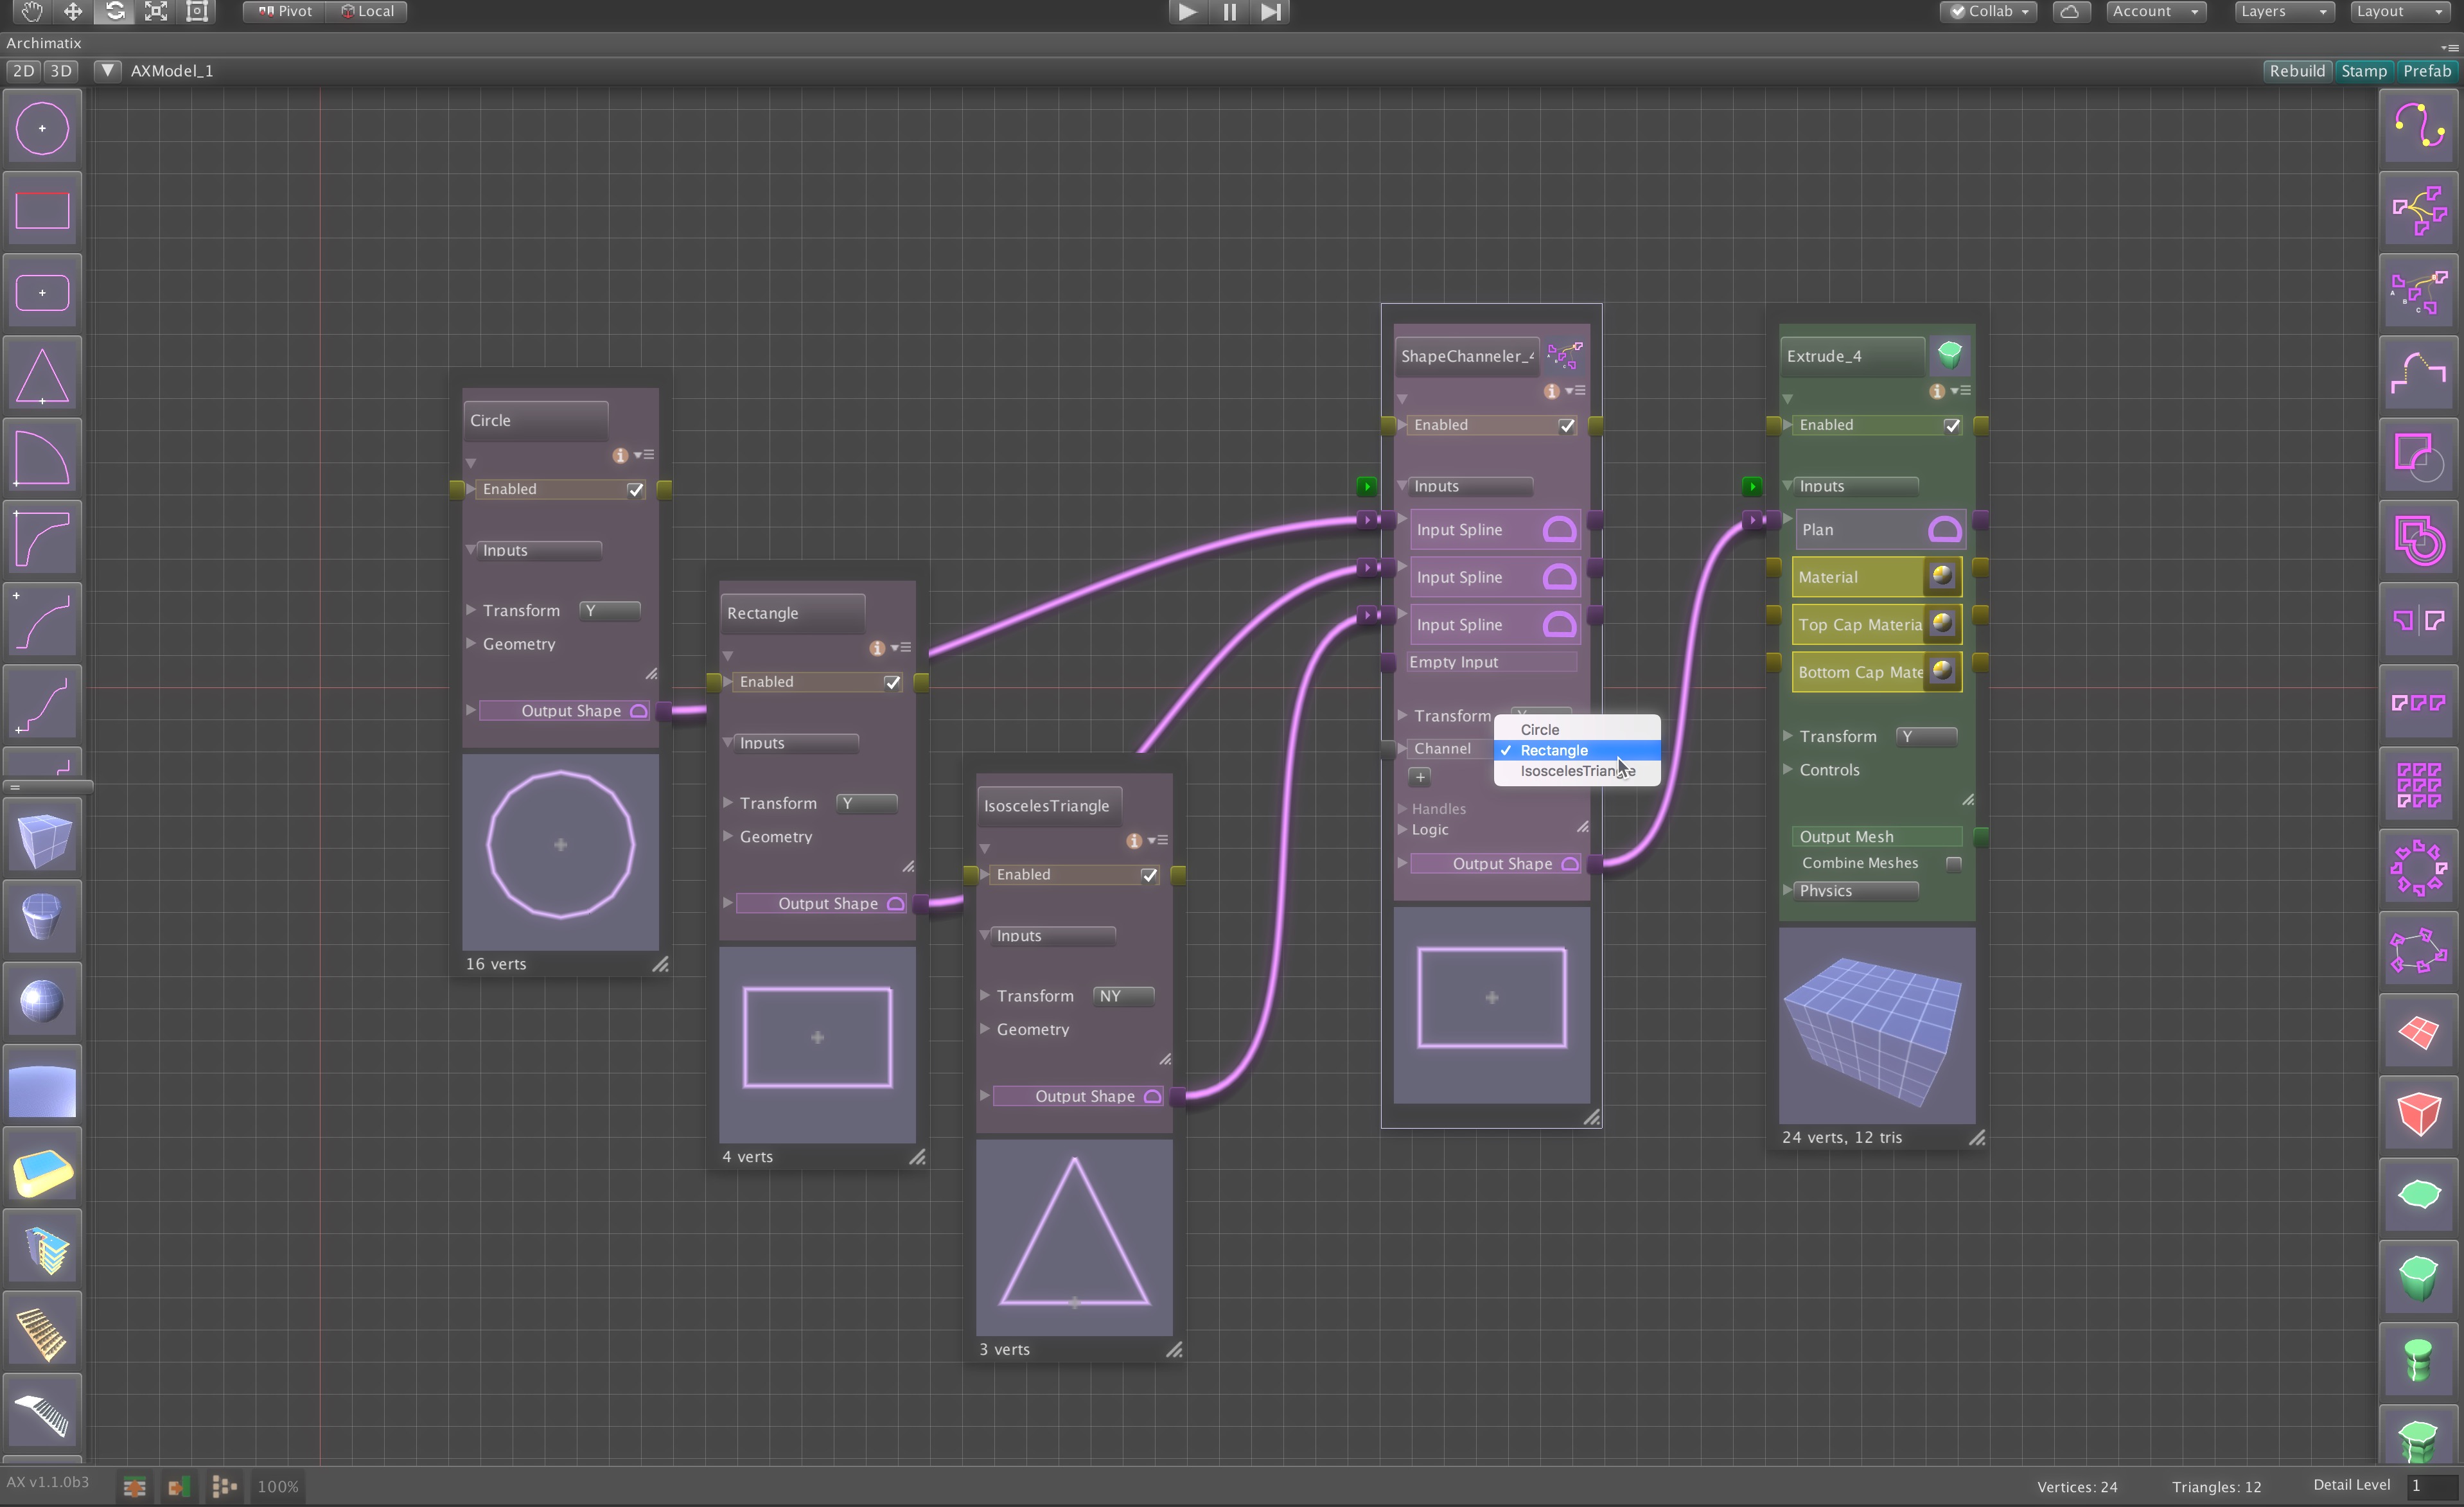
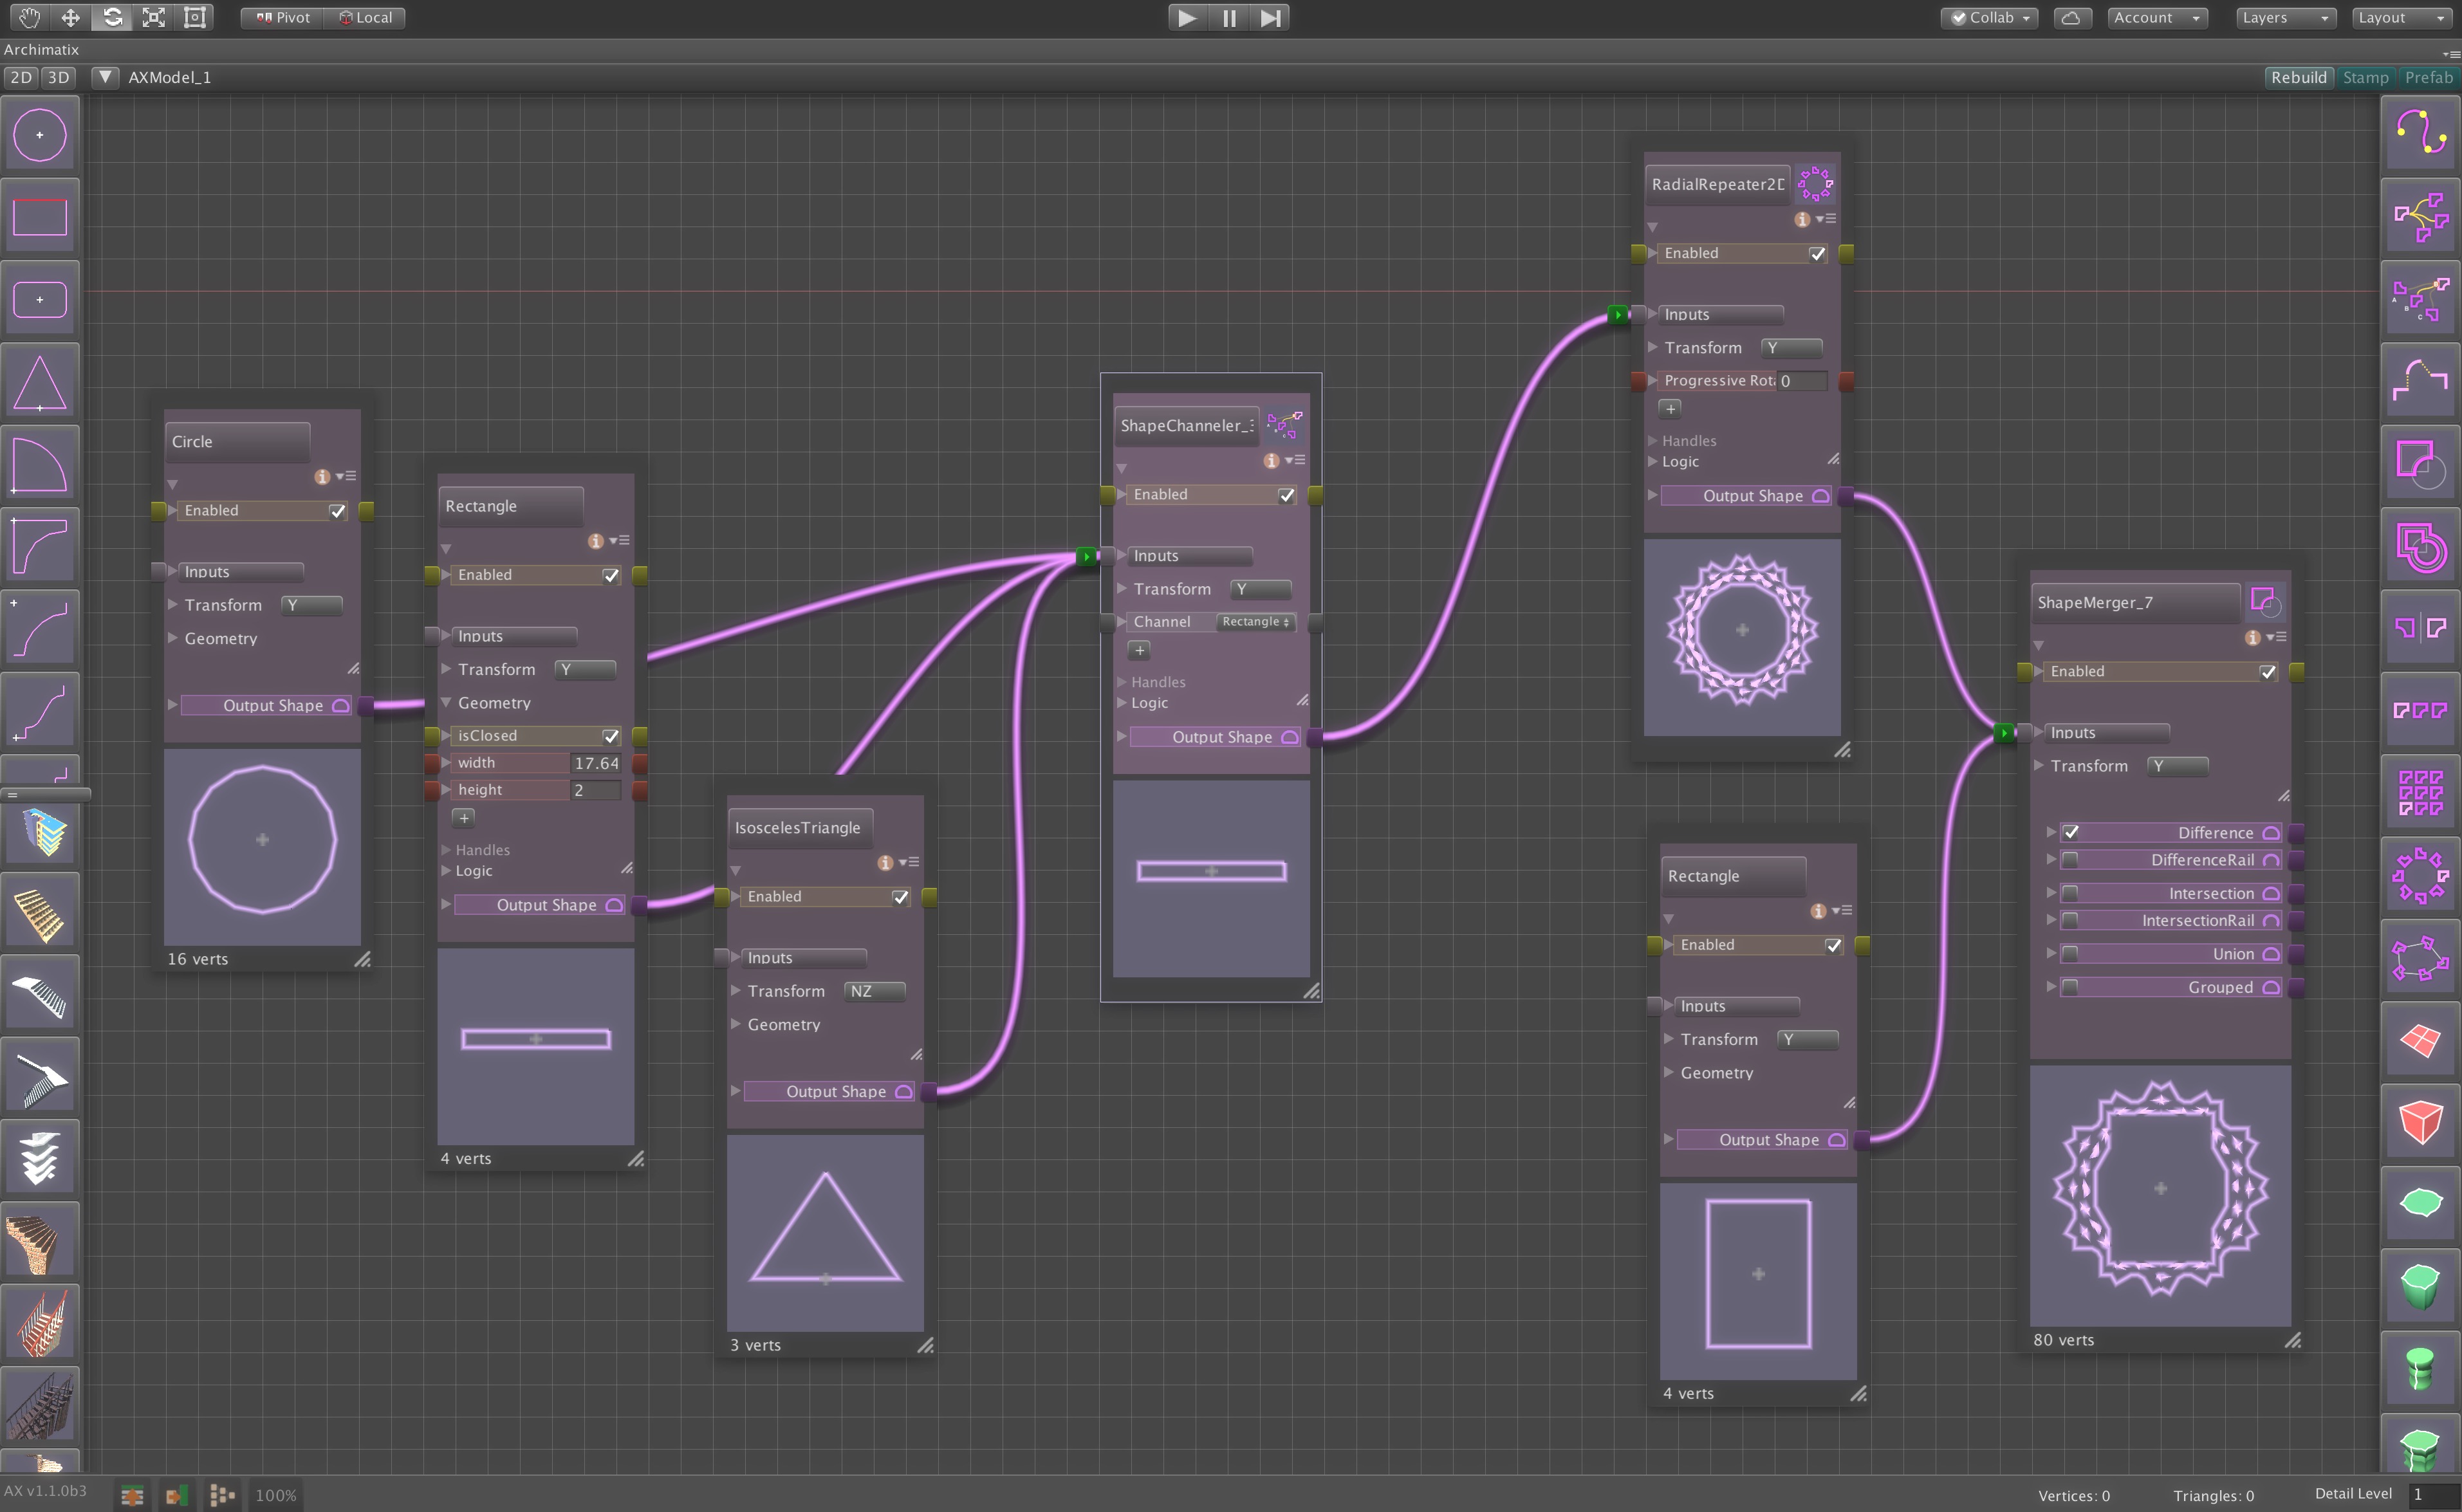
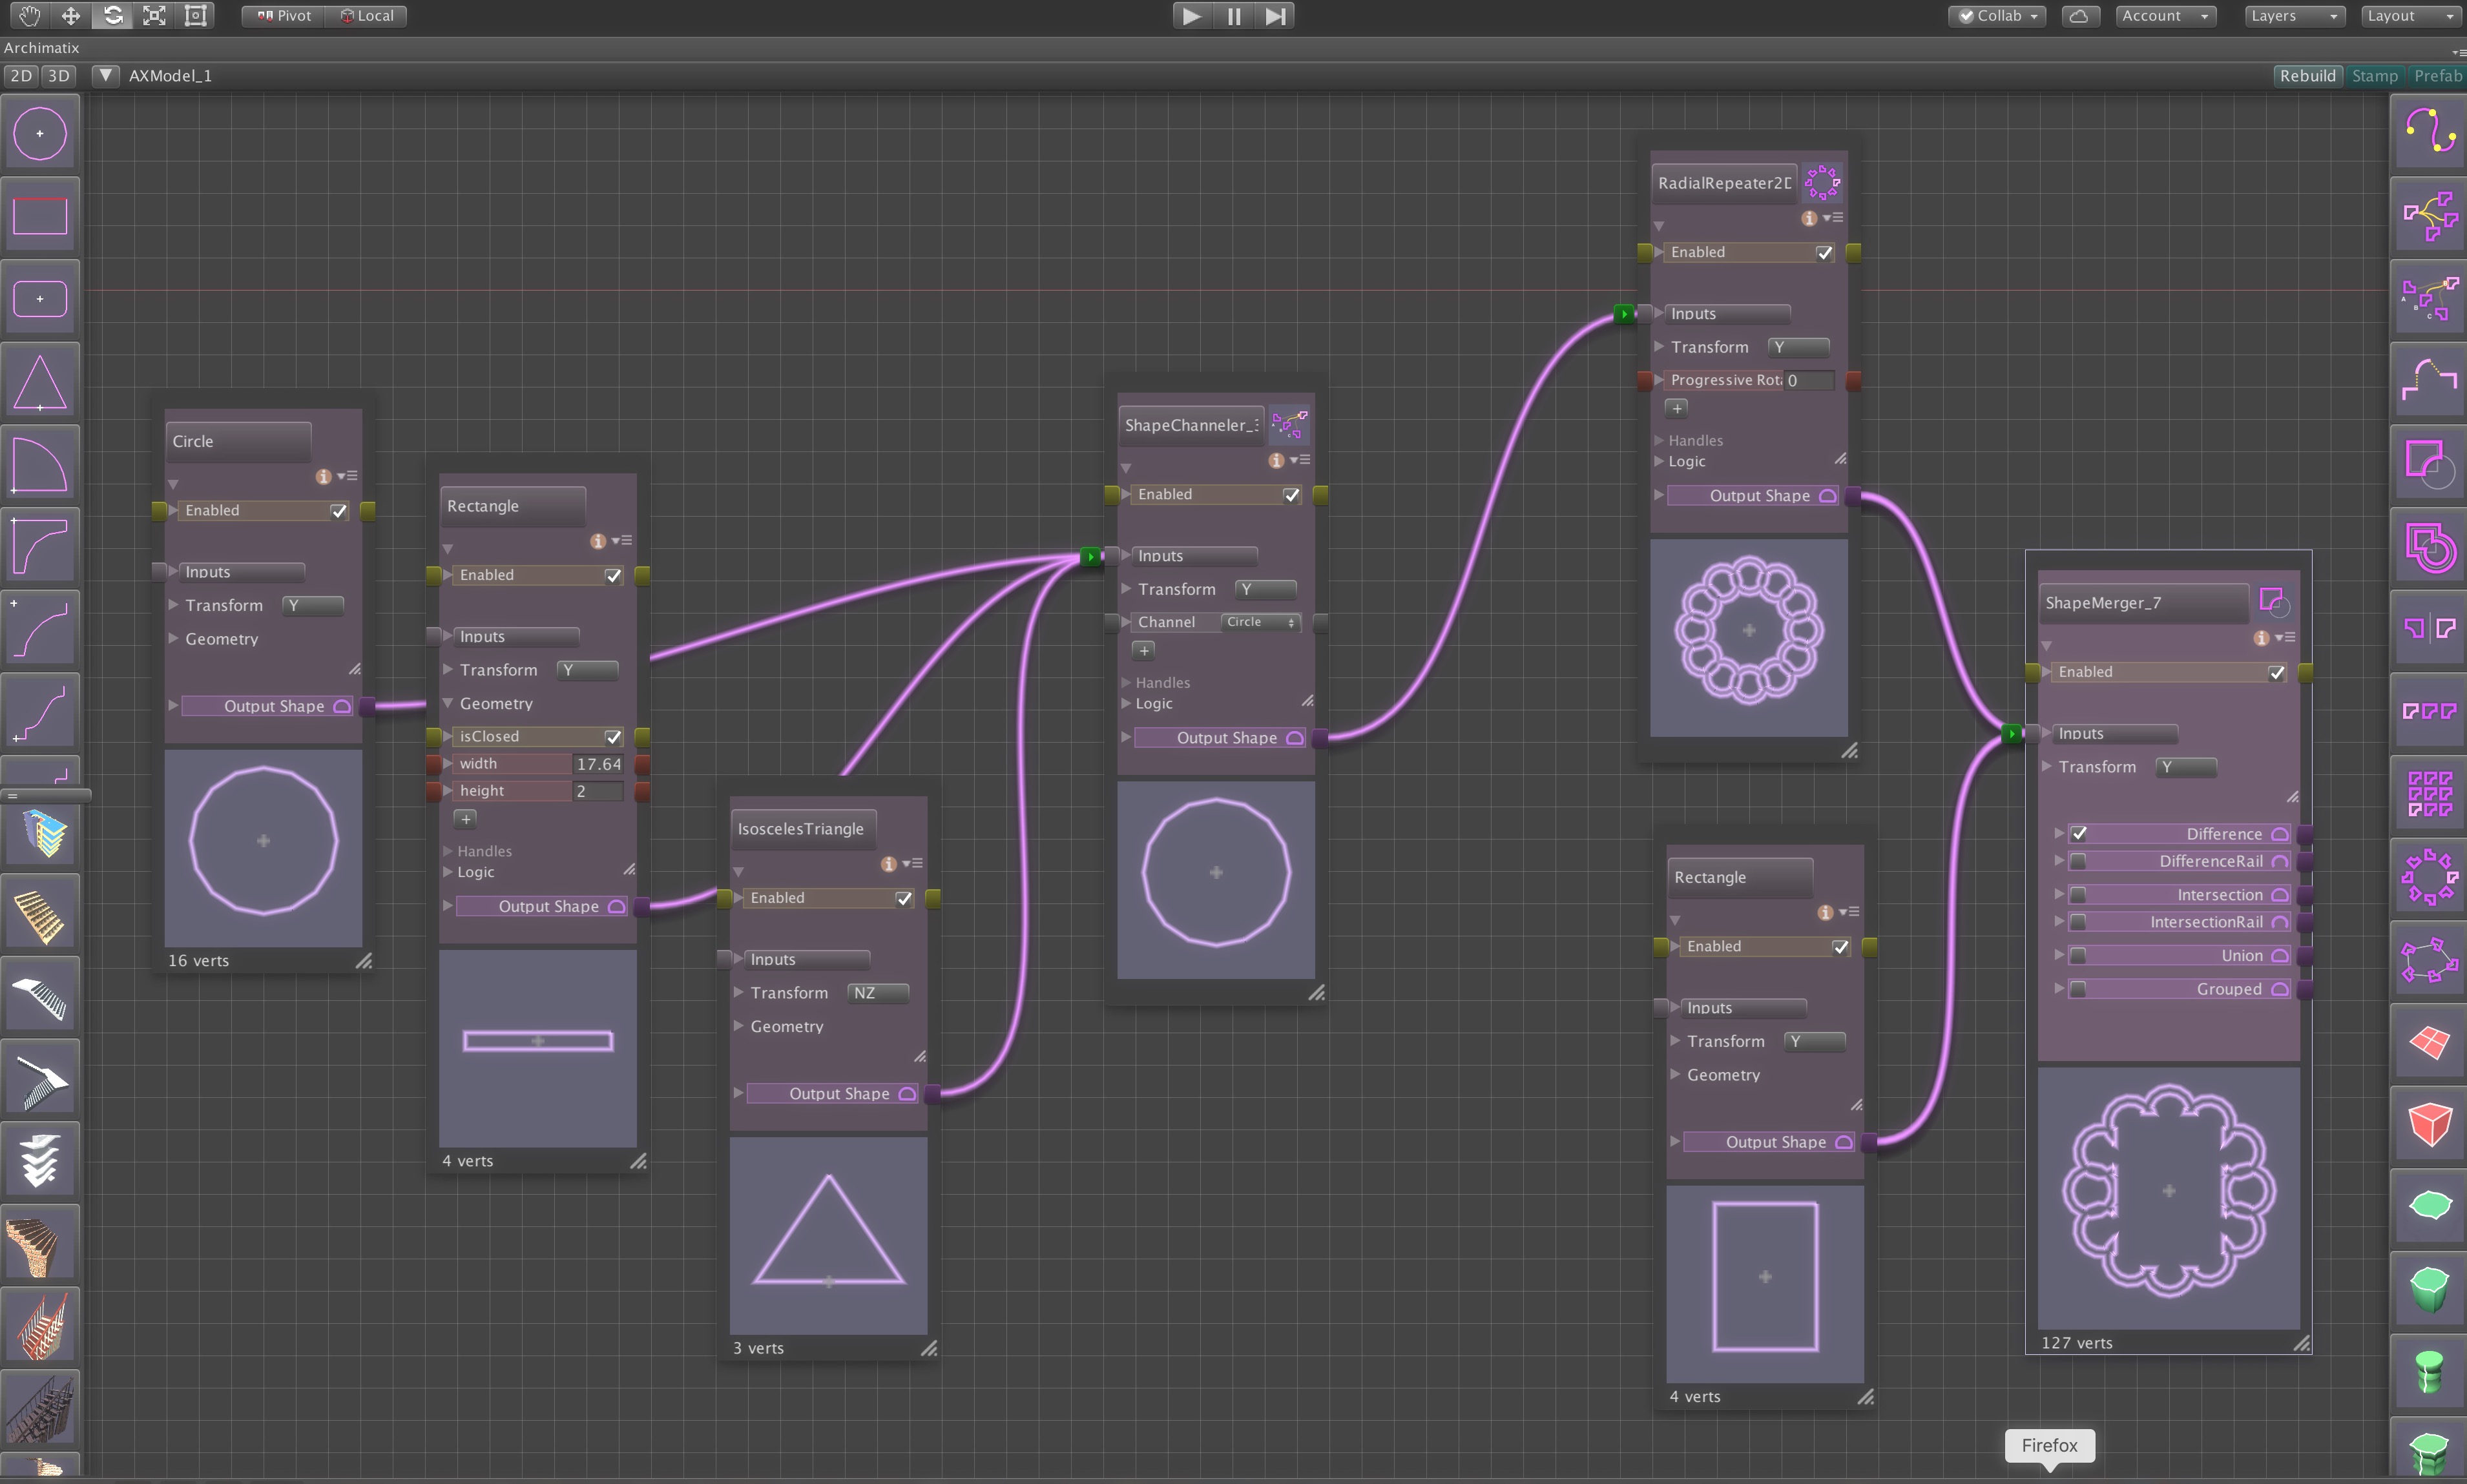
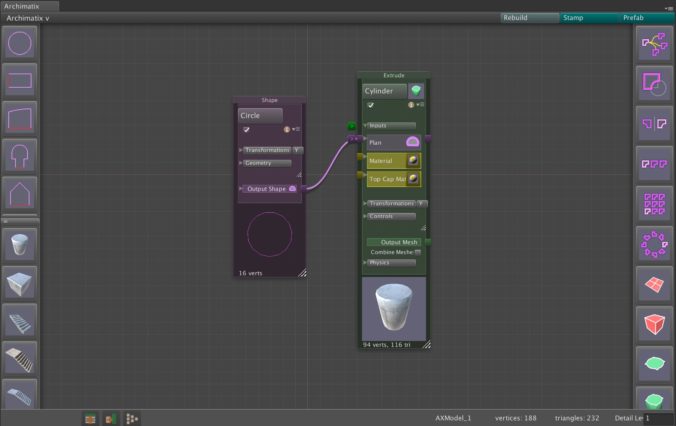
The ShapeChanneler node allows you to specify multiple shape inputs and provides a
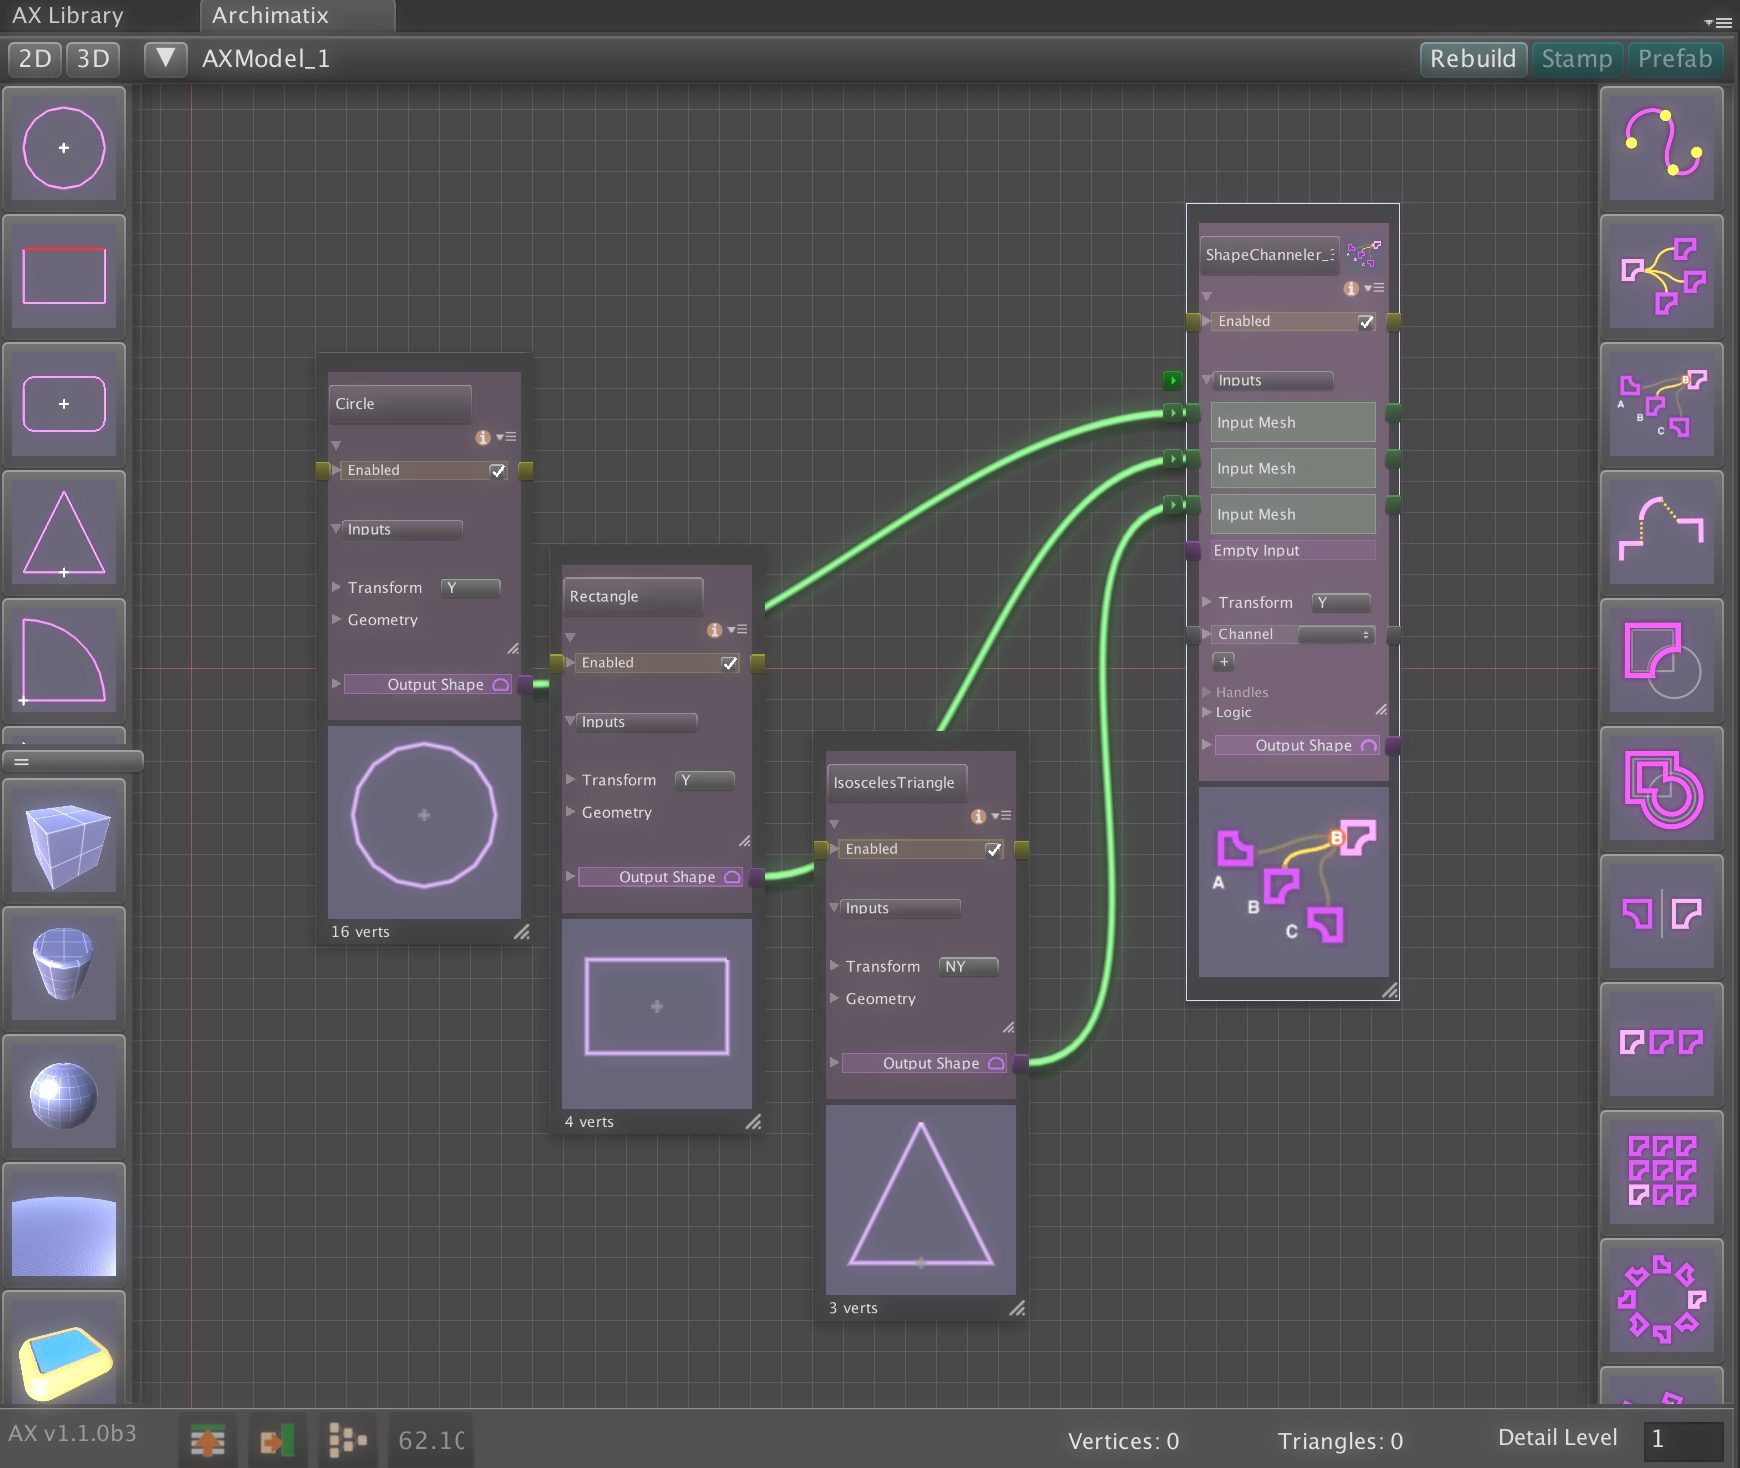
 Channel parameter that decides which of the inputs the node will output. In this sense, it is the 2D analogy of the Channeler node.

In the example below, we have three shapes that we instantiated from the 2D library sidebar. If we multi-select the the three shape nodes and then click the ShapeChanneler node in the right sidebar, the three shapes will be automatically fed into the node inputs. You may still add more nodes after that.

When you connect the output of the ShapeChanneler to another node, such as a ShapeMerger or a Mesher, only one shape will be passed to the downstream node based on the Channel setting.

In some ways, the ShapeChanneler shares some of the functionality of the ShapeDistributor, in that, it lets you swap shapes that propagate downstream. The difference is that the shapes are all ready to go and await their channel to be selected in order to become the output that the downstream nodes use.

The power of the ShapeChanneler becomes apparent in more complex graphs. Compare the next two images: in the first image, Rectangle has been selected in the Channel parameter and in the second image, the Circle has been selected:


The ShapeChanneler’s Channel parameter can be exposed as a runtime parameter so that you may allow your player to swap shapes in-game.


GrayShip

The Grayship tutorial is a great place to start learning Archimatix.  It takes you thought the modeling of a parametric spaceship. During the 20 minute video, you will learn to grab Shapes from the 2D library, extrude them, repeat them and group them using the Archimatix node graph editor. Once you parametric spaceship is done, you can easily stamp out variations to build your first Archimatix armada! You can also try the Grayship parametric model out in the WebGL demo to it it and a great preview of Runtime Archimatix.

Tutorials

The Grayship tutorial is a great place to start learning Archimatix.  It takes you thought the modeling of a parametric spaceship. During the 20 minute video, you will learn to grab Shapes from the 2D library, extrude them, repeat them and group them using the Archimatix node graph editor. Once you parametric spaceship is done, you can easily stamp out variations to build your first Archimatix armada! You can also try the Grayship parametric model out in the WebGL demo to it it and a great preview of Runtime Archimatix.

In addition to the tutorial videos in the menu to the right, check out  3D Lunatic Productions, who has been busy crafting some amazing additional video tutorials.

Node Graph Editor

archimatix-2016-09-08_09-30-33_am

archimatix-2016-09-08_09-30-07_am

The node graph editor is the graphical scripting window for Archimatix. Here is where you author the logic of your parametric model. You can connect parametric library items and functional nodes such as Shapes,  Meshers, Repeaters and Deformers to describe you building or prop in a way that let’s you play with it in the Unity editor or in runtime.

Anatomy of the Node Graph Editor

The Node Graph Editor window is organized as a canvas area surrounded by tool menus. To the left and right of the canvas are menus which are used to add nodes to the canvas. The left sidebar features items from the Archimatix Library. Theses items are divided into 2D and 3D items. The right sidebar displays functional nodes, nodes that take some input, process that input and then make the results available to other nodes through an output socket.

Along the top you will find model controls. The group address is a “bread crumb trail” that expands as you open subnode groups. The three buttons on the upper right give you options for model output. The “Build” of the model usually happens automatically when you complete a parameter change. The “Stamp” button creates a “frozen” version of the model that no longer needs Archimatix in the project. A stamped model can then be modified in other modeling packages such as ProBuilder or Megafiers. Finally, the Prefab button saves the model’s meshes to Unity’s AssetDatabase and creates a standard Unity Prefab. This Prefab is also “frozen” and no longer parametric

The bottom bar under the canvas features tools for cleaning up the graph, on the lower left, and provides quantitative feedback about your model, such as vertices and triangle counts, on the right.  To the far right is a Detail Level slider that lets you reduce the number of triangles that the model generates.

You will be using the Node Graph Editor window a lot as you create smart models with Archimatix. Take a moment to find a place to dock it.  It works well to have the Scene View window and the Node Graph Editor window the same size and side by side. The image on the right provides an example layout suited to modeling with Archimatix.

Parametric Shapes

Parametric shapes are the heart of Archimatix modeling. Much of the form generation in real architecture is defined by shapes that are then extruded, swept and repeated. In this sense, architectural forms are a departure from sculptural forms such as organic bodies, automotive forms or geological formations which are more topological in nature and best model with 3D booleans and sculpting tools found in Maya and ZBrush. Much of architecture, on the other hand, can be described digitally using plan shapes and section shapes. In Archimatix, plans and sections are usually parametric shapes.

A parametric shape is a 2D form that is generated by a certain geometric logic and sized by input parameters. A simple but common example of a parametric shape is a circle, which is defined simply by a single parameter, the radius. The full description of a circle at runtime in Unity is a set of vertices that are in its circumference. Depending on the detail level, there may be dozens of vertices. But for the person using a circle for modeling, the radius parameter is a convenient way to think more abstractly about the shape.


More examples of parametric shapes, such as the ArchShape can be found in the Archimatix 2D Library. Many of the parametric shapes that ship with archimatix are listed in the sidebar to the right.

To create your own parametric shapes, you can start with an empty Shape node and code your own logic for the geometry using parameters you define yourself.


What is Archimatix?

Now in the Unity Asset Store!

Archimatix is a powerful node-based parametric modeling extension for Unity that helps you quickly create mutable props and rich, variable environments.

A strong feature of Archimatix is its non-destructive, realtime and runtime editing, which makes environment-building a joy. Have you ever made a decision early in your design process and later regretted it? For all of its benefits, the drawback with destructive modeling is that the further you go on a project, the greater the cost to make a change. Yet design is an iterative process. So what if you could turn back time and transform that circular plan into a rounded rectangle with just a few simple strokes and no remorse, letting the change ripple through the project? Archimatix lets you do this, since each stage of the logic can be manipulated at any time, generating new variations with ease.

LighthouseBase is among the library items that ship with Archimatix, fully interactive and ready to use in your game!

The LighthouseBase model that ships with Archimatix, for example, is primarily generated by two shapes in plan, a Circle and an I-Shape. Simply manipulating the scene handles for these two shapes modifies the all the forms that depend on them.

If you have never tried parametric modeling, don’t worry, its not that hard to pick up. Although it is quite different from brush-based modeling, or topological modeling, where you directly manipulate vertices and faces, with parametric modeling you can manipulate relatively few handles or gizmos that alter the entire mesh in smart ways.

Archimatix was released in March 2017 and has enjoyed robust sales and superlative reviews from both artists and coders alike. As one reviewer aptly put it, Archimatix is “modeling software at the intersection of art and algorithm.”


Not only is change at any point in the creative process possible, but serendipitous creations often come out of time spent rigging up the logic of Archimatix assemblies using the visual node graph editor: That stadium you thought you were building may become a distinctive spaceship with the addition of a few nodes and some random slides of parameter variables, as what happened with the production of RedShip, below.

Archimatix uses its architectural smarts to amplify your creative ideas; its logic is at your fingertips via the visual scripting of the node graph editor. To see the logic at work from the get-go, Archimatix ships with dozens of example models.  The real value of these example models is that you can see their node graphs, and learn how they were rigged up. You can also simply modify them using scene handles, or use them “as is” in your games.

You can also roll your own parametric objects that are specific to your art direction. Archimatix features a node graph editor that puts all the power of modeling logic right at your fingertips. No coding required! In fact, with Archimatix you can create fantastic spaces and extensive realms with relatively few generative building blocks that are simple in nature, but can become quite expressive when linked together in the graphical node editor. The Circus below was modeled with only ten nodes.

What also makes Archimatix unique among other fine modelers available in the Asset Store is that it “thinks” architecturally – in plan and section, which, to architects, are the essential 2D shapes needed to form rich 3D spaces. Archimatix features powerful 2D shape manipulation tools that are not found in external modeling applications. These tools include shape merging (2D boolean operations), offsetting, thickening and rounding. When the shapes interact to form meshes in realtime, the results are magical. For example, sliding a Circle shape around the plan of a fantasy villa regenerates walls, window openings, railings and any other architectural elements that are dependent on the Plan shape of the building.


Senate 17


Get in touch with your inner architect and let loose the Unity3D level designing hero within!


Voila_Capture 2014-07-06_01-12-53_PMEquatorial Hall of Heroes   Voila_Capture 2014-07-06_06-04-29_PMCome to the Palladian Villa!


Stair 2014-07-21_11-32-49_AMThe Ministry of Robots


Stair 2014-07-21_10-41-41_AMAncient Spaceport

Stair 2014-07-22_02-40-36_PM The Old Machine [triangles3150 , modeling time: 8 mins]

© 2024

Theme by Anders NorenUp ↑