Month: September 2017

Parameter Relations

An important aspect of Archimatix is the ability to build relations between parameters. There are two ways to designate relations between parameters: 1 inter-nodal connections, and 2. parameter expressions.

When one parameter is related to another, they can work together, i.e., when one parameter in the relation is modified, another  parameter will be modified as well based on a relation expression that determines the nature of the relationship.

For example, as a designer, you may want to designate the height of a building column to always be equal to the height of the ceiling beam. Once this relation is set up, then you can move beam up and down, and the column height will adjust itself to be identical to have height identical to the vertical displacement of the beam.

In the above GIF, we first translate the beam up and down, observing the height of the column to match it. Then with the beam still selected we modify its length, which is not related to any other parameters at the moment. Finally, we click on the column and adjust its height, observing that the beam is also being translated in the Y-direction to match.


Inter-nodal Parameter Relations

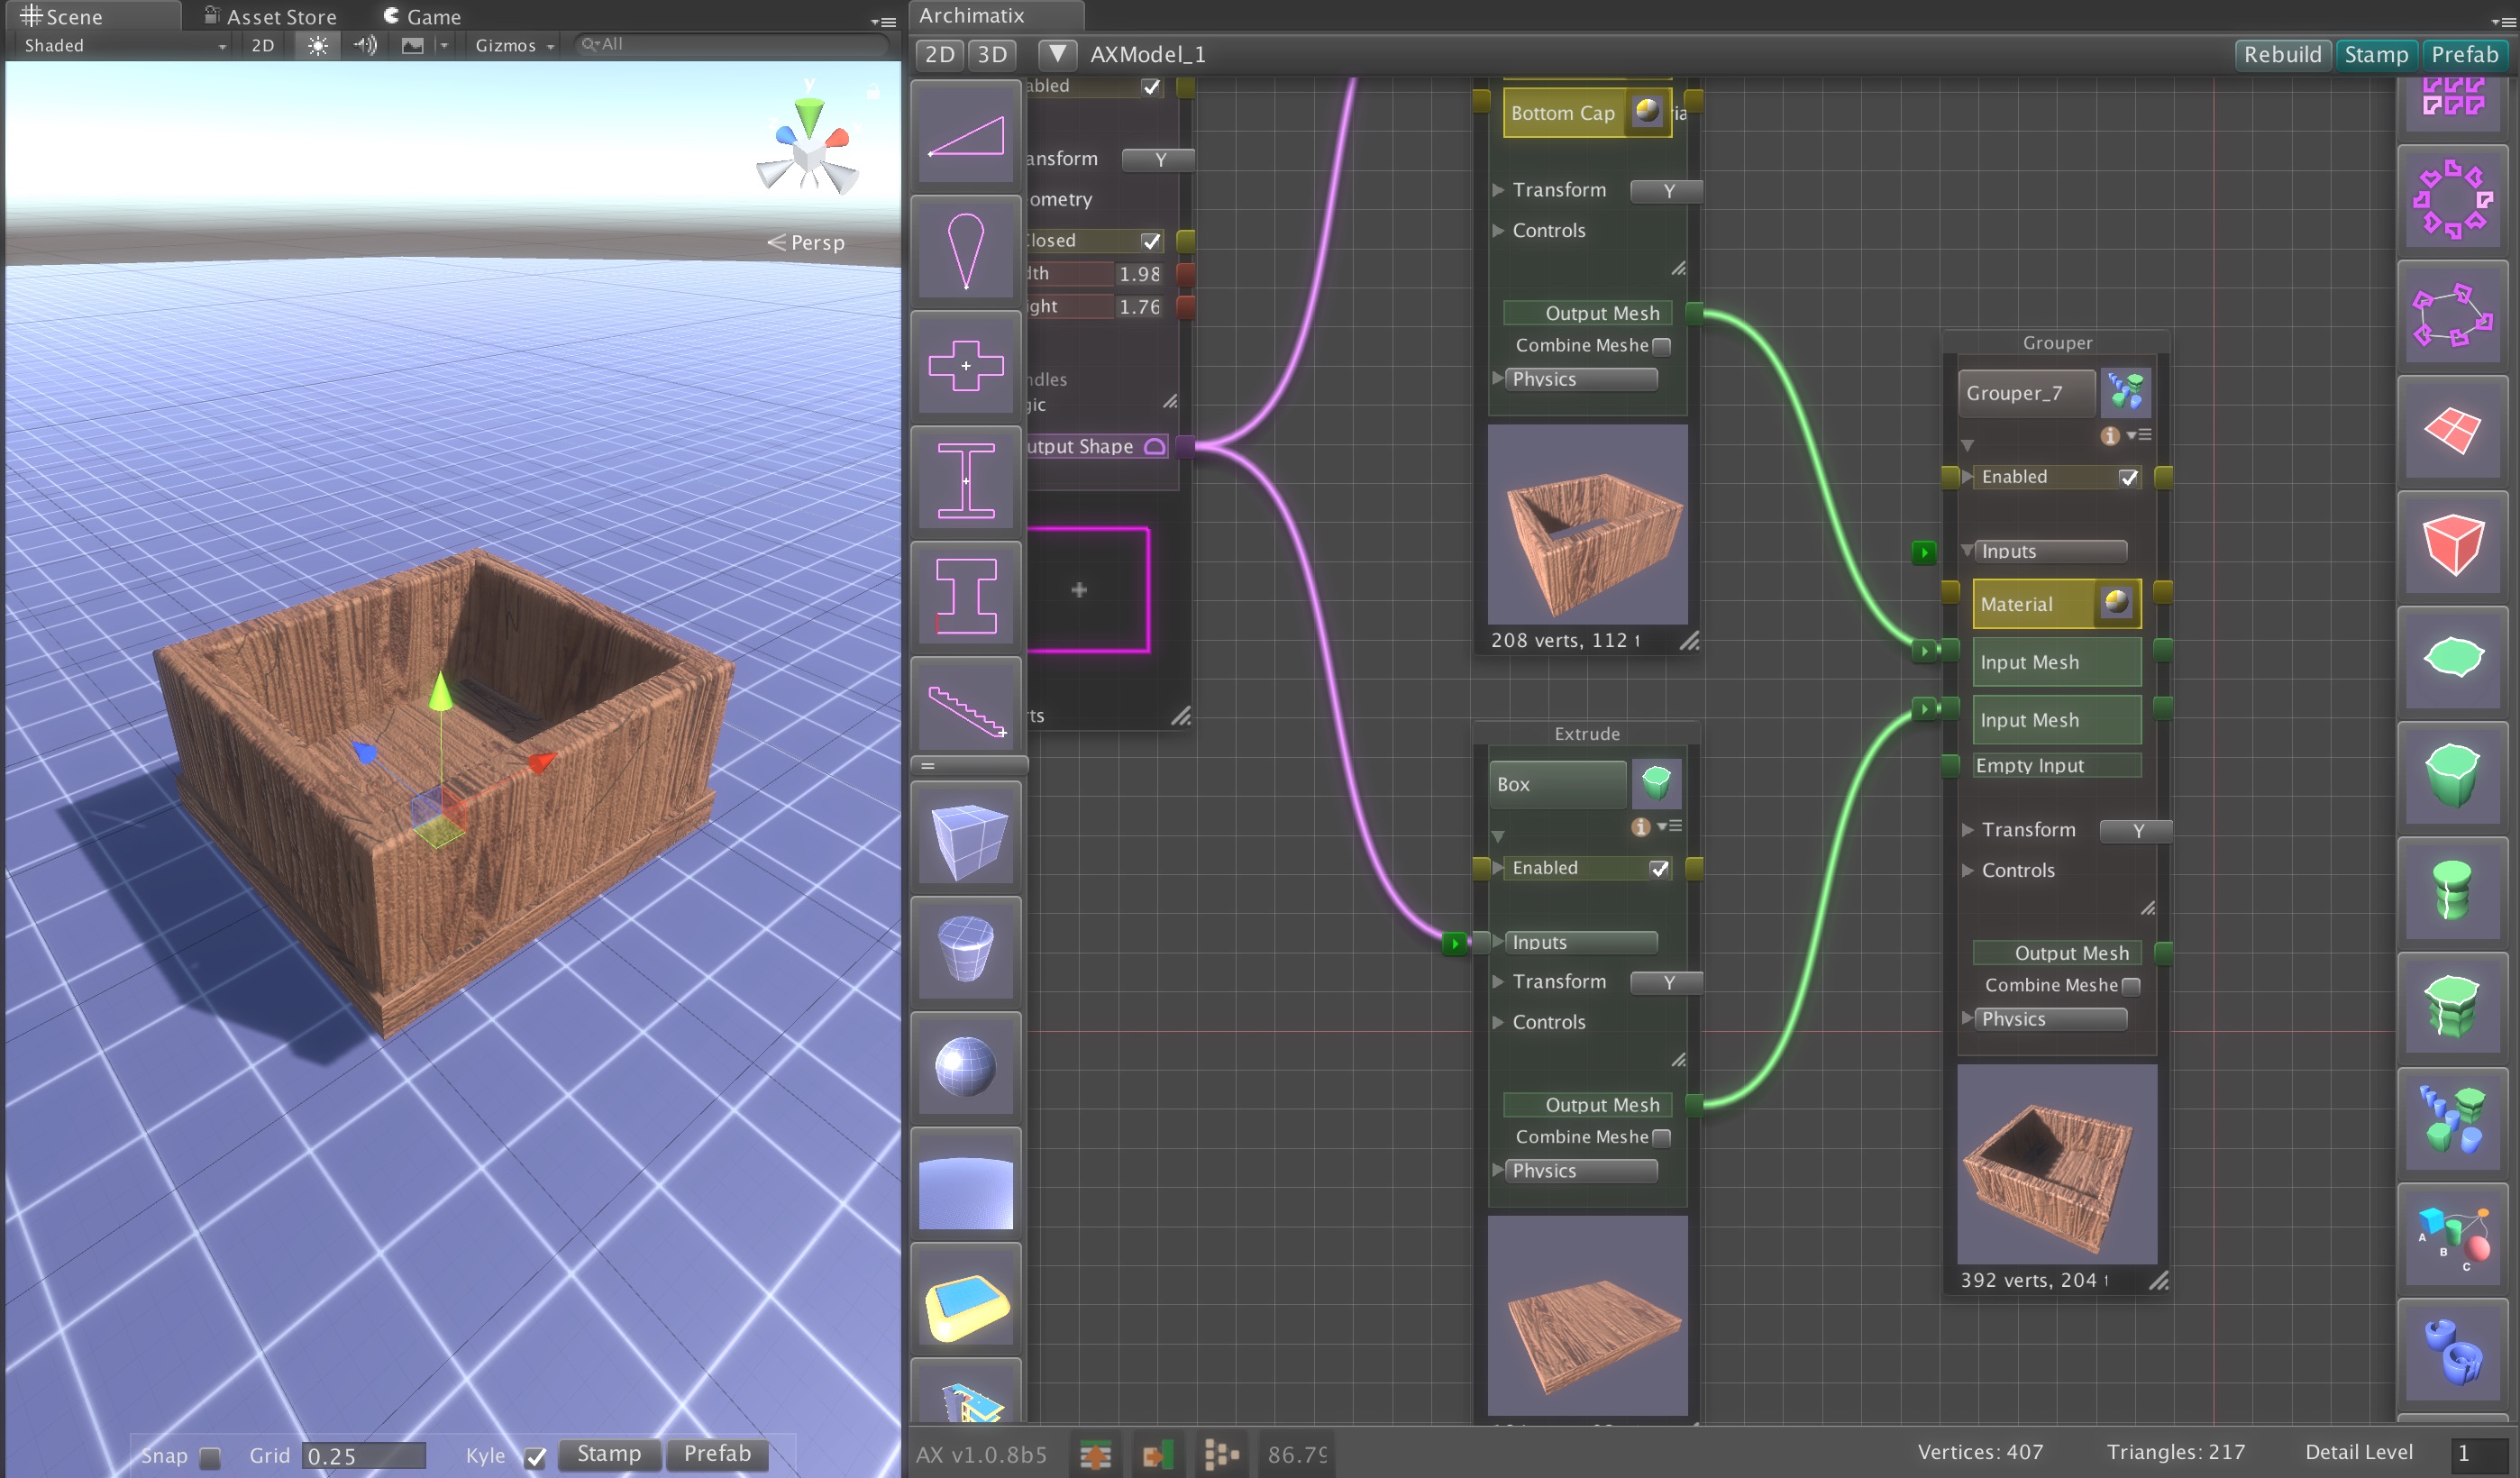
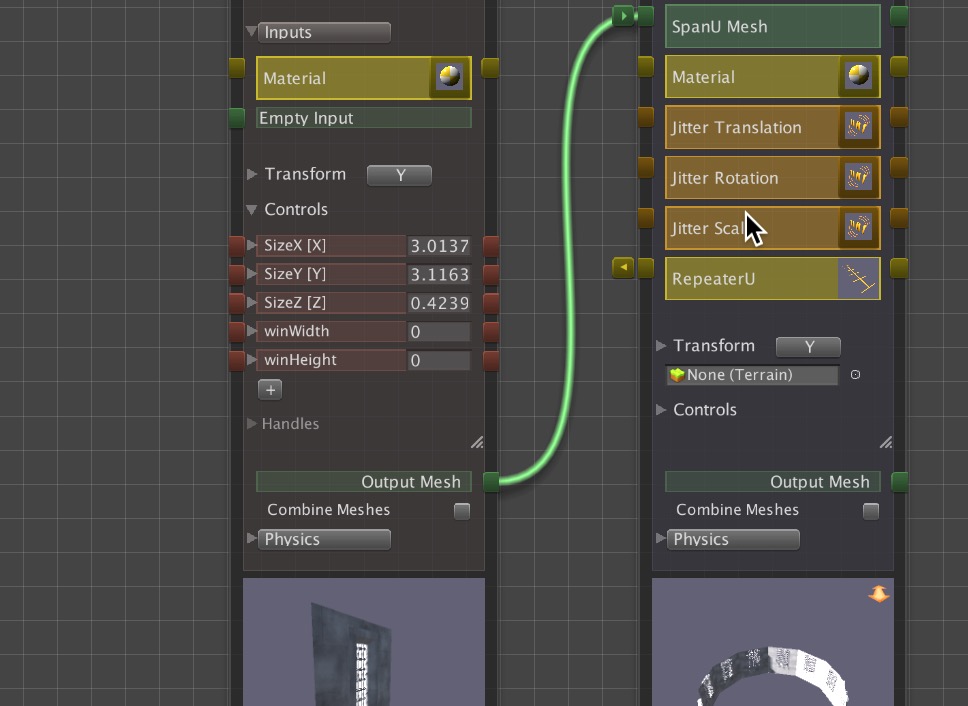
This is an inter-nodal parameter relation that connects the TransY parameter of the beam to with the height parameter of the column Extrude, as show in the figure below.

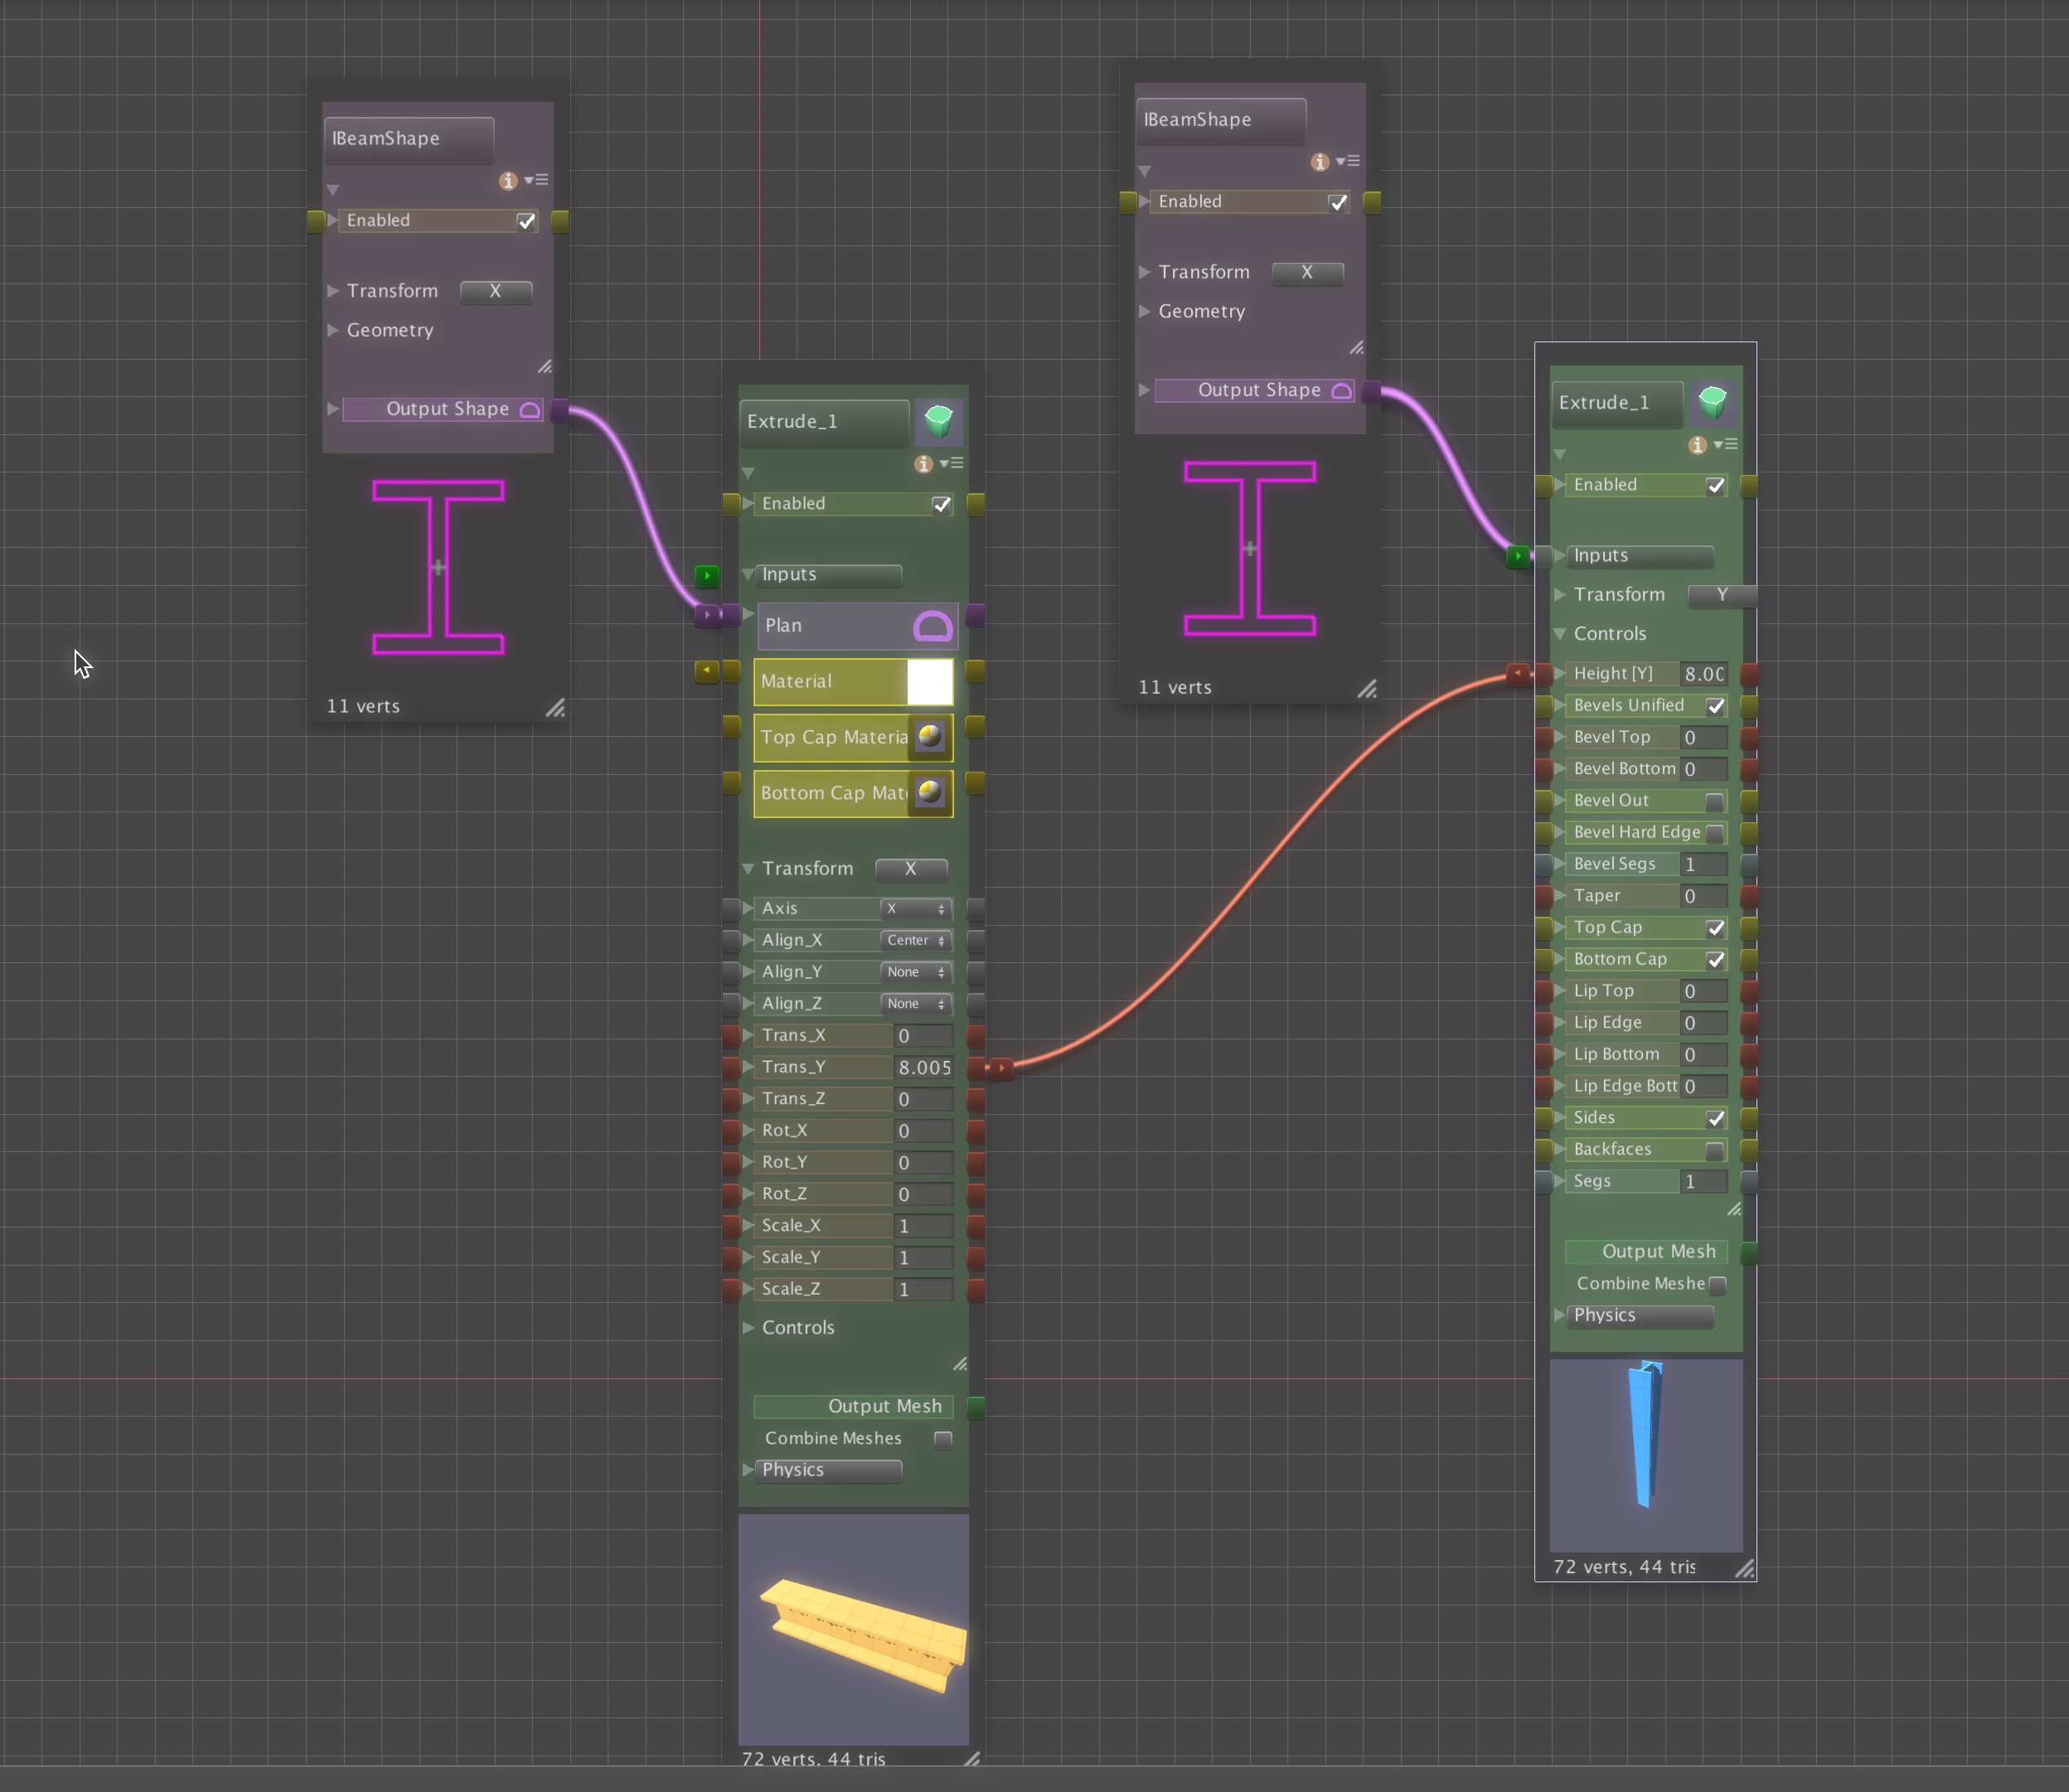
By simply connecting these two parameters we have related them as equivalent. But what if we want them to be proportional in some way rather than equivalent? For that, we would need to edit the default expressions for this relation.


Relation Expressions

The nature of the relation can be described with a mathematical expression. In the simple equivalent relation above, the default expression is not too intimidating mathematically. We can take a look at it by clicking on the red connection cable between the the two parameters.

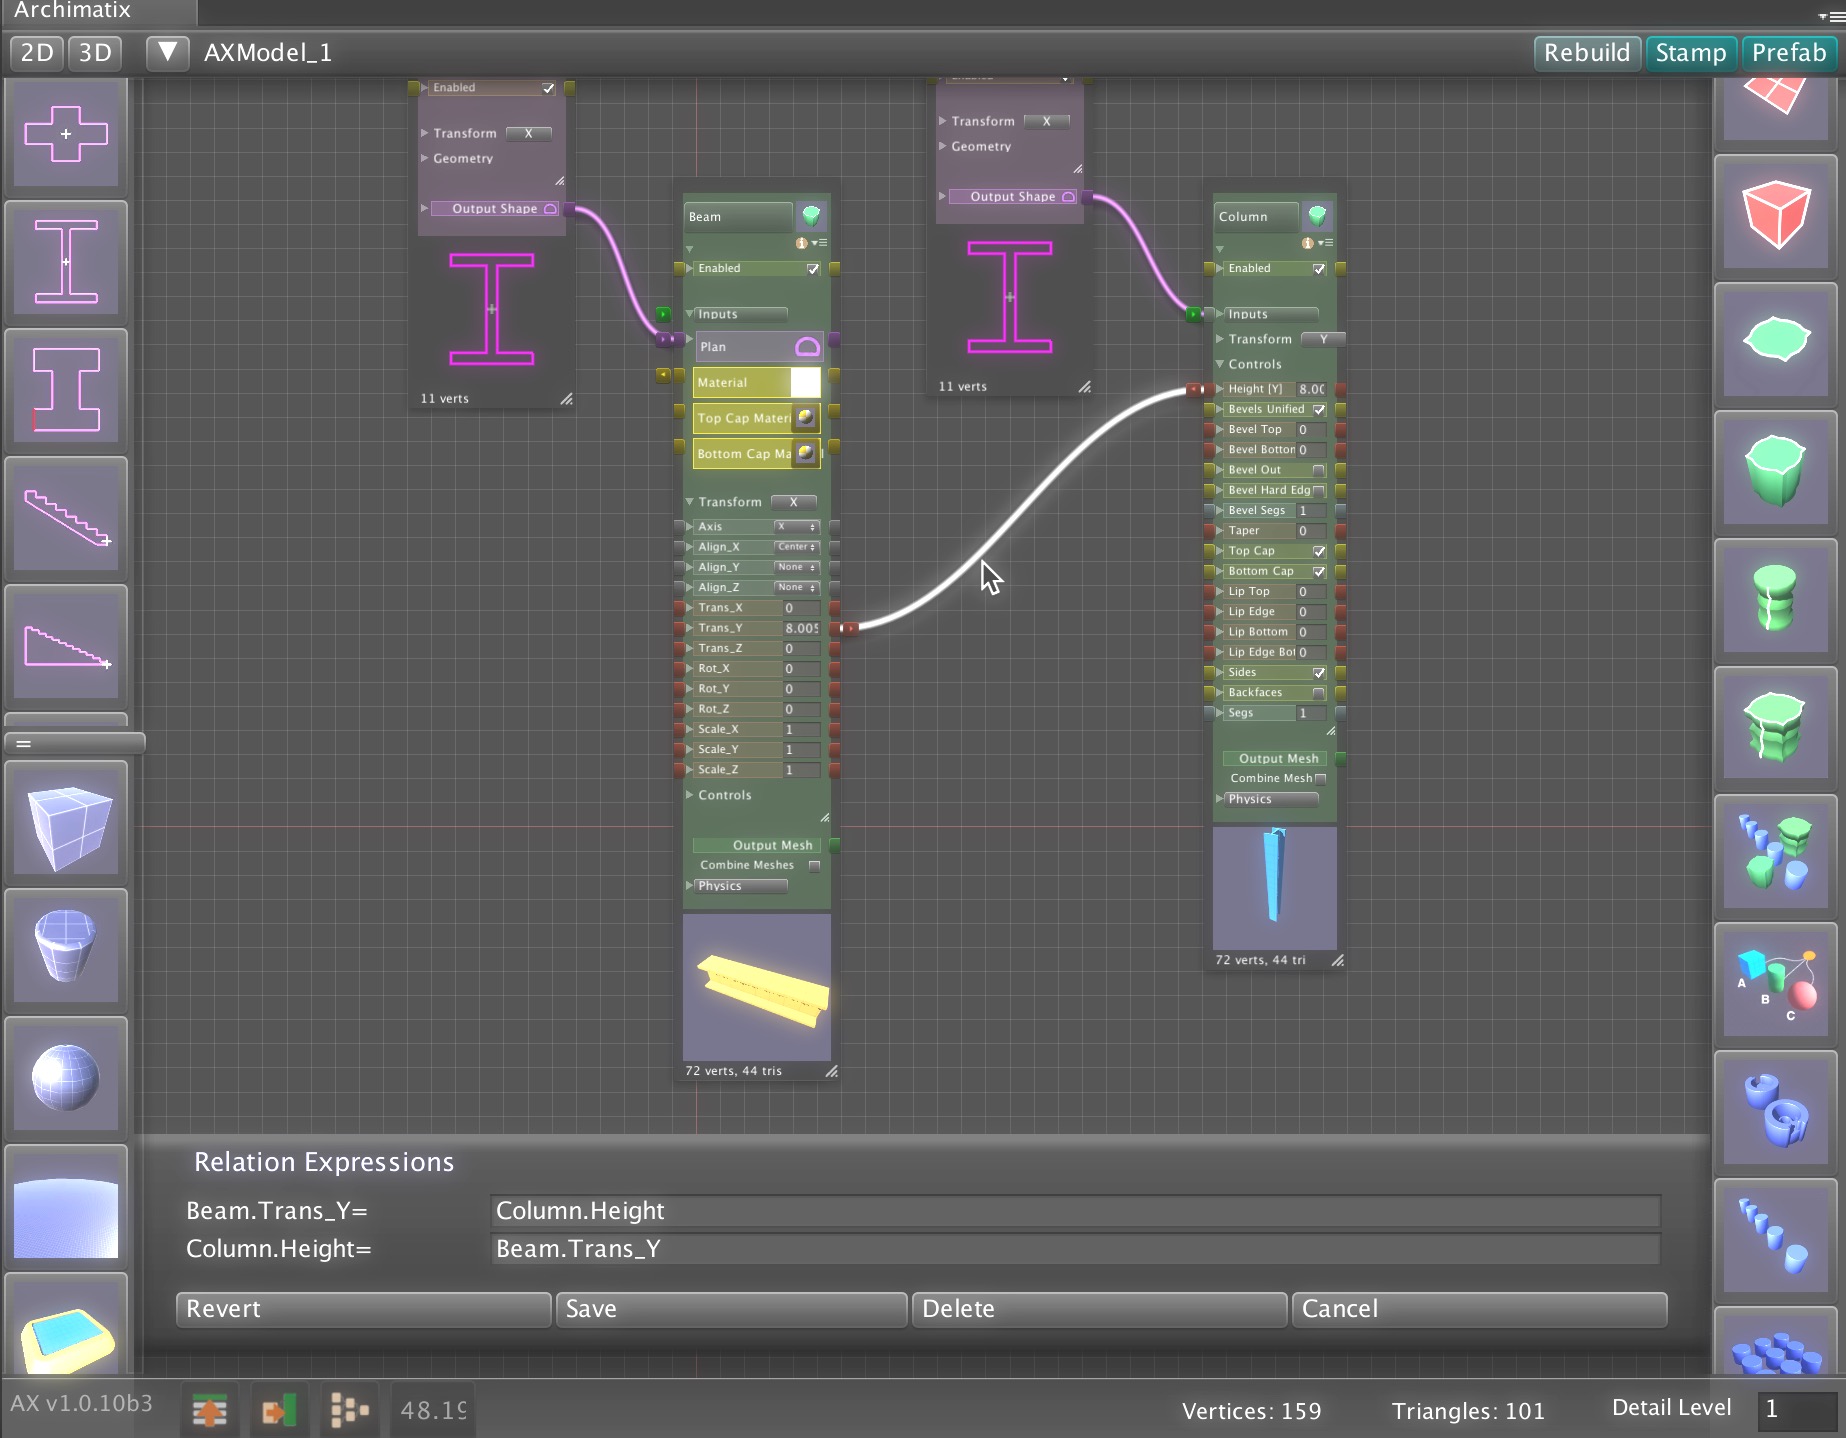
While the connection is selected, an expression editing box appears at the bottom of the node graph window. As we can see, the parameters are simply equal. We can modify these to something a little more complex.


Bi-direction Relations

Archimatix allows bi-directional flow in parameter relations. What facilitates this is that each inter-nodal relation provides for two expressions. The top expression, in the figure above, defines what happens to the Beam.Trans_Y when the Column.Height is modified. The bottom expression defines what happens to Column.Height when Beam.Trans_Y is modified.

While these expressions look identical, technically they are reciprocal. The key to bidirectionally is taking the time to author these dual expressions that are often, but not necessarily, reciprocal. The benefit to bi-directionality is that you don’t have to know which object is driving the other. You can simply click on any object of handle in the scene and start modifying, and the logic of the model will take care of everything. Most parametric systems do not feature this, leaving the user of the model to have to find out which object is the driver and which object is the slave.

If you do not want bidirectionally, you can always leave one of the expressions blank.

If we wanted a proportional relation here, we might edit these expressions to define that the beam should always be welded to  4/5 the height of the column.

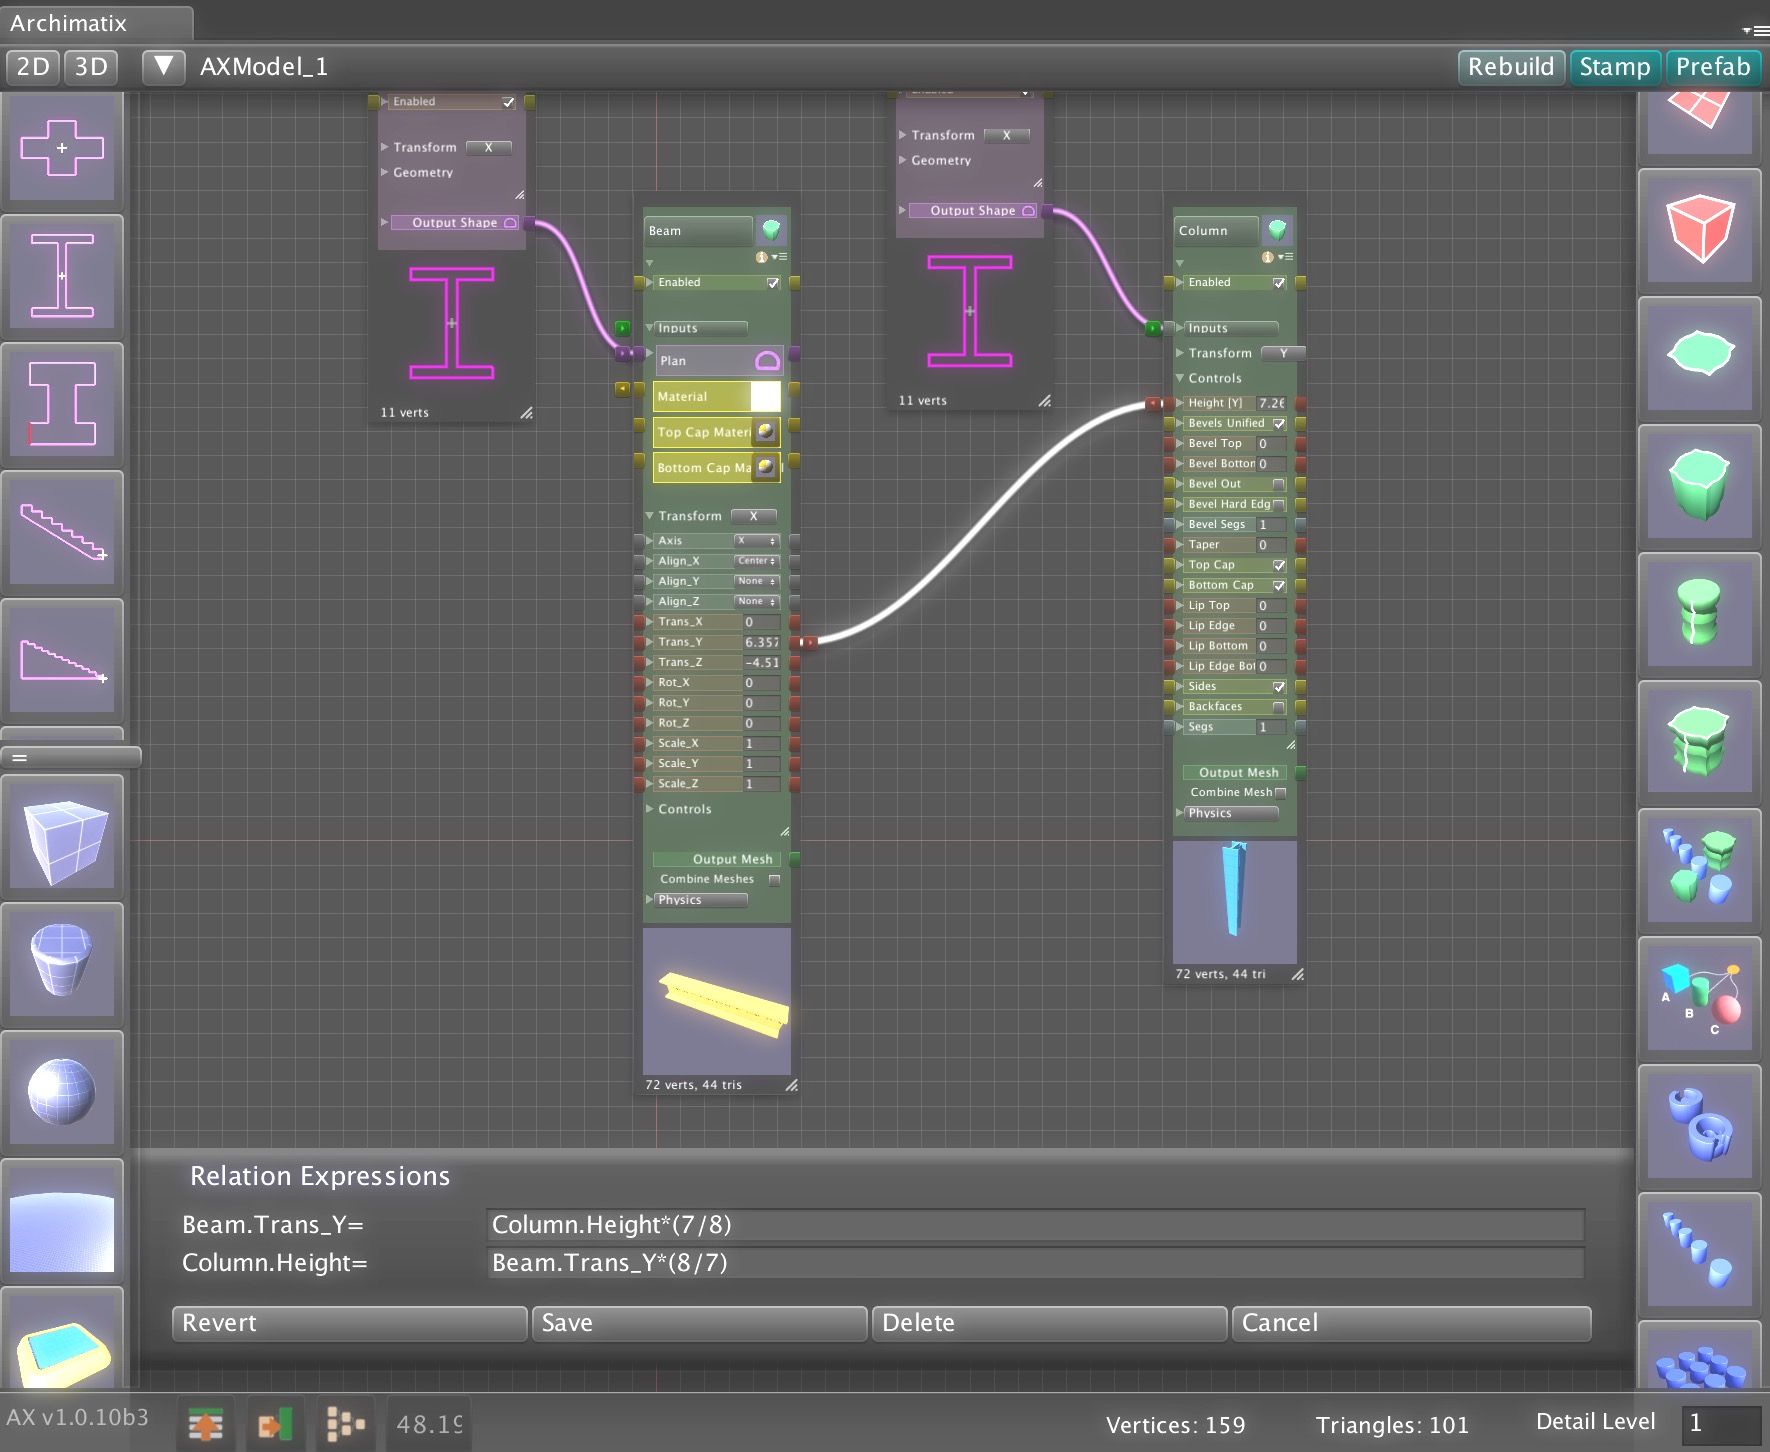
The expressions were edited to reflect this proportion mathematically and be reciprocal. Now dragging on either the column’s height handle or the beams translate Y will have the same effect.

But what if we want the portion ratio of 7/8 to be a parameter? Currently, an inter-nodal expression only supports using the parameters on either side of the connector. In order to include multiple parameters in an equation, you can use parameter expressions.

Parameter Expressions

One or more parameter expressions can be attached to any parameter. These expressions are executed whenever that parameter is changed.

Grouper: Mesh Combination versus Encapsulation

As you add nodes to your model, your node graphs gets larger. The Grouper node helps you organize your graph and increase modularity for reusability of components.

There are two ways to use Grouper to organize you nodes: 1. Combination and 2. Encapsulation..

Simple Mesh Combination

Perhaps the simplest way to group nodes is to feed there out put into a Grouper’s mesh inputs. For simple graphs, this is a fast and easy way to work with multiple objects as one pieces.

For example, if we make a box with two Extrudes that share the same Rectangle Shape from the Library, we can easily manipulate both the base of the box and the sides by modifying the height and width of the Rectangle.

But what if we now want to repeat this box in a line? We have two separate meshes that make up the box. Before repeating lets combine these meshes with the Grouper Inputs.

Make sure that none of the nodes are currently selected (click anywhere on the node graph background) and then select a Grouper node from the righthand sidebar in the Node Graph Editor and connect the output of the two extrudes to the Grouper.

Now the Grouper Output Mesh can be fed into any other node as a single unit.

For example, click on the Grouper Output and then click on LinearRepeater in the righthand sidebar.

Now the combined meshes are repeated as a unity. If you stamp out the model, the bottom and sides are still separate GameObjects. If you would like to truly combine the meshes (perhaps to reduce draw calls or have them function as a unity as rigidbodies, you can click the Combine Meshes option under the Grouper Output.

The benefits of this form of Grouping is that it is fast and you can see all the nodes at once. However, as your graph gets more complex, seeing all the nodes at once can be too messy. Also, this method does not allow for true encapsulation of logical parts that can improve reusability of subsystems in other models. The next use of Grouper is improves these factors.


Mesh Encapsulation

You can also encapsulate nodes inside the Grouper by dragging them over the Grouper’s thumbnail. Nodes inside the Grouper form a subgraph that can be reused in multiple models.

In this example, we have a section of wall with a window. The main control is the Rectangle of the window opening.


The graph that powers this is looking a little complicated. In this case it would be getting cumbersome to connect all these mesh output to the inputs of the Grouper.

If we drag all the nodes over its thumbnail, then  we have created a subgraph that encapsulates all the nodes. Now we have a single node that hides all of its complexity.

By double-clicking the Grouper thumbnail, we can go inside the Grouper and continue to operate on its parameters, and relations.

To step back out of the Grouper, we can double click its thumbnail again or click else where in the “breadcrumb trail” at the top of the node graph window.

As with the Mesh Combination method, we now have a single mesh output that we can feed into other nodes, such as a RadialRepeater.


To adjust parameters of nodes inside the Grouper, we can open it, but that would break the concept of encapsulation we are trying to achieve. What would be better is to create proxy parameters in the Controls of the Grouper to define its parametric behavior. This essentially creates an interface to the subgraph so that we need not ever go down into the subgraph and be distracted by its details.

In this case, the interface might be the width and height of the wall and the width and height of the window opening.

For the opening, lets create window width and height parameters.


For the wall lets use the default SizeX and SizeY of the Grouper.

Lets open the Grouper (perhaps one last time!) to connect theses parameters:


Now that we have encapsulated the wall section model and provided an interface, we have hidden the complexity of the subgraph to allow us to think at a higher level as we continue to use this parametric wall section in other larger assemblies.

If you do find yourself going back into the Grouper to adjust parameters, then it may be a good idea to make proxy parameters in the Grouper for them. In other words, once you finish rigging up a subnode graph in a Grouper, you should never need to open it again.

Also, keep in mind that you can have Groupers inside Groupers, to further organize and encapsulate.


Also note, that a Material given to a Grouper will be inherited by its Groupers in the subnode graph unless overridden inside.


© 2024

Theme by Anders NorenUp ↑